What is it?
A thread tension guide explains how to manage the pull between a sewing machine’s top thread and its bobbin thread. Proper tension ensures the threads lock perfectly between fabric layers, creating strong, flat stitches. Imbalanced tension is a common user concern, leading to frustrating issues like looped stitches on the top or bottom of the fabric, puckering, and thread breakage that can ruin a project.
Key Benefits at a Glance
- Professional Finish: Achieve smooth, even stitches that look identical on both sides of your project, creating a high-quality, durable seam.
- Prevents Fabric Damage: Avoid ugly puckering on lightweight fabrics and skipped stitches on thick materials by matching tension to your project.
- Saves Time and Thread: Eliminate constant top thread snapping and bobbin thread nesting, allowing you to sew without frustrating interruptions.
- Greater Sewing Versatility: Confidently switch between difficult thread types and fabric weights, from delicate silk to heavy denim, by knowing how to adjust tension.
- Reduces Machine Strain: Proper balance puts less stress on your machine’s motor and internal parts, helping to prolong its lifespan and prevent costly repairs.
Purpose of this guide
This guide is for any sewer, from a beginner struggling with their first machine to an experienced crafter aiming for flawless results. It solves the universal problem of messy, weak, or puckered stitches caused by unbalanced thread tension. Here, you will learn how to diagnose tension problems by examining your stitches, how to correctly adjust the top tension dial, and when to consider adjusting the bobbin case. It outlines a simple testing process to avoid common mistakes, ensuring you can achieve perfect, strong seams on any project.
Introduction
After thirty years of sewing and teaching hundreds of students, I've discovered that thread tension is the single most misunderstood aspect of machine sewing. What should be a reliable tool for achieving professional results often becomes a source of endless frustration. Through my experience working with every type of sewing machine and project imaginable, I've developed a systematic approach that transforms tension from mystery to mastery. This comprehensive guide will give you the confidence and knowledge to achieve perfect stitches every time, turning thread tension into your creative ally rather than your biggest obstacle.
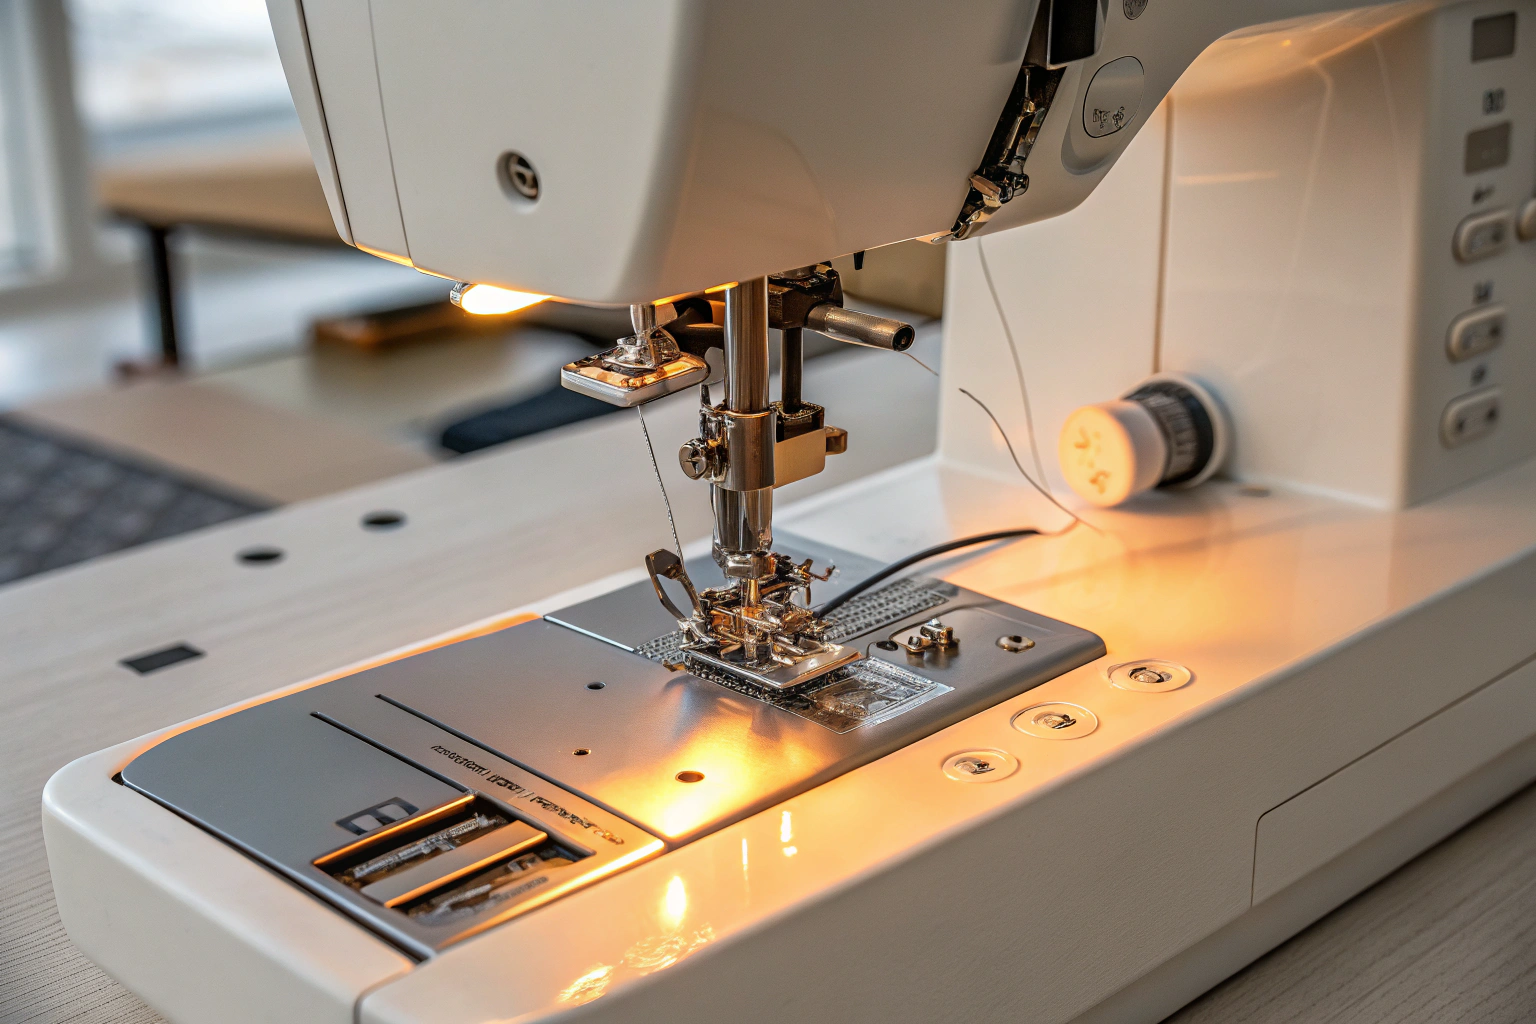
Understanding How Thread Tension Works
When I first started opening up sewing machines to understand exactly how tension systems work, I realized why so many sewists struggle with this concept. The tension mechanism is essentially a carefully balanced system of resistance that controls how threads interact as they form stitches. Having worked with machines ranging from vintage straight-stitch models to modern computerized units, I've learned to "think like a machine" when diagnosing tension issues.
| Component | Function | Impact on Tension |
|---|---|---|
| Tension Discs | Squeeze thread to create resistance | Primary upper thread control |
| Bobbin Case Spring | Controls bobbin thread release | Primary lower thread control |
| Thread Path | Guides thread through system | Affects tension consistency |
| Tension Regulator | Adjusts disc pressure | Fine-tunes thread resistance |
The Mechanics Behind Thread Tension
The upper thread travels through a series of guides and tension discs before reaching the needle. These discs, controlled by your tension dial, squeeze the thread with varying pressure to create resistance. Meanwhile, the bobbin thread is controlled by a small spring mechanism in the bobbin case. When these two systems work in harmony, threads meet and lock together in the middle of your fabric layers, creating the perfect stitch.
What many sewists don't realize is that this system is incredibly sensitive to variables beyond just the dial setting. I've seen students spend hours adjusting their tension dial when the real issue was improper threading or a dull needle. Understanding this mechanical relationship has saved me countless hours of frustration over the years.
The "Tug of War" Concept
I like to explain thread tension as a gentle tug of war between the upper and lower threads. When properly balanced, neither thread wins – they meet in the middle of your fabric layers and lock together smoothly. If one thread is too tight, it pulls the intersection toward its side of the fabric, creating visible loops or thread show-through on the opposite side.
This visualization has helped hundreds of my students finally grasp why their stitches look the way they do. Once you understand this fundamental concept, diagnosing tension issues becomes much more intuitive. The key is learning to read what your stitches are telling you about this delicate balance.
What Perfect Thread Tension Looks Like
After examining thousands of stitches in my teaching career, I can spot tension issues immediately. My trained eye looks for specific indicators that tell me whether the thread intersection is happening in the right place. This skill isn't magic – it's something any sewist can develop with practice and the right knowledge.
- Threads should intersect in the middle of fabric layers
- No loops or puckering should be visible on either side
- Stitches should lay flat against the fabric surface
- Thread colors should not show through to opposite side
- Consistent stitch appearance across entire seam
Visual Identification of Balanced Stitches
Perfect thread tension creates stitches that look identical on both sides of your fabric. The threads should intersect within the fabric layers, not on either surface. When I examine a well-balanced seam, I see smooth, flat stitches with no puckering, pulling, or visible thread from the opposite side showing through.
I remember working on a challenging silk blouse where achieving perfect tension made the difference between a professional-looking garment and obvious homemade construction. The balanced stitches lay perfectly flat against the delicate fabric, with no hint of the construction showing through to the right side. This is what we're aiming for in every project.
Recognizing Thread Tension Problems
Thread tension problems announce themselves through distinct visual cues. I've learned to identify these issues at a glance, which allows me to make corrections before they affect an entire project. The most common problems I see involve threads pulling to one side or the other, creating an imbalanced intersection.
| Tension Issue | Top Side Appearance | Bottom Side Appearance | Thread Intersection |
|---|---|---|---|
| Perfect Balance | Even, flat stitches | Even, flat stitches | Threads meet in fabric center |
| Upper Too Tight | Bobbin thread visible | Loops or puckering | Intersection pulled to top |
| Upper Too Loose | Loops on top | Upper thread visible | Intersection pulled to bottom |
| Bobbin Too Tight | Upper thread visible | Bobbin thread shows | Intersection pulled to bottom |
Factors That Affect Your Thread Tension
One of my biggest revelations came when I realized that thread tension isn't just about the tension dial. This discovery completely transformed my approach to tension issues and has saved me hours of frustration on countless projects. I now consider multiple variables before ever touching that dial, and this systematic thinking has become second nature in my sewing practice.
The materials you choose for your project have a profound impact on how threads behave as they form stitches. I've documented these relationships over years of working with different combinations, and I keep detailed notes on what works best for various material pairings. This reference system has become invaluable in my studio.
- Thread weight affects how much tension is needed
- Fabric density changes thread resistance through layers
- Batting type and thickness impacts overall tension balance
- Specialty threads often require significant tension adjustments
- Environmental factors like humidity can affect thread behavior
How Different Materials Impact Your Thread Tension
Working with various fabric and batting combinations has taught me that each material brings its own tension requirements. Dense batiks behave completely differently than lightweight cotton voiles, and I've learned to anticipate these differences before I even start sewing. A recent project using heavy duck cloth required significantly looser tension than the same thread would need on quilting cotton.
I remember struggling with a particularly challenging quilt that combined multiple fabric weights. The tension that worked perfectly for the cotton pieces created puckering on the silk sections. This experience taught me the importance of testing tension with every material combination, not just assuming one setting will work for everything.
| Material Type | Tension Effect | Recommended Adjustment |
|---|---|---|
| Dense Batting | Increases resistance | Loosen upper tension slightly |
| Batiks/Dense Fabrics | Creates drag | May need looser tension |
| Knit Fabrics | Stretches during sewing | Reduce tension to prevent puckering |
| Metallic Thread | Breaks easily | Significantly reduce upper tension |
| Heavy Thread | Creates bulk | Adjust both upper and bobbin |
| Lightweight Fabrics | Minimal resistance | May need tighter tension |
Choosing the Right Thread and Its Effect on Tension
Thread selection dramatically affects tension requirements, something I learned through years of experimenting with different brands and weights. A 40-weight cotton thread behaves completely differently than a 50-weight polyester, even when used on identical fabric. I've discovered that understanding these characteristics prevents most tension problems before they start.
My experience with metallic threads taught me just how dramatic these differences can be. What seemed like a simple decorative touch on a holiday table runner turned into a lesson in extreme tension adjustment. The metallic thread required such loose tension that my normal settings would have created bird's nests, but the final result was worth the extra testing time.
A Tension Pre-Check: Essential Steps Before Adjusting
My professional approach to troubleshooting always starts with fundamentals before touching the tension dial. I've solved countless "tension problems" without ever adjusting tension simply by addressing these basic issues first. This systematic approach has become my standard practice, and I use the same checklist in my own studio that I teach to my students.
I'll never forget helping a frustrated student who was convinced her machine had tension problems. After spending twenty minutes adjusting various settings, we discovered she had simply missed threading one of the upper thread guides. Her "tension issue" disappeared instantly with proper threading. This experience reinforced the importance of checking these basics first.
- Clean lint from tension discs and bobbin area
- Check needle is correct size and not damaged
- Verify machine is threaded correctly through all guides
- Ensure bobbin is wound evenly and inserted properly
- Confirm thread quality is good with no knots or weak spots
- Check presser foot is appropriate for fabric type
- Test with same fabric and thread as final project
Machine Maintenance Checklist
Regular maintenance prevents most tension issues before they develop. I've found that a clean machine with proper threading rarely has true tension problems. Lint buildup in the tension discs is particularly problematic – it prevents the discs from closing properly, making consistent tension impossible regardless of dial settings.
My maintenance routine includes checking the bobbin area for thread bits and lint, ensuring the needle is sharp and properly inserted, and verifying that all thread paths are clear. These simple steps have prevented countless hours of tension troubleshooting in my own work and in my classes.
Thread and Needle Considerations
The relationship between thread weight, needle size, and fabric type creates the foundation for proper tension. I've learned that mismatched combinations cause more "tension problems" than actual tension dial issues. Using a size 70 needle with heavy thread on lightweight fabric, for example, creates problems that no amount of tension adjustment can fix.
Quality thread makes an enormous difference in tension consistency. I've seen students struggle with tension issues that disappeared completely when they switched from bargain thread to quality thread. The investment in good thread pays dividends in consistent results and fewer frustrations.
My Step-by-Step Guide to Adjusting Thread Tension
Through years of teaching and troubleshooting, I've developed a systematic approach to tension adjustment that minimizes guesswork and prevents overcorrection. My "half-step" method for making precise adjustments has helped hundreds of students achieve perfect tension without the frustration of wild swings between settings.
I learned this cautious approach from an experienced sewing machine technician who emphasized the importance of small, incremental changes. His advice to always mark original settings before making adjustments has saved me from countless situations where I couldn't remember how to get back to where I started.
- Mark current tension dial position with tape or photo
- Make test stitches on fabric scraps using project materials
- Adjust upper tension in half-number increments only
- Test stitch after each small adjustment
- Document successful settings for future reference
- Only adjust bobbin tension if upper adjustments don’t work
- Return to original settings if adjustments make things worse
When and How to Adjust Upper Thread Tension
Upper thread tension adjustment should always be your first approach to fixing tension issues. The upper tension dial is designed to be adjusted regularly, unlike bobbin tension which should remain at factory settings for most projects. I typically start with small adjustments of half a number at a time, testing after each change.
Most tension issues I encounter in my classes resolve with upper tension adjustments alone. I've found that dramatic changes in either direction rarely improve things – small, methodical adjustments are far more effective. The key is patience and systematic testing rather than making large jumps in dial settings.
When and How to Adjust Bobbin Tension
Bobbin tension adjustment should be approached with extreme caution. I only recommend adjusting bobbin tension when upper thread adjustments have failed to solve the problem, or when working with specialty threads that require it. The bobbin tension screw is delicate, and small adjustments create significant changes in thread behavior.
- Never adjust bobbin tension more than 1/4 turn at a time
- Always mark original bobbin tension screw position
- Test on scraps before adjusting tension on actual project
- Some machines void warranty if bobbin tension is adjusted
My approach to bobbin tension is extremely conservative. I mark the original screw position with a fine-tip permanent marker before making any adjustments. This reference point allows me to return to factory settings if my adjustments don't improve the situation. I've seen too many students create bigger problems by making aggressive bobbin tension changes.
Diagnosing Specific Thread Tension Issues
My systematic diagnostic approach developed after years of helping students solve tension problems that had stumped other sewists. I structure my troubleshooting as a problem-solution format, addressing issues in order of frequency and likelihood. This methodical approach prevents the random adjustments that often make problems worse.
One particularly challenging case involved a student whose vintage machine created perfect stitches with some threads but terrible results with others. Through systematic testing, we discovered the issue wasn't tension at all, but thread path problems caused by wear in one of the thread guides. This experience reinforced the importance of looking beyond obvious solutions.
| Problem | Likely Cause | Solution | Prevention |
|---|---|---|---|
| Loops on top | Upper tension too loose | Increase upper tension gradually | Regular tension testing |
| Bobbin thread shows on top | Upper tension too tight | Decrease upper tension | Use appropriate thread weight |
| Thread breaks frequently | Tension too tight | Reduce tension, check threading | Quality thread and proper needle |
| Puckering fabric | Tension too tight for fabric | Reduce tension, use appropriate needle | Test on fabric scraps first |
| Skipped stitches | Multiple factors | Check needle, tension, threading | Regular machine maintenance |
Upper Thread Problems
Upper thread issues typically manifest as visible problems on the top side of your work. Loops, thread breakage, and visible bobbin thread all indicate upper tension problems. I've found that most upper thread issues resolve with systematic dial adjustments, but the key is making small changes and testing thoroughly.
Thread breakage deserves special attention because it's often mistaken for a simple tension problem when it may involve needle condition, thread quality, or threading errors. I always check these factors before adjusting tension, as fixing the root cause prevents recurring problems.
Bobbin Thread Problems
Bobbin thread problems usually show up as issues on the bottom side of your work, though they can affect top-side appearance too. Loose bobbin tension creates loops on the bottom, while tight bobbin tension can cause the upper thread to show through on the bottom side of your work.
I approach bobbin problems cautiously because the bobbin tension system is more delicate than upper tension controls. Most bobbin issues I encounter actually resolve with upper tension adjustments, making bobbin tension changes unnecessary in the majority of cases.
Special Case: Tension Issues With Specialty Threads
Specialty threads like metallics, heavy decorative threads, and monofilament require completely different tension approaches than standard threads. My experience with these threads has taught me that normal tension rules don't apply – these materials often need extreme adjustments to work properly.
Working with metallic thread taught me patience and the importance of extensive testing. What works for one metallic thread brand may not work for another, and environmental factors like humidity can dramatically affect results. I now keep detailed notes on successful settings for each specialty thread I use.
Thread Tension Guide for Different Sewing Projects
My diverse project experience across quilting, garment construction, and decorative work has shown me that tension requirements change dramatically based on project type. The approach I use for straight seams in garment construction won't work for quilting through multiple layers, and decorative stitching requires yet another strategy.
Each type of sewing presents unique challenges that affect tension needs. Understanding these differences allows me to anticipate adjustments before problems develop, saving time and preventing frustration during complex projects.
| Project Type | Typical Tension Range | Special Considerations |
|---|---|---|
| Garment Seams | 3-5 (standard) | Match thread to fabric weight |
| Quilting | 2-4 (slightly loose) | Account for batting thickness |
| Topstitching | 4-6 (tighter) | Use heavier thread, larger needle |
| Appliqué | 2-3 (loose) | Prevent fabric puckering |
| Decorative Stitching | Varies widely | Test extensively with actual materials |
| Embroidery | 1-3 (very loose) | Prevent thread breakage and puckering |
Tension for Garment Sewing
Garment construction requires tension settings that create strong, flat seams without puckering delicate fabrics. My approach varies based on fabric weight and type, but I typically start with standard settings and adjust based on the specific materials. Seam strength is crucial, but so is maintaining the drape and appearance of the finished garment.
Working with knit fabrics taught me the importance of looser tension to prevent stretching and distortion during construction. The same tension that works perfectly for woven cotton will create wavy, stretched seams on jersey knit. This experience reinforced the importance of testing with actual project materials.
Tension for Quilting
Quilting through multiple layers requires different tension considerations than single-layer sewing. The batting creates additional resistance that affects thread behavior, and I've learned to anticipate this by starting with slightly looser tension than I'd use for garment construction.
My quilting tension strategy also considers the quilting pattern and thread type. Dense stippling requires different settings than straight-line quilting, and specialty quilting threads often need significant tension adjustments from standard settings.
Tension for Decorative Work
Decorative stitching presents the most complex tension challenges because it often involves specialty threads, dense stitch patterns, and varying fabric thicknesses. My approach is to test extensively with the exact materials and patterns I'll use in the final project, as small changes in any variable can dramatically affect results.
Appliqué work requires particularly careful tension management to prevent puckering while maintaining secure attachment. I've found that slightly loose tension works best for most appliqué techniques, but the specific setting depends on fabric combinations and the chosen stitch pattern.
Machine-Specific Tension Considerations
My experience with different machine brands has revealed significant variations in how tension systems function. What works on my mechanical Bernina behaves completely differently on a computerized Brother, and vintage machines have their own unique characteristics. Understanding these differences helps me adapt my techniques to any machine I encounter.
“The dial settings run from 0 to 9, so 4.5 is generally the ‘default’ position for normal straight-stitch sewing. This should be suitable for most fabrics.”
— Artisan Stitch, June 2024
Source link
Different Machine Types and Their Tension Systems
Mechanical machines give you direct control over tension discs through a physical connection to the tension dial. I find these systems more predictable and easier to fine-tune because there's no computer interpretation between my adjustment and the actual tension change. Vintage machines often have particularly robust tension systems that respond well to adjustment.
Computerized machines introduce additional complexity through electronic tension control. Some models attempt to automatically adjust tension based on stitch selection, which can be helpful but sometimes interferes with manual adjustments. Understanding your specific machine's approach helps you work with rather than against its design.
Computerized vs. Mechanical Tension Controls
The fundamental difference between computerized and mechanical tension control affects my adjustment strategy. Mechanical systems respond immediately and predictably to dial changes, while computerized systems may have built-in limitations or automatic overrides that affect manual adjustments.
I've learned to work within each system's capabilities rather than fighting against them. Some computerized machines work best when you let them handle automatic adjustments, while others give better results with manual control. Understanding your machine's personality is crucial for consistent results.
“Recommended tension settings for most embroidery machines, the standard bobbin tension is between 18 and 22 grams. Bobbin tension for caps may need to be set slightly higher, up to 25 grams. Some machines prefer up to 30 grams.”
— Madeira USA, March 2024
Source link
My Proven Techniques for Perfect Tension Every Time
Through years of teaching and problem-solving, I've developed "secret" techniques that aren't found in machine manuals but have saved me countless hours of frustration. These methods represent the accumulated wisdom of working through every type of tension challenge imaginable, and they've become invaluable tools in my sewing practice.
My documentation system has become one of my most valuable sewing resources. What started as simple notes has evolved into a comprehensive reference that saves time and prevents repeated problem-solving on similar projects. This system has transformed how I approach new projects and materials.
- Keep a tension reference sheet with successful settings
- Take photos of dial positions for complex projects
- Test tension changes on doubled fabric scraps
- Make small adjustments and test frequently
- Document environmental conditions that affect tension
- Keep notes on thread and fabric combinations that work well
Quick Fixes for Common Tension Issues
My arsenal of quick fixes has developed through years of troubleshooting under pressure. When a project deadline looms and tension problems emerge, these techniques provide fast solutions without extensive testing. The key is understanding which quick fix applies to which specific problem pattern.
One of my most effective quick fixes involves the "thread sandwich" test – sewing through doubled fabric scraps with the same materials as the project. This test reveals tension issues more clearly than single-layer testing and often shows problems that aren't visible in simple straight stitching.
Creating Your Own Thread Tension Reference Sheet
My personal reference sheet has evolved into an indispensable tool that prevents repeated problem-solving. What began as scattered notes has become a systematic documentation of successful settings for different material combinations. This reference saves hours of testing time and provides confidence when working with familiar material combinations.
| Information to Track | Why It Matters | Example Entry |
|---|---|---|
| Fabric Type & Weight | Affects tension needs | Cotton quilting cotton, medium weight |
| Thread Brand & Weight | Different threads behave differently | Gutermann 50wt polyester |
| Batting Type | Changes resistance | Warm & Natural cotton batting |
| Tension Settings | For future reference | Upper: 3.5, Bobbin: factory |
| Needle Size | Affects thread flow | 80/12 universal |
| Project Notes | Context for settings | Perfect for straight seams, no puckering |
Tension Testing Methods for Flawless Results
My systematic approach to testing tension has evolved through teaching hundreds of students and working on countless projects. Proper testing prevents problems before they affect your actual project and gives you confidence in your settings before committing to final construction.
The importance of testing with exact project materials cannot be overstated. I've seen too many sewists test with random scraps and then wonder why their actual project behaves differently. Testing methodology makes the difference between accurate predictions and unpleasant surprises.
- Cut test swatches from actual project fabrics
- Layer exactly as final project (including batting/interfacing)
- Thread machine with same threads as project
- Stitch various patterns: straight, zigzag, decorative
- Examine both sides of test swatch carefully
- Adjust tension based on test results
- Repeat testing until perfect balance achieved
The Swatch Test Method
My swatch testing method has prevented countless project disasters by revealing tension issues before they affect finished work. The key is creating test conditions that exactly match your final project – same fabrics, same threads, same layering, same stitch patterns. This comprehensive approach provides accurate predictions of how your actual project will behave.
I learned the importance of thorough testing during a complex art quilt project that combined multiple fabric types and specialty threads. The extensive testing phase revealed tension adjustments needed for each material combination, allowing me to complete the project without a single tension-related problem during construction.
Machine-Specific Testing Techniques
Different machines require adapted testing approaches based on their tension characteristics. My mechanical machines respond predictably to testing, while computerized models sometimes require additional test patterns to reveal how their automatic systems will interact with my manual adjustments.
| Test Method | Best For | Time Required | Accuracy |
|---|---|---|---|
| Basic Straight Stitch | General tension check | 2-3 minutes | Good for basic issues |
| Zigzag Pattern | Decorative work prep | 5 minutes | Reveals complex tension problems |
| Layered Swatch | Quilting projects | 5-7 minutes | Most accurate for multi-layer work |
| Thread Variety Test | Mixed thread projects | 10-15 minutes | Essential for specialty threads |
Conclusion: Confidence in Your Stitching
Mastering thread tension has been one of the most transformative skills in my sewing journey. What once seemed like an insurmountable obstacle has become a reliable tool for achieving exactly the results I envision. This transformation from frustration to confidence is available to every sewist willing to understand the principles and apply systematic techniques.
My philosophy about tension centers on viewing it as a creative tool rather than a source of anxiety. When you understand how tension works and have reliable methods for achieving balance, you can focus on the creative aspects of your projects instead of wrestling with technical problems. This shift in perspective opens doors to more complex and ambitious projects.
- Perfect tension is achievable with systematic approach and testing
- Small adjustments and frequent testing prevent major problems
- Understanding your materials is as important as machine settings
- Documentation saves time and frustration on future projects
- Tension mastery opens doors to more complex and creative sewing
The confidence that comes with tension mastery has allowed me to tackle projects I never would have attempted when I was still struggling with basic tension issues. From delicate silk garments to complex art quilts with specialty threads, understanding tension has been the foundation that makes ambitious projects possible. This same confidence and capability is within reach for every sewist who commits to learning these principles and techniques.
Frequently Asked Questions
To measure waist for men accurately, use a flexible tape measure and wrap it around the narrowest part of your torso, typically just above the belly button. Ensure the tape is level and snug but not too tight, then exhale normally before taking the reading. This method helps in determining proper clothing sizes or monitoring health metrics like waist circumference.
When learning how to measure waist for men, locate the waist at the midpoint between the lower ribs and the top of the hip bones, often around the navel area. Stand straight with feet together and avoid sucking in your stomach for an accurate measurement. This spot ensures consistency whether for fitness tracking or buying pants.
For how to measure waist men effectively, a soft measuring tape is essential, as it’s flexible and provides precise results. You can also use a mirror to check if the tape is level around your body. Avoid using string or rulers, as they may lead to inaccuracies in your waist size reading.
Yes, when considering how to measure waist for men, clothing sizes often measure at the natural waistline, while health assessments might focus on the widest part around the abdomen. For apparel, the tape goes over where pants sit, but for medical purposes, it’s about belly fat indicators. Always follow specific guidelines for your intended use to get the right measurement.
A frequent error in how to measure waist men is holding your breath or pulling the tape too tight, which can give a smaller reading. Another mistake is measuring over clothing instead of bare skin, leading to inaccuracies. To avoid these, breathe normally and ensure the tape is parallel to the floor for reliable results.