
Have you ever wanted to master the skill of sewing patches onto your favorite garments? Whether for repairs, customization, or decoration, sewing on patches is a valuable skill. With extensive experience of sewing hundreds of patches on various fabric items like jeans, jackets, and bags, I’ll guide you through this process. This comprehensive instruction will help you learn how to sew patches properly, ensuring the patch doesn’t go anywhere once applied.
Proper patch application isn’t just aesthetic; it ensures durability and functionality. In this guide, you’ll learn to sew-on patches by hand or machine, accessible enough for beginners yet detailed for experienced sewers. Let’s dive into the patch-sewing journey, where you’ll gain techniques for stunning results.
Key Takeaways
- Different sewing methods for patches
- Material selection for patch application
- Techniques for various patch types
- Working Time: 30 minutes to 1 hour
- Skill Level: Beginner to Intermediate
- Estimated Cost: $5 – $20 per patch application
Understanding Different Patch Types
Patches come in various styles, each suited to specific applications. Embroidered patches, for instance, are often used for items subjected to heavy use, such as jackets and bags. They have a traditional look with a thick background fabric. Woven patches offer more detailed designs due to their finer threads and are ideal for delicate items where detail is crucial.
Iron-on patches have a heat-activated adhesive backing with a thin paper covering that you remove before application. These are quick to apply and will adhere initially, but might require sewing for longevity, especially on heavily laundered garments that go through frequent laundry cycles. The adhesive backing looks shiny when heated and activated properly.
Think of a Girl Scout or Boy Scout badge as a classic example of embroidered patches used for both durability and decoration.
- Embroidered Patches: Durable, clear images, best for jackets/bags
- Woven Patches: Detailed designs, for lighter-use items
- Iron-On Patches: Quick but may need sewing for durability
Essential Materials and Tools
For patch sewing, certain tools are essentials. A high-quality sewing needle and thread are fundamental. You’ll also need fabric scissors, sewing pins, and an iron if working with iron-on patches. Invest in quality brands like Gingher for scissors and Dritz for needles for better results. While sewing pins help hold patches in place, a temporary adhesive like a spray or fabric glue can offer a cleaner hold before you start sewing.
- Essential Supplies: Sewing needle, thread, fabric scissors, pins, iron
- Nice-to-have Items: Temporary adhesive spray, thimble, needle threader
These tools are handy for any sewing project and can be found easily on platforms like Etsy or local craft stores for DIY enthusiasts who like to personalize their clothing.
Thread Selection Guide
Selecting the right thread that matches is critical for the longevity and appearance of your patch. Polyester thread excels with stretchy fabrics, offering durability and flexibility, while cotton thread aligns with natural fibers. For high-stress areas, consider hand-quilting or jeans thread, which are thicker and more durable than all-purpose thread.
When selecting thread, you can match the color for subtlety or contrast it for a decorative touch. Using double thread can provide extra strength for patches that will endure heavy use.
| Thread Type | Properties | Best Uses |
|---|---|---|
| Polyester | Flexible, durable | Stretchy fabrics |
| Cotton | Natural, soft | Natural fibers |
| Hand-Quilting/Jeans | Thick, sturdy | High-stress areas |
Needle Types for Different Patches
Choosing the correct needle type makes sewing smoother and more efficient. A thicker needle is necessary for heavy fabrics or thick patches to ensure strength and avoid breakage when pushing the needle through multiple layers. For delicate patches, a finer embroidery needle maintains fabric integrity without damage.
- Thicker Needle: For heavy fabrics, thick patches
- Embroidery Needle: For delicate patches
Preparing Your Patch and Garment
Before sewing, ensure the compatibility between the fabric and the patch. Determine the optimal patch placement avoiding seams or areas prone to stretching. When covering holes, clean up frayed edges and strengthen weak fabrics underneath for better adherence. For iron-on patches, check if the garment can withstand heat application.
Steps to Prepare
- Check fabric and patch compatibility
- Ensure clean and flat application area
- Test patch placement visually
- Secure any fabric tears beneath the patch
Positioning and Temporary Securing Methods
Secure your patch effectively using various methods. Straight pins are the most straightforward solution, but if avoiding holes, try masking tape or temporary adhesive spray to hold the patch smoothly in place. When you put the patch in position, ensure it lies flat with no wrinkles.
Temporary Securing Steps
- Place the patch where desired
- Use preferred securing method: pins, tape, or adhesive
- Ensure the patch lies flat with no wrinkles
| Securing Method | Pros | Cons |
|---|---|---|
| Pins | Easy, accessible | Can leave holes |
| Masking Tape | No holes, repositionable | May leave residue |
| Adhesive Spray | Firm hold, no residue | Limited repositioning |
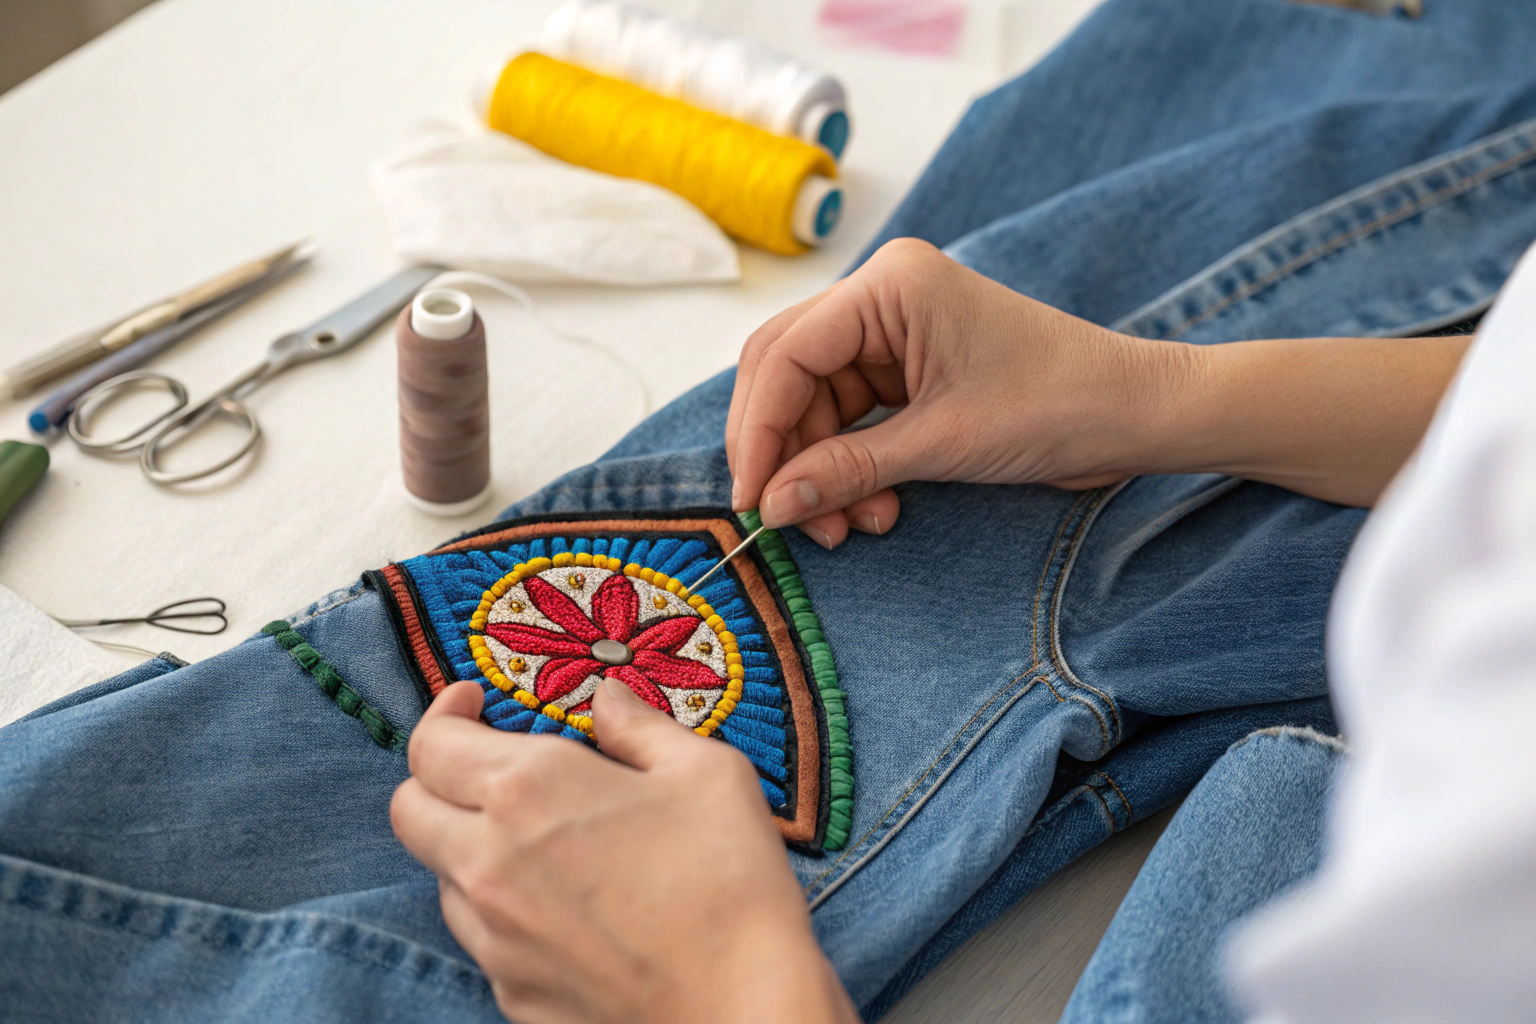
Hand-Sewing Techniques
Hand-sewing offers precision and is ideal for delicate patches or detailed work. This is the preferred method for many experienced sewers who like to sew with complete control. Whip stitch, backstitch, and blanket stitch are valuable techniques for creating secure and aesthetic applications.
Hand-Sewing Steps
- Thread the needle and knot the end to hide the knot on the wrong side
- Begin by inserting your needle into the fabric from the backside of the fabric
- Come up with the needle close to the edge of the patch
- Use backstitch along patch edges for a secure hold, working your way around the entire perimeter
- When you reach about an inch to the left of your starting point, bring it all the way around to complete the circuit
- Finish with a hidden double or triple-knot on the wrong side for durability
The backstitch is particularly strong and creates an invisible finish when done properly. Start to sew with small, even stitches, keeping them tightly spaced for security.
- Whip Stitch: Quick, for decorative edges
- Backstitch: Strong, for secure applications
- Blanket Stitch: Decorative, for ornamental patches
Working with Merrow Edge Patches
Merrow edge patches prevent fraying, offering a clean finish. Sewing into the merrow edge demands precision. My specialized technique involves using a thin needle and matching thread to maintain the patch’s original aesthetic without visible stitches.
Merrow Edge Sewing Steps
- Align the patch along the garment edge of the patch
- Begin from under the edge to hide the start knot
- Needle up through the fabric and into the merrow edge subtly
- Continue sewing, moving about an inch to the right with each stitch
- Knot securely to end without visible stitches
Technique for Patches Without Borders
Patches without defined borders require extra attention to the edge of the patch to prevent fraying. When attaching a patch without borders, employ whip stitches around the patch, slightly overlapping onto fabric edges. This ensures durability and cleanliness without unsightly threads or fluff that may appear around the edges.
Borderless Patch Sewing Steps
- Align patch without exposed border
- Begin with a thread knot hidden beneath on the backside of the fabric
- Put your needle back up through both the fabric and the patch
- Use a whip stitch around patch’s raw edges
- Right from where your needle emerged, move to the next stitch point
- Secure with overlapping stitches to prevent fray
Machine Sewing Methods
Machine sewing provides efficiency, especially for large patches. When you want to start sewing with a machine, adjust settings for different patch types to ensure even stitching. The zigzag stitch is particularly effective for securing patch to the fabric connections.
Machine Sewing Steps
- Set machine to desired stitch type and length
- Position the patch; use a presser foot best suited for the patch
- Start sewing with a zigzag stitch for flexible hold
- Sew corners with precision for uniformity
- Finish by securing threads to avoid unraveling
Machine Settings and Preparation
Proper setup of your machine ensures smooth sewing. Use matching top and bobbin thread, adjusting the stitch length for the fabric type. The correct presser foot helps guide the fabric evenly under the needle.
| Fabric Type | Recommended Settings |
|---|---|
| Denim | Heavy duty needle, longer stitches |
| Cotton | Standard needle, medium stitches |
Step-by-Step Machine Sewing Process
Begin with a strong foundation by anchoring the patch securely. When the needle came down for your first stitch, ensure you’re close to the edge but not too close. Use a straight stitch for a clean look, then patch and go around the perimeter methodically.
Machine Sewing Walkthrough
- Set machine with appropriate settings (stitch length, needle)
- Secure patch edges with straight stitches
- Focus on corners and ensure even stitching
- When you need new thread, tie off securely and restart
- Back down into the hole where you ended for seamless continuation
- Finish by securing threads behind the garment
Advanced Techniques and Finishing
Creating Professional Results
To achieve professional results, pay attention to stitch consistency. Whether hand or machine sewing, maintain even spacing and tension. When you come up with the needle, ensure it emerges exactly where planned. The goal is to create a finish that appears invisible from the front while remaining secure.
Working with Different Fabric Types
Different fabrics require adjusted techniques. Stretchy fabrics need more flexibility in your stitching, while heavy denim requires stronger thread and more force. Always test your technique on a scrap piece first.
Stylistic Considerations
Patch application serves both functional and decorative roles. Use contrasting threads for vibrant, decorative effects, or subtle stitching to blend the patch seamlessly. You can personalize your approach and print your own custom patches for unique projects. Enhance your patch as a style element using playful, larger stitches for a bold statement.
- Decorative Threads: For standout patches
- Larger Stitches: Creative, bold appearance
Troubleshooting and Tips
Encounter patch-sewing challenges? You’re not alone. From pulling needles through thick fabrics to dealing with running out of thread, I’ve faced these issues and devised solutions. A thimble adds grip when pushing the needle through tough materials, while a jar gripper or round can opener serves those without one.
Common Problems and Solutions
Problem: Difficulty pulling needle through thick fabric
Solution: Use a thimble or jar gripper for extra leverage when pushing the needle
Problem: Thread may run out mid-project
Solution: Plan thread length carefully and keep extra new thread ready
Problem: Patch doesn’t go on smoothly or lays crooked
Solution: Re-position and ensure proper securing before sewing
Problem: Patch doesn’t lay flat
Solution: Check for fluff that may appear around edges and trim carefully
Problem: Stitches are visible from the front
Solution: Ensure you’re working on the wrong side and keeping stitches close to the edge
Patch Removal Techniques
Removing patches should not harm the underlying fabric. Carefully snip the threads using pointed scissors or a seam ripper, ensuring no fabric damage. Remove all visible threads and gently scrape off any glue residue from iron-on patches without causing tears to the fabric and patch interface.
Patch Removal Steps: instruction
- Identify the stitches securing the patch
- Carefully cut threads with scissors
- Peel the patch away, avoiding fabric damage
- Remove glue residue delicately with a scraper
Conclusion
With these professional techniques at your disposal, sewing patches becomes an accessible and rewarding project. Whether you like to sew by hand or prefer machine methods, this detailed instruction will help you achieve professional results. Start with simple projects to build confidence, witnessing the satisfaction of achieving professional-looking results.
When you learn how to sew patches properly using these methods, you ensure the patch doesn’t go anywhere, even after repeated washing and wearing. The key is to bring it all the way through each step methodically, ensuring both the fabric and the patch work together harmoniously.
Remember, practice makes perfect, and soon you’ll find attaching a patch becomes second nature. Feel free to share your patch projects or ask questions as you develop this handy skill!
Before sewing on a patch, make sure the fabric has been pre-washed. If not, shrinkage may occur after the first wash, causing the seams to become distorted. Find out why prewashing is an essential step: Turn Prewash Into the Essential Laundry Step You Never Skip.
If you are using a machine, it is important to set the thread tension correctly. A seam that is too loose will break during washing. Check your settings: Thread Tension Guide.
Sewing on patches is part of a broader skill set. If you are just starting out in sewing, begin with the basic guides: How to Use a Sewing Machine for Patches and How to Set Up a Sewing Machine.
The patch will retain its appearance and durability if the item is cared for properly. Avoid hot water and bleach. For more information, see: Textile Care Guide.


