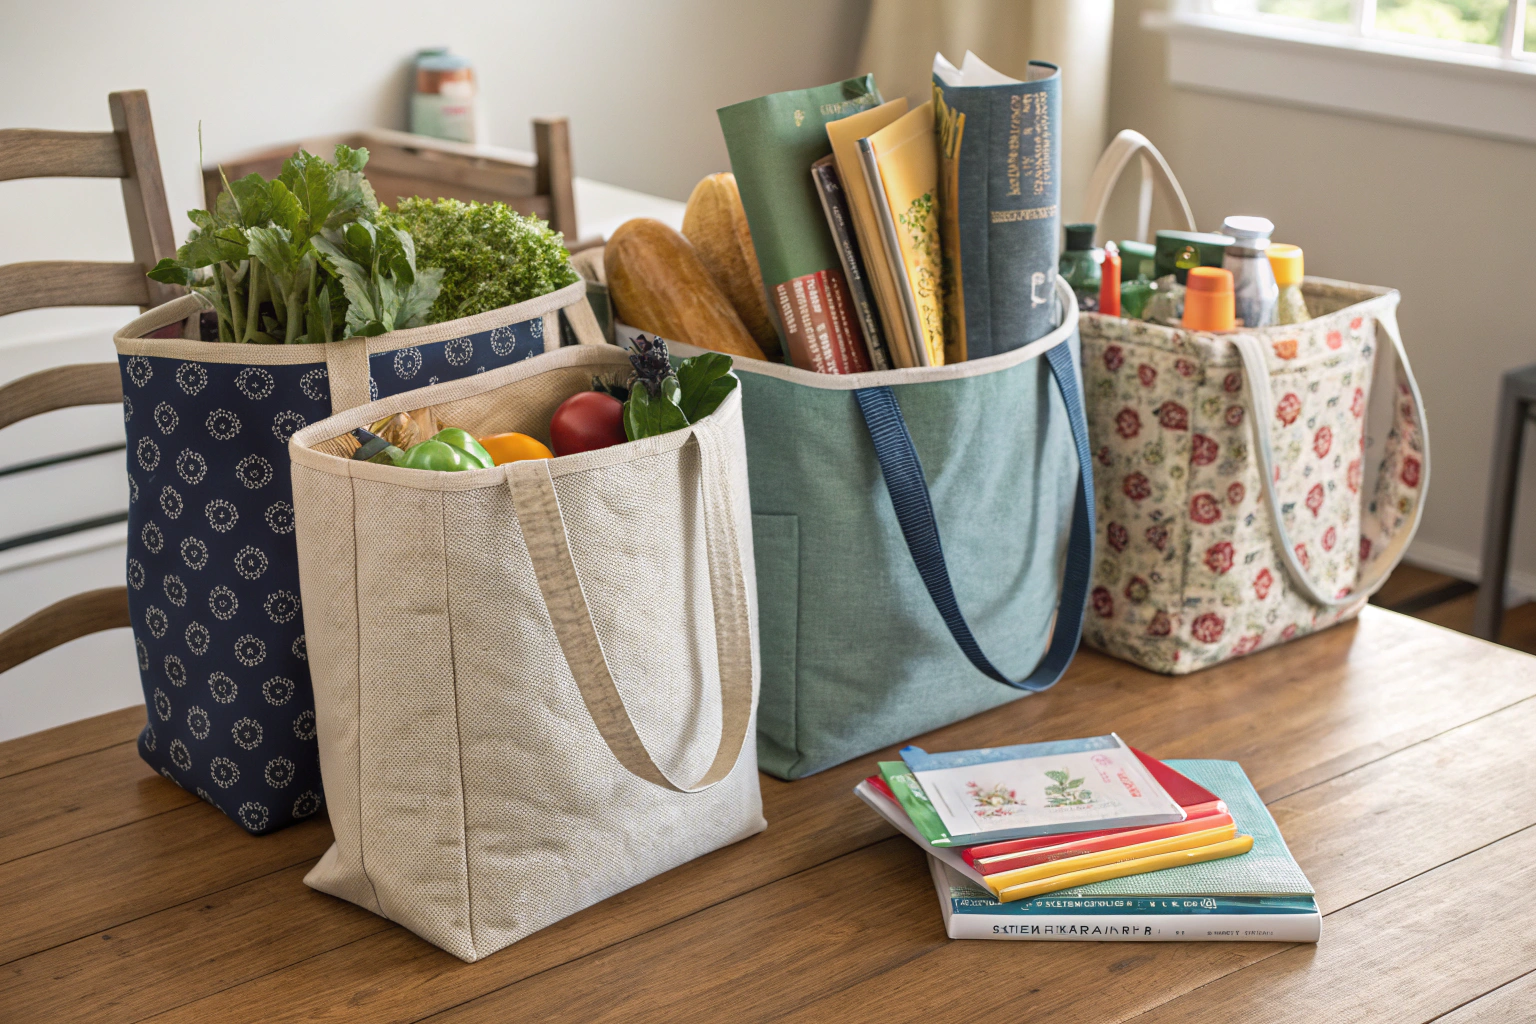
Learning how to sew a tote bag with flat bottom involves a simple technique called “boxing corners” to create a three-dimensional base. This method transforms a flat bag into a structured carrier that can stand upright on its own, making it more practical for items like groceries or books. While it may seem complicated, it only requires a few extra seams and precise measurements to achieve a professional-looking result that significantly boosts the bag’s functionality.
Key Benefits at a Glance
- Benefit 1: A flat bottom provides stability, allowing the bag to stand upright on its own and preventing it from tipping over.
- Benefit 2: It increases the bag’s usable capacity, making it easier to organize and carry bulky items like containers or books.
- Benefit 3: This technique creates a polished, professional finish, elevating your handmade project to look more like a store-bought bag.
- Benefit 4: The method is beginner-friendly and works well with sturdy fabrics like canvas, denim, or corduroy without a complex pattern.
- Benefit 5: You can create a durable, eco-friendly shopping bag that is reusable and perfect for reducing single-use plastic waste.
Purpose of this guide
This guide is for beginner and intermediate sewers who want to create a more functional and structured tote bag. It solves the common problem of floppy, shapeless bags that are difficult to pack and organize. Here, you will learn the straightforward, step-by-step process for measuring, cutting, and sewing boxed corners to make a flat bottom. We will also highlight common mistakes, such as incorrect measurements or uneven seams, to help you craft a durable, well-made tote bag that is perfect for everyday use.
Why I love making flat bottom tote bags
My journey with flat-bottom tote bags began out of pure frustration. I’d been making regular tote bags for years, and while they looked lovely hanging empty in my closet, they were utterly useless for actual carrying. Every time I loaded them with groceries, library books, or craft supplies, they’d collapse into shapeless pouches that toppled over the moment I set them down. The contents would spill everywhere, and I’d find myself constantly wrestling with limp fabric that refused to cooperate. Then I discovered the magic of flat-bottom construction, and everything changed.
The difference was immediately obvious – these sturdy totes actually stood upright when filled, making packing and unpacking a breeze. My first flat-bottom grocery bag has been in regular rotation for over three years now, carrying everything from heavy canned goods to delicate produce without showing signs of wear. Unlike store-bought options that seem to fall apart after a few months, these handmade totes have proven their worth time and again. The reusable grocery bags I’ve made have completely replaced disposable bags in my household, and I love knowing exactly how they were constructed. Even if you’re new to sewing, this is an incredibly approachable project that yields professional-looking results with just basic techniques.
Materials and tools you’ll need
After making countless tote bags over the years, I’ve refined my materials list to include only what truly matters for success. While you could potentially make a bag with just fabric and thread, having the right tools makes the difference between a project that’s enjoyable and one that’s frustrating. Some items on this list are absolute essentials, while others are optional upgrades that will improve your final results. I’ve discovered several budget-friendly alternatives along the way – for instance, a sharp pair of fabric scissors can substitute for a rotary cutter when you’re starting out, though the cutter definitely makes the job faster and more precise.
The key to a successful tote bag project is preparation, and that means gathering everything you need before you start cutting fabric. I learned this lesson the hard way when I was halfway through a project and realized I didn’t have the right thread color – by the time I made it to the fabric store, I’d lost momentum and the bag sat unfinished for weeks.
- Fabric (1-2 yards depending on size)
- Coordinating thread
- Sewing machine
- Fabric scissors or rotary cutter
- Cutting mat
- Measuring tape
- Pins or clips
- Iron and ironing board
- Seam ripper
- Interfacing (optional for structure)
- Marking tools (fabric pen or chalk)
Choosing the right fabric for your tote bag
Fabric selection has been one of my biggest learning curves in tote bag making. Early in my sewing journey, I made the mistake of choosing a gorgeous lightweight cotton simply because I loved the print. The bag looked beautiful when finished, but within two weeks of regular use, the seams were stretching and the fabric was showing wear at stress points. That expensive fabric ended up in my scrap bin, and I learned a valuable lesson about prioritizing function alongside beauty.
Now I approach fabric selection with both practicality and aesthetics in mind. The fabric needs to be sturdy enough for the bag’s intended use while still being something I’ll enjoy looking at every day. I’ve discovered that some of my most successful bags have been made from unexpected materials – old denim jeans transformed into incredibly durable everyday carriers, vintage curtains that created unique statement pieces, and even a shower curtain liner that became the perfect beach bag. The key is understanding how different fabric weights and weaves will behave under stress.
Pre-washing has become a non-negotiable step in my process after learning this lesson the hard way. I once spent hours creating what I thought was the perfect grocery bag, complete with careful measurements and professional-looking seams. After the first wash, it had shrunk so dramatically that it was only suitable for carrying a single paperback book. Different fabrics require different pre-washing approaches – I treat canvas and duck cloth much more aggressively than delicate cotton prints, sometimes washing them twice to ensure all shrinkage happens before construction.
| Fabric Type | Durability | Ease of Sewing | Best Uses | Personal Notes |
|---|---|---|---|---|
| Canvas | Excellent | Moderate | Grocery bags, heavy items | My go-to for everyday use |
| Duck Cloth | Excellent | Challenging | Outdoor bags, beach totes | Pre-wash essential |
| Denim | Very Good | Moderate | Casual bags, book totes | Great for upcycling old jeans |
| Cotton Quilting | Fair | Easy | Light use, gift bags | Beautiful but not for heavy loads |
| Upholstery Fabric | Excellent | Challenging | Structured bags | Check needle compatibility |
Best fabrics for durability
Through years of real-world testing, I’ve identified the heavyweight champions of the fabric world for tote bag construction. My go-to choice remains 12-16 ounce canvas – it’s heavy enough to maintain structure under load but still manageable for home sewing machines. I’ve made grocery bags from this weight canvas that have carried weekly shopping loads for over four years without showing significant wear. Duck cloth runs a close second, though it requires more patience during construction due to its thickness.
Denim deserves special mention, particularly when you’re upcycling old jeans. I look for jeans with at least 14-ounce weight, and I’ve found that the worn areas actually add character rather than weakness when incorporated thoughtfully into bag design. Pre-washing denim is absolutely critical – I learned this after a beautiful bag I’d made from new denim fabric shrank so much after washing that the proportions were completely thrown off. The handles became too short and the whole bag looked awkward.
- Canvas (12-16 oz weight recommended)
- Duck cloth (heavyweight cotton)
- Denim (14+ oz for best results)
- Outdoor/marine fabric (water-resistant)
- Upholstery fabric (medium to heavy weight)
- Heavyweight linen (pre-shrunk)
Creative fabric combinations that work
Some of my most successful and eye-catching bags have come from unexpected fabric pairings. I once combined a bold geometric print cotton with solid navy canvas – the cotton became the main body while the canvas formed the bottom panel and handles. This combination wasn’t just visually striking; it was also highly functional since the heavier canvas provided structure exactly where it was needed most.
The key to successful fabric mixing is balancing weight and drape. I’ve learned to use heavier fabrics for high-stress areas like the bottom panel and handle attachments, while lighter fabrics work beautifully for decorative elements or low-stress areas. One of my favorite techniques is using a coordinating but heavier fabric for just the bottom few inches of the bag – it adds visual interest while providing extra durability where the bag contacts surfaces most often. I’ve successfully repurposed everything from old tablecloths to vintage shower curtains, always keeping in mind how the different weights will work together structurally.
Pre washing and preparing your fabric
My fabric preparation routine has evolved into a precise system that I never skip, no matter how eager I am to start cutting. The process begins with examining the fabric for any obvious flaws or directional patterns that might affect my cutting layout. I then pre-wash according to the fabric type – hot water and regular detergent for sturdy cottons and canvas, gentle cycle for anything with special finishes or delicate fibers.
The importance of this step was driven home when I created what I thought was a perfectly proportioned medium tote, only to have it shrink into a child-sized bag after its first wash. Now I actually embrace some of the character changes that pre-washing brings – canvas becomes softer and more workable, while still retaining its strength. After washing, I press the fabric while it’s still slightly damp, which helps reset the grain and makes cutting much more accurate. I’ve found that taking time for proper fabric preparation prevents countless headaches down the line and ensures that your finished bag will look as good after years of use and washing as it did the day you completed it.
Three methods for creating a flat bottom
Over the years, I’ve thoroughly tested all three major flat-bottom construction methods, and I can honestly say each has its place in my tote bag making repertoire. The choice often comes down to the specific project requirements, my available time, and sometimes just my mood on a given day. Many sewers assume that some methods are significantly harder than others, but I’ve found that’s not necessarily true – they’re just different approaches to achieving the same goal.
The box corner method has become my default choice for most projects because it’s reliable and produces consistently good results. However, when I’m making extra-large bags or want maximum structure, I reach for the strip method. The fold-and-sew technique started as my “rescue method” for when I’d forgotten to cut corners before construction, but I’ve discovered it actually works beautifully as a planned technique for certain bag styles. All three methods create bags that stand upright beautifully and distribute weight effectively.
| Method | Skill Level | Time Required | Professional Look | Best For |
|---|---|---|---|---|
| Box Corner | Beginner | Quick | Good | Most projects |
| Strip Method | Intermediate | Moderate | Excellent | Large/structured bags |
| Fold-and-Sew | Beginner | Quick | Good | Rescue technique |
For an illustrated overview, visit the tote bag article.
You can also see step-by-step instructions on the American Sewing Guild site.
The box corner method
This has become my go-to technique for most tote bag projects because it delivers reliable results with minimal fuss. The key to perfect box corners lies in accurate measuring and cutting – I’ve learned to measure twice and cut once, because uneven corners are immediately obvious in the finished bag. My technique for ensuring symmetrical corners involves cutting both corner squares at the same time when possible, and always double-checking measurements before making that first cut.
The depth of your finished bag bottom depends entirely on the size of the squares you remove from the corners. I typically use 2-3 inch squares for standard grocery-sized bags, but I’ve experimented with everything from 1-inch squares for shallow gift bags to 4-inch squares for deep laundry totes. One trick I’ve developed is to test the depth with paper first – cut small squares from paper in the same dimensions as your planned bag, fold them into a box shape, and see if the proportions look right.
- Cut squares from bottom corners (2-3 inches for standard depth)
- Sew side seams with right sides together using 1/2 inch seam allowance
- Turn bag inside out and flatten corner seams
- Mark and sew across corner triangles perpendicular to seam
- Trim excess fabric leaving 1/4 inch seam allowance
“For the base of the bag, cut two 3-inch squares from both bottom corners… A 2024 poll revealed 81% of sewing hobbyists prefer the box corner method for making tote bags with flat bottoms due to its sturdiness and finish.”
— Sew Nikki, June 2024
“To make a flat bottom for your tote bag, cut out notches from the bottom corners, squish the bag, pin and sew across the notched edges; 74% of beginners find this step transforms the bag’s shape and usability.”
— Instructables, May 2024
The strip method
I turn to this method when I’m creating larger bags that need maximum structural integrity, or when I want to incorporate a contrasting fabric for the base. The strip method involves cutting a separate rectangular piece for the bag bottom and a long strip that forms the sides. While it requires more precision in measuring and cutting, the results are worth the extra effort – bags made this way have incredible structure and can handle heavy loads without losing their shape.
The trickiest part of this method is easing the strip around the corners of the base piece without creating puckers. I’ve developed a technique where I clip small notches into the seam allowance of the strip at regular intervals, which allows it to curve smoothly around corners. I also pin extensively – it might seem like overkill, but taking time to pin properly prevents the frustration of having to rip out seams later. This method works particularly well when you want to use a very heavy fabric for the base while keeping the sides in a lighter weight material.
- Cut rectangular bottom piece to desired bag base size
- Cut long strip for sides (width = bag height + seam allowances)
- Pin and sew short ends of strip to create loop
- Attach strip to bottom piece, easing around corners
- Complete bag construction as normal
The fold and sew method
What started as my “oops, I forgot to cut the corners” rescue technique has actually become a legitimate method I use for certain projects. I discovered this approach when I was three-quarters through constructing a bag and realized I’d completely forgotten to cut corner squares. Instead of starting over, I decided to experiment with creating the flat bottom after the fact – and was pleasantly surprised by how well it worked.
This method involves completing the basic bag construction with regular straight seams, then turning the bag inside out and creating triangular corners by folding and sewing. The key to success is consistent measuring – I use a ruler to ensure both corners are exactly the same distance from the point, because even a small difference will be obvious in the finished bag. I’ve found this method particularly useful for bags where I want to be able to adjust the bottom depth after seeing how the proportions look, since you can always make the corners deeper but you can’t make them shallower once they’re sewn.
- Complete bag construction with regular seams
- Turn bag inside out and flatten corner seams
- Measure and mark triangle corners (2-3 inches from point)
- Sew across marked lines perpendicular to seam
- Trim excess fabric and turn bag right side out
Which method is best my recommendations
After making dozens of bags using all three methods, I find myself reaching for the box corner technique about 70% of the time. It’s become second nature, and I can execute it quickly and reliably. For beginners, I always recommend starting with box corners because the technique is forgiving – small variations in cutting or sewing don’t dramatically affect the final result, and it’s easy to see what you’re doing at each step.
However, when I’m making bags for heavy-duty use or want the most professional-looking results, I choose the strip method despite the extra time investment. The clean lines and structural integrity it provides are unmatched, particularly for larger bags. I made a massive beach bag using this method that has survived three summers of being loaded with wet towels, sandy toys, and heavy beach gear without showing any signs of stress at the seams.
The fold-and-sew method has earned its place as my go-to for gift bags and smaller projects where I want flexibility in the final proportions. It’s also perfect for those moments when you’re working with limited fabric and need to see how everything comes together before committing to corner cuts. While all three methods produce functional, attractive bags, understanding when to use each one has made me a more versatile and confident bag maker.
Measuring and cutting fabric for your tote bag
Precision in measuring and cutting has been the single biggest factor in improving the quality of my finished bags. Early in my tote-making journey, I was casual about measurements, thinking that “close enough” would work for such a simple project. That approach resulted in bags with uneven proportions, handles that didn’t align properly, and corners that never quite matched. Now I have a systematic approach that ensures consistent, professional results every time.
My cutting setup includes a large cutting mat, sharp rotary cutter, and quilting rulers for perfectly straight lines. I’ve found that taking time to cut accurately actually speeds up the sewing process because pieces fit together properly the first time. Over the years, I’ve developed standard dimensions for different bag sizes based on real-world testing – these measurements have proven themselves through countless projects and various intended uses.
| Bag Size | Main Panel | Handle Length | Best Uses |
|---|---|---|---|
| Small | 12″ x 14″ | 18″ | Lunch, books, gifts |
| Medium | 14″ x 16″ | 22″ | Shopping, everyday carry |
| Large | 16″ x 18″ | 24″ | Groceries, beach, laundry |
- Measure and mark fabric pieces according to chosen size
- Cut main panels (2 pieces)
- Cut handle strips (2 pieces, 3″ wide)
- Cut lining pieces if using (same as main panels)
- Double-check all measurements before cutting
Step by step construction process
This is where everything comes together – all the planning, fabric selection, and preparation culminates in the actual construction of your tote bag. I’ve streamlined this process over years of bag-making, developing a sequence that minimizes handling and maximizes efficiency. The key is to work methodically and not rush any steps, even though the excitement of seeing your bag take shape can make you want to speed through.
My workspace organization has become almost ritualistic – I lay out all cut pieces in the order I’ll need them, thread my machine with the appropriate color, and double-check that my iron is ready for pressing seams. This preparation prevents those frustrating moments when you’re in the middle of a seam and realize you need to stop to find something or make an adjustment. The construction process should flow smoothly from one step to the next, and proper preparation makes that possible.
Creating and attaching the handles
Handle construction and attachment evolved significantly after my early bags suffered handle failures. My first attempts used simple strips folded in half and topstitched, but these stretched under load and eventually pulled away from the bag. Through trial and error, I developed a method that creates incredibly strong, comfortable handles that have never failed me, even on bags that regularly carry heavy groceries.
The secret lies in the construction technique and the reinforcement method. I create handles by folding the fabric strip in quarters rather than half, which eliminates raw edges and creates multiple layers for strength. The handle length formula I use takes into account not just comfort, but also how the handles will sit when the bag is loaded – too short and they dig into your shoulder, too long and the bag hangs awkwardly.
- Cut handle strips 3″ wide by desired length plus 2″
- Fold strips in half lengthwise, press
- Fold raw edges to center crease, press again
- Topstitch along both long edges for durability
- Position handles 4″ from side seams
- Attach with box stitch reinforcement
Adding optional features
The beauty of making your own tote bags lies in the ability to customize them for specific needs. I’ve learned to think about how each bag will be used before deciding which features to include. A grocery bag benefits from easy-to-clean lining and perhaps a small pocket for shopping lists, while a craft bag might need multiple interior compartments and a secure closure to prevent spills during transport.
My standard interior pocket size of 6″ x 8″ has proven perfect for phones, keys, and other small essentials that tend to disappear in the bottom of large bags. I position these pockets on one side of the bag interior, about 3 inches down from the top edge. For bags that will carry valuable items, I add a zippered pocket – though I’ve learned to choose heavy-duty zippers that can withstand the stress of a loaded bag.
- Interior slip pockets (6″ x 8″ standard)
- Zippered pocket for valuables
- Magnetic snap closure
- Key fob attachment
- Interior divider panel
- Exterior patch pocket
- Pen holder loops
Adding a lining to your tote bag
I line every tote bag I make, regardless of the intended use, because lining transforms a homemade bag into something that looks professionally manufactured. Beyond appearance, lining provides practical benefits – it protects the main fabric from wear, makes the interior easy to clean, and adds structure that helps the bag maintain its shape over time. The key to professional-looking lining is precision in cutting and attachment.
My lining technique ensures that the interior sits perfectly smooth without sagging or pulling. This took considerable practice to master, as my early attempts often resulted in lining that was either too loose (creating unsightly bubbles) or too tight (causing the bag opening to pucker). The secret is cutting the lining pieces exactly the same size as the exterior pieces and taking care with seam allowances during attachment.
Finishing the top edge
The top edge finish can make or break the professional appearance of your tote bag. This area receives constant handling and needs to be both durable and attractive. I’ve experimented with various edge finishing techniques, from simple single-fold hems to more complex bias tape binding, and each has its place depending on the bag’s style and intended use.
My most-used technique is a double-fold hem that encases all raw edges and provides a clean, sturdy finish. The challenge comes at the handle attachment points, where multiple layers of fabric create considerable bulk. I’ve developed a technique for gradually tapering the hem thickness in these areas to reduce bulk while maintaining strength. The key is patience – rushing this final step can undo all the careful work that came before.
Troubleshooting common issues
Every sewist encounters problems, and tote bag construction presents its own unique challenges. I’ve made virtually every mistake possible in my bag-making journey, and while frustrating at the time, these experiences taught me valuable lessons that I now pass on to others. The key is recognizing that problems are learning opportunities, not failures, and that most issues can be fixed with patience and the right approach.
My most embarrassing mistake happened when I was making a bag as a gift and became so focused on finishing quickly that I sewed one handle on upside down. Rather than admit the error and start over, I tried to convince myself it looked intentional – it didn’t. That experience taught me the importance of taking breaks and double-checking my work, especially when I’m excited about a project or working under a deadline.
Uneven corners plagued my early bags until I developed a systematic approach to measuring and marking. Puckered seams were another common issue that I solved by adjusting my machine tension and using the appropriate needle for my fabric weight. The most important lesson I’ve learned is that most problems are preventable with careful preparation, but when they do occur, patience and a seam ripper can fix almost anything.
- Uneven corners: Measure twice, mark carefully before sewing
- Puckered seams: Check thread tension and use appropriate needle
- Fraying edges: Finish seams with zigzag or serger
- Weak handle attachment: Always use box stitch reinforcement
- Lining sagging: Ensure proper measurements and attachment
- Fabric shrinkage: Always pre-wash all materials
Variations and customizations
The basic flat-bottom tote pattern serves as an excellent foundation for countless variations. My creative experimentation with different sizes, proportions, and features has resulted in specialized bags for every conceivable use. The beauty of understanding the fundamental construction principles is that you can modify them to suit specific needs while maintaining structural integrity.
Some of my most successful variations came from observing how I actually used my bags and identifying improvements. A beach bag needed to be wider and shorter to accommodate towels, while a craft bag required interior organization to keep supplies separated. My library bag needed to be tall and narrow for books, while grocery bags benefited from reinforced bottoms and easy-clean linings.
The key to successful customization is changing one element at a time and testing the results before making additional modifications. I keep detailed notes about what works and what doesn’t, including photos of particularly successful designs. This documentation has become invaluable when friends request custom bags or when I want to recreate a particularly successful design.
Size variations for different uses
Through years of experimentation and real-world testing, I’ve identified optimal dimensions for different bag purposes. These measurements aren’t arbitrary – they’re based on careful observation of how bags are used and what sizes work best for specific items. My grocery bag dimensions accommodate standard paper bags while fitting comfortably over the shoulder when loaded. Beach bags need to be wide enough for towels but not so large that they become unwieldy when filled with sandy, wet items.
The relationship between bag size and handle length is crucial for comfort and functionality. I’ve developed a formula that ensures handles are long enough for comfortable carrying but not so long that the bag swings excessively when walking. Proportions matter too – a bag that’s too tall and narrow will tip over easily, while one that’s too wide and short won’t hold items securely.
| Purpose | Dimensions | Handle Length | Special Notes |
|---|---|---|---|
| Grocery Shopping | 16″ x 18″ x 6″ | 24″ | Reinforced bottom recommended |
| Beach/Pool | 18″ x 20″ x 8″ | 26″ | Water-resistant fabric |
| Library Books | 14″ x 16″ x 4″ | 22″ | Structured interfacing helpful |
| Craft Storage | 12″ x 14″ x 10″ | 20″ | Interior pockets useful |
| Gift Bag | 10″ x 12″ x 4″ | 16″ | Decorative fabric choices |
Decorating and personalizing your tote bag
My approach to bag decoration has evolved from simple appliqués to more sophisticated techniques that integrate seamlessly with the bag’s construction. The key insight I’ve gained is that decoration should be planned before construction begins, not added as an afterthought. This allows you to position decorative elements where they’ll show to best advantage and won’t interfere with the bag’s functionality.
Block printing with household objects became one of my favorite techniques after discovering that simple foam brushes and acrylic paint could create sophisticated patterns. I’ve used everything from cork stoppers to potato stamps to create unique designs. The secret is building up layers of pattern and color rather than trying to achieve perfection in a single application. Heat-setting is crucial for durability – I learned this after creating a beautiful painted bag that gradually faded with each wash.
Embroidery and appliqué work beautifully on tote bags, but placement is critical. I avoid decorating areas that will receive heavy wear, like the bottom third of the bag or handle attachment points. Instead, I focus on the upper portion of the bag where decoration will be visible and protected. Testing techniques on fabric scraps before applying them to the finished bag has saved me countless hours of frustration and rework.
- Plan decoration placement before construction
- Test techniques on fabric scraps first
- Use fabric-specific paints and markers
- Heat-set decorations according to manufacturer instructions
- Consider washability when choosing decoration methods
- Simple block printing with household objects creates unique patterns
Care instructions for your finished tote
Proper care has allowed some of my earliest tote bags to remain in regular use for over five years. The key is understanding that different fabrics and construction methods require different care approaches. My canvas grocery bags can handle hot water washing and line drying, while bags made from delicate prints need gentler treatment to maintain their appearance.
I’ve learned to spot-clean heavily soiled areas before putting bags in the washing machine, which prevents stains from setting during the wash cycle. Turning bags inside out before washing protects any surface decorations and reduces wear on the exterior fabric. Air drying is my preferred method for all bags, as it prevents shrinkage and maintains the bag’s shape better than machine drying.
- Machine wash cold for most fabrics
- Air dry to prevent shrinkage
- Iron on appropriate heat setting
- Spot clean heavily soiled areas first
- Turn inside out before washing to protect decorations
- Store flat or hanging to maintain shape
Common questions about sewing tote bags
What seam allowance should I use? I use 1/2 inch seam allowances for all main construction seams, as this provides adequate strength while not being so wide that it creates bulk. For topstitching and edge finishing, I typically use 1/4 inch allowances. Consistency is more important than the exact measurement – pick an allowance and stick with it throughout the project.
Can I make this without a sewing machine? While it’s possible to hand-sew a tote bag, I wouldn’t recommend it for beginners. The stress points on tote bags require strong, consistent stitching that’s much easier to achieve with a machine. If you must hand-sew, use a backstitch for all seams and consider reinforcing stress points with additional rows of stitching.
How much fabric do I need? For most standard-sized bags, 1 yard of fabric is sufficient if you’re not including lining. For larger bags or if you want lining, plan on 1.5 to 2 yards. I always buy slightly more than I think I’ll need to account for cutting mistakes or design changes during construction.
- What seam allowance should I use? 1/2 inch for main seams, 1/4 inch for topstitching
- Can I make this without a sewing machine? Yes, but hand-sewing will take much longer
- How much fabric do I need? 1 yard for small bags, 1.5-2 yards for large bags
- What’s the best stitch length? 2.5-3mm for most fabrics, shorter for lightweight materials
- Can I use old sheets or curtains? Yes, but test durability with a small sample first
What’s the best stitch length? I use 2.5-3mm stitch length for most fabrics, which provides good strength without being so small that it’s difficult to remove if needed. For very lightweight fabrics, I might go down to 2mm, while very heavy fabrics might need 3.5mm stitches to penetrate properly.
Can I use old sheets or curtains? Absolutely! Some of my most successful bags have been made from repurposed materials. The key is testing a small sample first – wash it, stretch it, and see how it behaves. Old sheets work wonderfully for linings, while heavy curtains can make excellent bag exteriors.
Why making your own tote bags is worth it
After years of making tote bags, I can confidently say that the investment in time and materials pays dividends far beyond the cost savings. My handmade bags have completely replaced disposable shopping bags in my household, and I estimate I’ve prevented hundreds of plastic bags from entering the waste stream. But the environmental benefits, while significant, aren’t the primary reason I continue making bags.
The satisfaction of using something I created with my own hands never gets old. Every time I reach for one of my handmade totes, I’m reminded of the problem-solving process that went into its design, the care I took in construction, and the pride I felt when it was completed. These bags carry not just my groceries or books, but also the memory of their creation and the knowledge that they were made to last. The skills I’ve developed through tote bag making have also translated to other sewing projects, making me a more confident and capable sewist overall.
Making your own tote bags connects you to a tradition of practical creativity while providing exactly what you need for your lifestyle. Whether you’re motivated by sustainability, creativity, or simply the desire for a bag that perfectly fits your needs, this project offers rewards that extend far beyond the finished product. Start with a simple design, focus on good construction techniques, and don’t be afraid to make mistakes – they’re often the best teachers.
Frequently Asked Questions
What are the three ways to make a flat bottom on a tote bag?
There are three popular methods to create a flat bottom on a tote bag: sewing box corners by pinching and stitching the bottom seams, adding a gusset strip for expanded width, or attaching a separate rectangular bottom panel for structure. Box corners are ideal for beginners as they require minimal extra fabric. Choose the method based on your tote bag’s desired size and stability needs.
How do I make square corners on a tote bag?
To make square corners on a tote bag, sew the side and bottom seams, then at each corner, pinch the fabric to form a triangle and mark a line perpendicular to the seam based on your desired depth. Stitch across this line and cut off the excess fabric, creating a boxed effect for a flat bottom. This technique ensures the bag stands upright and holds more items securely.
What materials do I need to make a tote bag with a flat bottom?
You’ll need sturdy fabric like canvas or cotton, matching thread, a sewing machine or needle, pins, scissors, and optional interfacing for reinforcement. For handles, use webbing or self-fabric strips, and consider a ruler for precise measurements. These materials ensure your flat-bottom tote bag is durable and functional for everyday use.
How do I reinforce a tote bag’s flat bottom for heavy items?
To reinforce a tote bag’s flat bottom, add interfacing or fusible fleece to the bottom panel before sewing, and consider doubling the fabric layers for extra strength. Stitch reinforced seams and box corners securely, or insert a rigid insert like cardboard wrapped in fabric. This prevents sagging and makes the bag suitable for carrying heavier loads like books or groceries.
How to sew a tote bag for beginners step by step?
Start by cutting two rectangles of fabric for the body and strips for handles, then sew the sides and bottom with right sides together, leaving the top open. Create a flat bottom by boxing the corners, attach the handles securely to the top edges, and hem the top for a finished look. Practice on scrap fabric first to master the basics, resulting in a simple yet sturdy tote bag.
What type of fabric works best for a flat-bottom tote bag?
Medium to heavy-weight fabrics like canvas, denim, or cotton duck work best for a flat-bottom tote bag due to their durability and ability to hold shape. Avoid lightweight or stretchy materials as they may sag under weight. Lining with a contrasting fabric can add style and extra strength to the structure.