Learning how to sew a zipper pouch is a fantastic beginner project for creating a small, versatile bag. This simple process involves attaching a zipper to fabric panels and sewing them together to form a lined or unlined pouch. Many new sewers worry about installing the zipper correctly and achieving neat corners, but with a few key techniques, it’s a straightforward and rewarding skill to master. This project is perfect for building confidence and creating a useful, handmade item.
Key Benefits at a Glance
- Customize Size & Style: Easily adjust dimensions and choose any fabric to create unique pouches for makeup, pencils, or travel essentials.
- Master Basic Skills: This project is the perfect way to practice essential techniques like sewing straight lines, installing zippers, and topstitching.
- Create Inexpensive Gifts: Hand-sewn zipper pouches make thoughtful and affordable personalized gifts for friends and family for any occasion.
- Complete in Under an Hour: Once you understand the steps, a simple zipper pouch can be sewn quickly, making it a satisfying and fast project.
- Use Up Fabric Scraps: A great way to use leftover fabric pieces from larger projects, reducing waste and saving money on new materials.
Purpose of this guide
This guide is for anyone, especially sewing beginners, who wants to create a functional and stylish zipper pouch from scratch. It solves the common challenges of zipper installation and achieving a polished finish by providing a clear, step-by-step process. You will learn how to properly prepare your fabric, align and attach the zipper, sew the pouch body, and turn it out for a professional look. We’ll also cover common mistakes to avoid, like sewing the zipper tape incorrectly, ensuring a successful outcome on your first try.
Introduction to sewing zipper pouches
- Learn the foolproof zipper sandwich technique for professional results
- Master fabric selection and preparation for durable pouches
- Discover time-saving tips from years of teaching beginners
- Create custom-sized pouches for any purpose
- Overcome common zipper installation problems with proven solutions
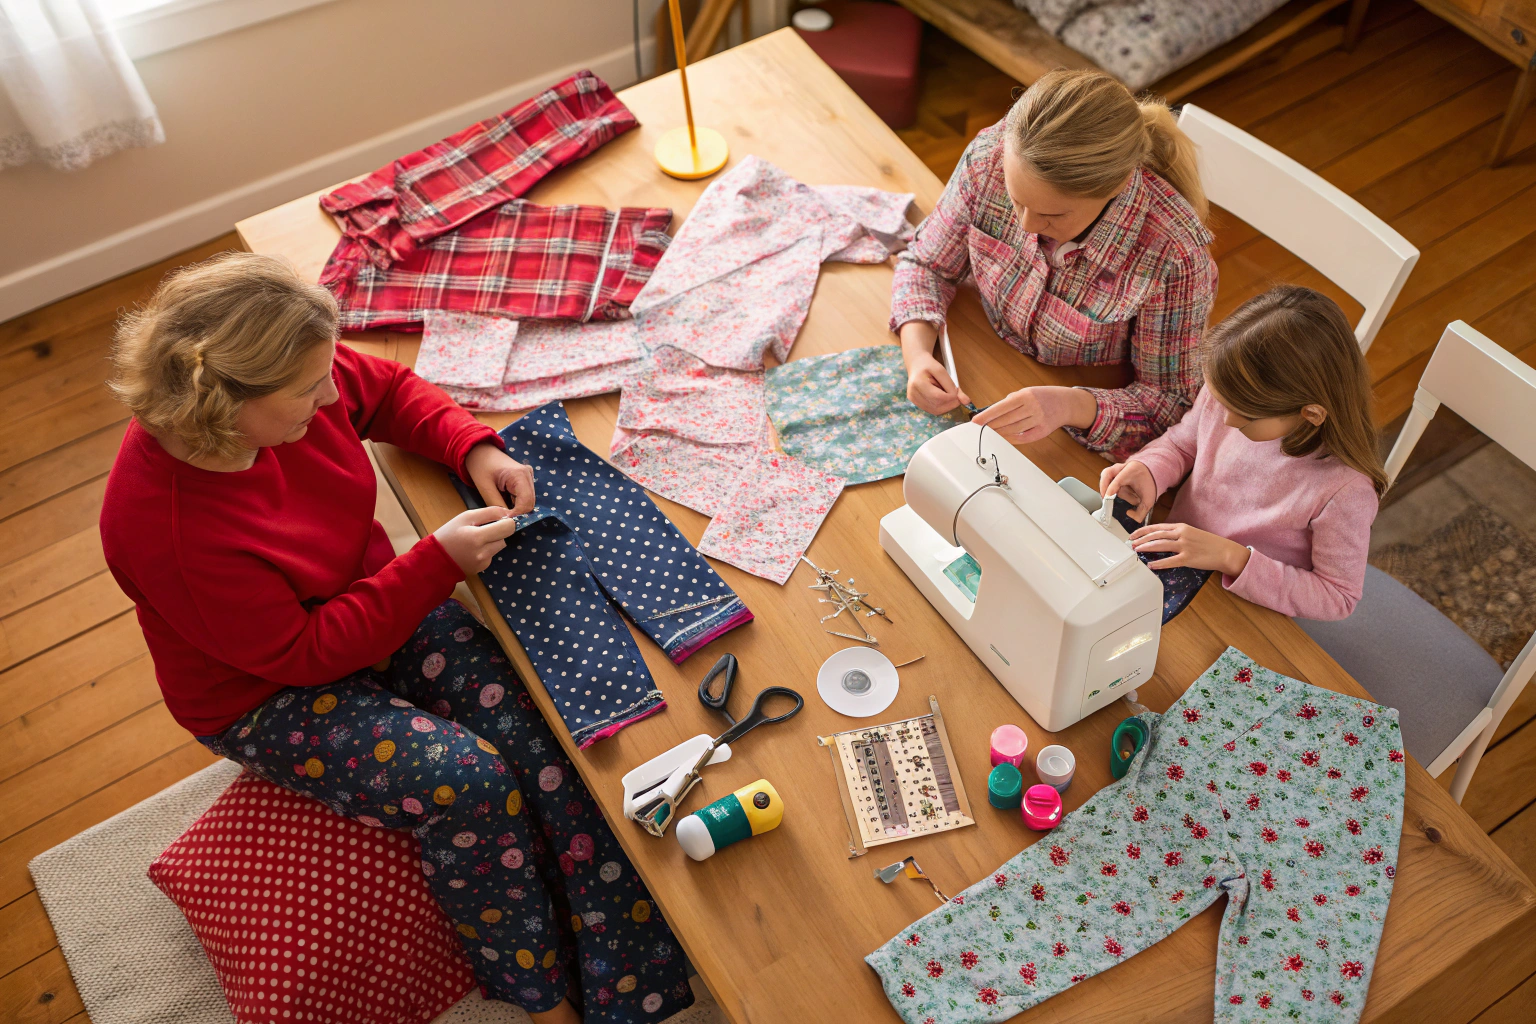
Learning how to sew a zipper pouch opens up a world of creative possibilities for both beginners and experienced sewists. These versatile accessories serve countless purposes, from organizing makeup and toiletries to storing craft supplies and electronic accessories. The beauty of zipper pouches lies in their perfect balance of functionality and style—they’re practical enough for everyday use yet attractive enough to give as handmade gifts.
What makes zipper pouches particularly appealing is their forgiving nature for beginners. Unlike complex garment construction, pouch-making allows you to practice essential sewing skills like precision cutting, seam construction, and zipper installation without the pressure of achieving a perfect fit. The rectangular shape provides a stable foundation for learning, while the finished product delivers immediate satisfaction and usefulness.
Why I love teaching beginners to sew zipper pouches
After fifteen years of teaching sewing workshops, I’ve discovered that zipper pouches are the perfect gateway project for overcoming what I call “zipper anxiety.” This common fear among beginners often stems from one bad experience with a puckered or crooked zipper installation. However, I’ve refined a foolproof method that transforms even the most hesitant students into confident zipper enthusiasts.
One of my most memorable teaching moments involved Sarah, a complete beginner who came to my workshop convinced she’d never master zippers. After struggling with her first attempt, she was ready to give up entirely. But when I showed her my zipper sandwich technique, everything clicked. By the end of the class, she had completed three perfect pouches and was already planning her next project. That transformation happens repeatedly in my workshops, and it’s why I’m passionate about sharing these techniques with a broader audience.
Essential materials and tools for your zipper pouch project
Success in zipper pouch construction begins with selecting the right materials and having proper tools on hand. After years of teaching this project, I’ve learned that investing in quality supplies upfront prevents frustration and ensures professional-looking results. The good news is that zipper pouches require relatively few materials, making them an economical way to build your sewing skills.
- Fabric: 1/2 yard quilting cotton or linen for exterior and lining
- Zipper: 12-14 inch nylon coil zipper (any color)
- Interfacing: 1/4 yard fusible interfacing OR thin batting
- Thread: All-purpose thread matching fabric
- Tools: Fabric scissors, rotary cutter, quilting ruler, pins or clips
- Sewing machine with zipper foot attachment
- Iron and pressing surface
I always recommend buying supplies from fabric stores where you can feel the materials before purchasing. Online shopping works well for zippers and interfacing, but fabric selection benefits from hands-on evaluation. My money-saving tip is to buy fat quarters for smaller pouches—they provide enough fabric for multiple projects while allowing you to experiment with different color combinations.
Choosing the right fabric for your zipper pouch
Fabric selection significantly impacts both the construction process and the finished pouch’s durability. Through years of making hundreds of pouches, I’ve developed a “feel test” that helps determine whether a fabric will work well for this project. The ideal fabric should have enough body to hold its shape but not be so thick that it creates bulk at the seams.
Quilting cotton remains my top recommendation for beginners because it presses well, doesn’t shift during sewing, and comes in countless beautiful prints. Medium-weight linen creates elegant pouches with a sophisticated texture, though it requires more careful pressing. I advise against slippery fabrics like silk or stretchy knits until you’ve mastered the basic technique—they add unnecessary complexity to the learning process.
When selecting coordinating fabrics for exterior and lining, I always consider the pouch’s intended use. For makeup bags, I choose darker exterior colors that won’t show stains and lighter lining colors that make contents visible. Travel pouches benefit from durable canvas exteriors, while gift pouches can showcase special occasion fabrics like metallic prints or seasonal designs.
Adding structure with interfacing or batting
The choice between interfacing and batting dramatically affects your pouch’s final appearance and functionality. After making countless pouches with different structural elements, I’ve developed strong preferences based on intended use and desired aesthetics. This decision often determines whether your pouch looks homemade or professionally crafted.
| Structure Type | Best For | Feel | Durability |
|---|---|---|---|
| No interfacing | Lightweight items | Soft, flexible | Good |
| Light interfacing | Daily use pouches | Structured but pliable | Very good |
| Heavy interfacing | Travel pouches | Firm, holds shape | Excellent |
| Thin batting | Quilted look | Squishy, padded | Good |
My personal preference leans toward medium-weight fusible interfacing for most pouches because it provides structure without excessive bulk. I discovered a time-saving technique of applying interfacing to multiple fabric pieces at once when preparing for craft fairs—this batch processing approach ensures consistent application and saves considerable time when making multiple pouches.
Selecting and preparing your zipper
Zipper selection might seem straightforward, but choosing the right type and length significantly impacts your project’s success. After years of working with various zipper types, I’ve developed strong preferences based on functionality, appearance, and ease of installation. Nylon coil zippers consistently deliver the best results for beginners because they’re flexible, forgiving, and less likely to break during construction.
Metal zippers create a more upscale appearance but require extra care during installation to prevent needle damage. The key insight I discovered after ruining several expensive zippers is to buy longer zippers and cut them to size—this approach provides more flexibility and often costs less than hunting for specific lengths.
How to shorten a zipper
Learning to customize zipper length revolutionized my pouch-making process and eliminated the frustration of hunting for “just right” zipper sizes. This technique emerged from necessity after I invested in bulk zipper purchases to reduce costs for my craft fair inventory. The method I’ve refined prevents the common problem of frayed zipper ends while creating a secure stop that functions as well as factory-installed hardware.
- Measure desired zipper length and mark with fabric marker
- Set sewing machine to tight zigzag stitch (width 3, length 0.5)
- Stitch across zipper tape 3-4 times at marked point to create new stop
- Test zipper pull stops at new stitched barrier
- Cut excess zipper 1/2 inch beyond stitched stop
The critical step many people miss is creating the new stop before cutting the zipper. I learned this lesson the hard way after watching several zipper pulls slide right off freshly cut zippers. The tight zigzag stitching creates an effective barrier that prevents the pull from sliding past your desired endpoint, essentially mimicking the factory-installed zipper stop.
Precise cutting guide for perfect zipper pouches
Accurate cutting forms the foundation of professional-looking zipper pouches, yet it’s often where beginners make their first mistakes. Through years of teaching, I’ve developed a systematic approach that ensures symmetrical pieces every time. My measuring trick involves using a quilting ruler as both measuring tool and cutting guide—this eliminates the common error of pieces that don’t match properly.
| Pouch Size | Exterior Fabric | Lining Fabric | Finished Dimensions |
|---|---|---|---|
| Small | 8″ x 6″ | 8″ x 6″ | 7″ x 5″ |
| Medium | 10″ x 8″ | 10″ x 8″ | 9″ x 7″ |
| Large | 12″ x 10″ | 12″ x 10″ | 11″ x 9″ |
The secret to consistent results lies in cutting all pieces at the same time using the same ruler and cutting method. I always cut exterior pieces first, then use them as templates for lining pieces to ensure perfect matching. This approach eliminates the slight variations that occur when measuring each piece individually.
- Cut 2 pieces exterior fabric to chosen dimensions
- Cut 2 pieces lining fabric to same dimensions
- Cut interfacing or batting 1/4 inch smaller on all sides
- Apply interfacing to wrong side of exterior pieces following manufacturer’s instructions
My foolproof zipper installation method
Zipper installation represents the make-or-break moment in pouch construction, where many beginners either gain confidence or become discouraged. The method I’ve refined over years of teaching addresses every common problem I’ve encountered in workshops. This technique emerged from my own early struggles with crooked, puckered, or poorly aligned zippers that left me questioning my sewing abilities.
The breakthrough came when I stopped trying to sew the zipper and fabric separately and instead treated them as a single unit. This shift in perspective led to the development of my zipper sandwich technique, which creates perfect alignment automatically. Students often experience an “aha moment” when they see how this method eliminates guesswork and produces consistently professional results.
What makes this approach particularly effective is its forgiving nature—small mistakes in alignment or stitching can be corrected without starting over completely. The technique also works equally well with different zipper types and fabric weights, making it versatile enough for various project requirements.
Mastering the zipper sandwich technique
The zipper sandwich technique revolutionized my own sewing when I first learned it from a quilting mentor, and it has since become the cornerstone of my teaching method. This approach treats the zipper installation as a layering process rather than a precision alignment challenge, which removes much of the stress and guesswork that intimidates beginners.
- Place exterior fabric right side up on work surface
- Position zipper face down on top, aligning raw edges
- Place lining fabric face down over zipper
- Pin or clip all three layers together along zipper edge
- Stitch 1/4 inch seam using zipper foot
- Flip fabrics away from zipper and press seams
The key to success lies in the finger placement I demonstrate in workshops—keeping your left hand flat against the fabric layers while guiding them through the machine prevents shifting and ensures even seam allowances. I discovered that students who master this hand position achieve professional results from their very first attempt, while those who neglect it often struggle with alignment issues.
Essential tips for smooth zipper sewing
Preventing fabric puckering near the zipper was a problem that plagued my early projects until I discovered the importance of proper zipper foot positioning and fabric handling. The secret lies in understanding that the zipper foot should work with you, not against you, to create smooth, even stitching lines.
- Use zipper foot positioned to left of needle for better visibility
- Go slowly and stop with needle down when navigating around zipper pull
- Keep fabric layers flat and aligned to prevent puckering
- Test zipper function before proceeding to next step
- Use small scissors to clip threads close to zipper teeth
My technique for preventing puckering involves maintaining consistent pressure on the presser foot while allowing the fabric to feed naturally through the machine. Many beginners make the mistake of pulling or pushing the fabric, which creates tension that manifests as puckering around the zipper area.
Topstitching along the zipper for a professional finish
Topstitching transforms a good zipper installation into a professional-looking one, but the technique requires precision to achieve the clean, even lines that characterize high-quality construction. Through experimentation with different distances and stitch settings, I’ve found that 1/8 inch from the zipper edge creates the most balanced appearance while providing functional benefits.
“Topstitch along both sides of the zipper about 1/8″ (0.3 cm) to 1/4″ (0.6 cm) away from the edge. Make sure to have the zipper half way or all the way open before this next part!”
— Bethany Lynne Makes, October 2025
My pressing technique before topstitching ensures perfectly flat seams that create clean, professional-looking results. I press seams away from the zipper using a pressing cloth to protect the zipper teeth, then topstitch while the fabric is still slightly warm from pressing. This approach helps the topstitching settle into perfectly straight lines.
Sewing your pouch together the construction phase
The construction phase brings all your careful preparation together into a finished pouch, but the order of operations can make the difference between success and frustration. My specific sequence prevents common mistakes I’ve observed in countless workshops, particularly the problem of sewn-shut zippers that require seam ripping to fix.
- Open zipper halfway for easier turning later
- Place exterior pieces right sides together, aligning zipper edges
- Place lining pieces right sides together, aligning opposite zipper edges
- Pin around entire perimeter, leaving 3-inch opening in lining bottom
- Stitch 1/4 inch seam around entire perimeter
- Clip corners and trim seam allowances to reduce bulk
The time-saving technique I developed involves chain-piecing multiple pouches when making them for gifts or craft fairs. This approach reduces thread waste and creates a rhythm that improves consistency across multiple projects. However, I always recommend beginners complete one pouch entirely before starting another to avoid confusion.
The correct way to fold your zipper during seam construction
Proper zipper folding prevents the bulky, distorted ends that plague many homemade pouches and mark them as amateur construction. This technique was a breakthrough moment in my own sewing journey—before learning it, my pouches always had that telltale bunched appearance at the zipper ends that screamed “homemade” rather than “handmade.”
“When sewing over the zipper tape, point the seam allowances and zipper tape down towards the lining – this ensures the zipper is laying correctly when turned right side out.”
— Bethany Lynne Makes, October 2025
- Fold zipper ends so teeth point toward lining fabric
- Ensure zipper tape lies flat against seam allowance
- Pin zipper ends securely to prevent shifting during sewing
- Stitch slowly over zipper area, using hand wheel if needed
Achieving perfect corners and crisp edges
Corner construction separates amateur-looking pouches from professional ones, yet many sewists rush through this crucial step. My corner-clipping technique evolved from years of trial and error, including several pouches with corners that wouldn’t turn properly due to insufficient trimming or over-aggressive cutting that weakened the seams.
The pressing sequence I use in my professional work creates the crisp edges that make handmade items look store-bought. I press each seam immediately after sewing while the fabric is still positioned correctly, then do a final press of the entire pouch after turning. This two-stage pressing approach sets the seams permanently and creates sharp, professional-looking edges.
Turning and finishing your professional quality pouch
The turning process requires patience and gentle persuasion rather than forceful pulling that can damage seams or distort the pouch shape. My “gentle persuasion” method prevents the torn seams and stretched fabric that plagued my early pouch-making attempts. This technique recognizes that fabric has natural limitations and works within those constraints rather than against them.
- Press all seams flat before turning for crisp edges
- Use point turner or chopstick to gently push out corners
- Press finished pouch with steam for professional appearance
- Topstitch around opening if desired for extra durability
The pressing sequence I’ve developed gives the cleanest results and ensures that seams lie flat in their final positions. I always press the pouch while it’s still inside out to set the seams, then press again after turning to create sharp edges and eliminate any remaining wrinkles.
The art of turning your pouch right side out
Turning pouches without damaging the structure requires a systematic approach that I developed after struggling with torn seams in my early projects. The three-step process I now teach prevents frustration and ensures that all your careful construction work remains intact during this critical phase.
My technique involves working from the lining opening, using it as leverage to gently coax the exterior through without stressing any single seam. The key insight is that turning should be gradual rather than forceful—rushing this step often results in damage that requires repair or complete reconstruction.
Choosing between machine and hand finishing
The decision between machine topstitching and hand blind stitching for closing the lining opening depends on the pouch’s intended purpose and your available time. My preference varies based on whether I’m making pouches for personal use, gifts, or craft fair sales, with each application having different requirements for appearance and construction speed.
| Finishing Method | Pros | Cons | Best For |
|---|---|---|---|
| Machine topstitch | Quick, strong, matches other seams | Visible stitching line | Casual pouches, gifts |
| Hand blind stitch | Invisible finish, professional look | Time-consuming, requires skill | Special occasion items |
For craft fair items where speed is essential, I choose machine topstitching that matches the thread used elsewhere in the pouch. For special gifts or pouches using expensive fabrics, I invest the extra time in hand blind stitching that creates an invisible closure indistinguishable from factory construction.
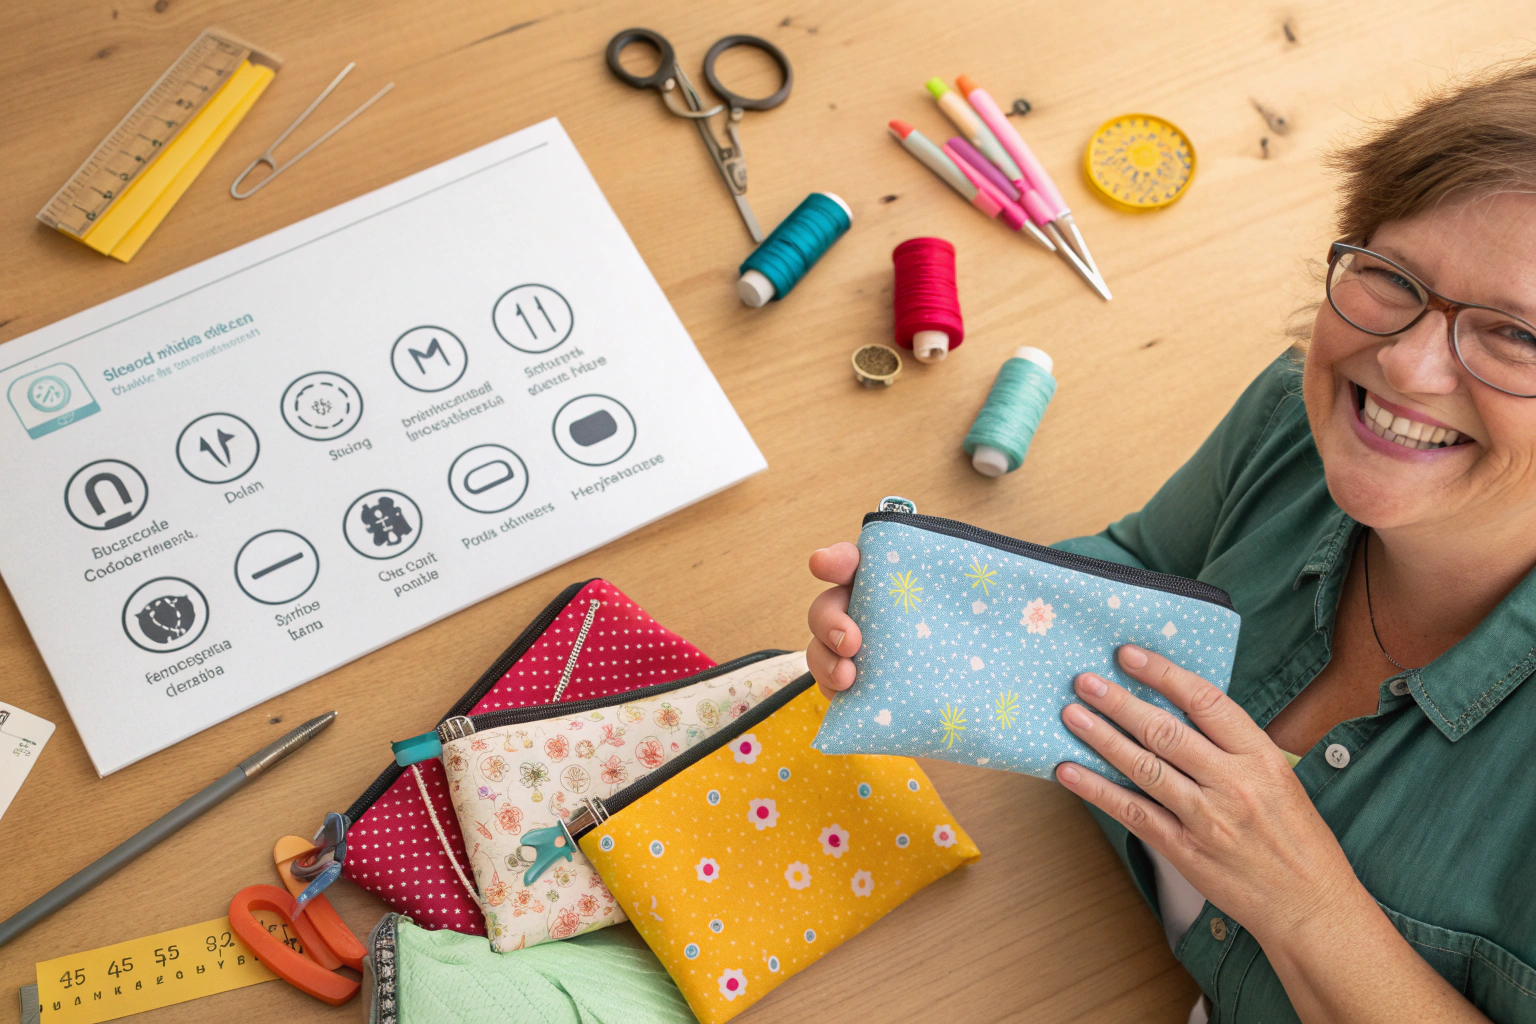
Creative customization making the pouch your own
Customization transforms basic zipper pouches into personalized accessories that reflect individual style and serve specific purposes. The most successful adaptations I’ve created emerged from identifying particular needs that weren’t met by standard pouch dimensions or features. These modifications often become signature elements that friends and customers specifically request.
My approach to customization focuses on functionality first, then aesthetics. A pouch that looks beautiful but doesn’t serve its intended purpose well becomes a decorative object rather than a useful tool. The most rewarding projects combine visual appeal with enhanced functionality, creating items that users reach for repeatedly.
Adapting your pouch for specific uses
Modifying the basic pattern for specialized purposes requires understanding how different uses stress the construction and what features enhance functionality. The dimensional and structural changes I make for various applications emerged from observing how different pouches performed in real-world use over extended periods.
| Pouch Type | Dimensions | Special Features | Fabric Recommendations |
|---|---|---|---|
| Makeup bag | 10″ x 7″ | Wipeable lining, flat bottom | Canvas exterior, vinyl lining |
| Pencil case | 9″ x 4″ | Slim profile, reinforced corners | Denim exterior, cotton lining |
| Electronics pouch | 8″ x 6″ | Padded, anti-static lining | Canvas exterior, fleece lining |
| Knitting notions | 6″ x 8″ | Clear window panel | Cotton exterior, vinyl window |
The specialized pouches that receive the most compliments and requests are those that solve specific organizational problems. My knitting notions pouch with a clear vinyl window panel allows knitters to quickly identify contents without opening the pouch, while the padded electronics pouch provides protection for delicate devices during travel.
Troubleshooting guide solutions to common zipper pouch problems
Even experienced sewists encounter challenges when making zipper pouches, but most problems have straightforward solutions that don’t require starting over completely. The rescue techniques I’ve developed emerged from my own mistakes and the countless issues students have brought to my workshops over the years.
- Puckered zipper seam: Remove stitching, re-press, and sew more slowly
- Zipper won’t close smoothly: Check for fabric caught in teeth, trim excess
- Uneven zipper installation: Use consistent seam allowance and proper foot position
- Bulky zipper ends: Trim excess zipper tape and fold properly during construction
- Corners won’t turn out: Clip closer to stitching line and use point turner gently
The key to successful problem-solving lies in identifying the root cause rather than just addressing symptoms. A zipper that won’t close smoothly might seem like a zipper problem, but it’s often caused by fabric caught in the teeth during construction or inadequate trimming of seam allowances that create bulk.
Your zipper pouch journey next steps and inspiration
Mastering the zipper pouch technique opens doors to countless other sewing projects that incorporate similar skills. The confidence gained from successfully installing zippers translates directly to garment construction, where zipper insertion often intimidates beginners. These pouches became my signature handmade gift after friends and family began specifically requesting them for birthdays and holidays.
The versatility of this basic pattern means you’ll never run out of creative possibilities. From tiny coin purses to large travel organizers, the fundamental construction method remains the same while the applications are limitless. I encourage you to start with the basic pattern, master the techniques, then let your creativity guide you toward personalized variations that serve your specific needs.
For beginner-friendly guidance, see the step-by-step tutorial and learn basic pouch assembly at the sewing blog.
Frequently Asked Questions
What supplies do I need to sew a lined zipper pouch?
To sew a lined zipper pouch, you’ll need outer fabric, lining fabric, a zipper that matches your pouch size, fusible interfacing for structure, matching thread, scissors or a rotary cutter, pins, and a sewing machine. Optional items include a zipper foot for easier installation and an iron for pressing seams. These basics will help beginners master how to sew a lined zipper pouch efficiently.
How do I sew a zipper into a bag with lining?
To sew a zipper into a bag with lining, first sandwich the zipper between the outer fabric and lining, right sides facing, and stitch along the edge using a zipper foot. Repeat on the other side, then open the zipper halfway before sewing the sides and bottom of the pouch. This technique ensures a clean finish when learning how to sew a lined zipper pouch, preventing the lining from getting caught.
What are the most common mistakes when sewing a zipper pouch and how can I avoid them?
Common mistakes include not opening the zipper before final sewing, which makes turning the pouch difficult, and mismatched seam allowances leading to uneven edges. To avoid them, always leave the zipper partially open and double-check measurements before cutting. When following a guide on how to sew a lined zipper pouch, pressing seams flat after each step also helps achieve professional results.
How do I choose the right type of zipper for my pouch?
Choose a zipper based on pouch size and purpose: nylon coil zippers are flexible and ideal for small pouches, while metal ones offer durability for heavier use. Ensure the zipper is slightly longer than the pouch opening for easy trimming. This selection is key in tutorials on how to sew a lined zipper pouch to ensure smooth functionality and a polished look.
How do I create a boxed bottom zipper pouch?
To create a boxed bottom zipper pouch, sew the pouch as usual but leave the bottom corners unsewn, then pinch and stitch across each corner to form a box shape. Measure the corner depth based on desired base width, typically 1-2 inches. This method adds dimension and stability, enhancing projects when you learn how to sew a lined zipper pouch for storage or gifts.
What fabrics work best for zipper pouches?
Cotton quilting fabrics are popular for zipper pouches due to their ease of sewing and variety of prints, while canvas or denim provides durability for everyday use. For linings, lightweight cottons or satin prevent bulk. Choosing stable, non-fraying fabrics simplifies the process in beginner guides on how to sew a lined zipper pouch.