Transform Your Home in Just 30 Minutes
After years of working with overwhelmed clients who felt they needed entire weekends to tackle their disorganized homes, I discovered something remarkable: the most successful transformations happen in short, focused bursts. As a professional organizer, I’ve refined this 30-minute approach through hundreds of organizing projects, and I can confidently say that consistent small efforts yield better results than occasional marathon sessions.
My philosophy centers on the reality that most busy people can’t dedicate entire days to organizing, but everyone can find 30 minutes. This approach isn’t about perfection—it’s about creating sustainable systems that fit real life. Through my proven methods, you’ll learn to focus on high-impact areas that deliver immediate visual relief and build momentum for long-term success.
Key Takeaways
- Organizing doesn’t require entire days—30 minutes can create dramatic improvements
- Focus on high-impact areas first for immediate visual results
- Use the proven 5-step system for consistent success
- Maintain organization with simple daily habits that take just minutes
Understanding the 30-Minute Organizing Mindset
The biggest obstacle I see clients face is “organization paralysis”—the overwhelming feeling that leads to postponing organizing until they have “enough time.” I used to fall into this trap myself, waiting for perfect conditions that never came. The breakthrough came when I shifted my perspective from all-or-nothing thinking to progress-focused action.
This mindset shift transforms organizing from a dreaded weekend project into a manageable daily practice. My concept of “progress over perfection” has revolutionized how I approach my own home and how I coach clients. When you embrace the idea that small, consistent efforts compound into significant transformations, organizing becomes less intimidating and more achievable.
Essential Mindset Shifts
- Think zones not rooms—focus on manageable sections
- Focus on function over perfection—prioritize usability
- View organizing as a regular activity not a special event
- Celebrate small victories—acknowledge every improvement
Preparation: Setting Yourself Up for Success
My professional organizing toolkit has evolved over years of practice, but the essentials remain surprisingly simple. The key is gathering everything you need before starting, eliminating the need to search for supplies mid-session. I always prepare my clients by having them collect necessary items in advance, which dramatically improves efficiency and focus.
My personal pre-organizing ritual includes setting up my environment for maximum productivity. This preparation phase is crucial—it creates the mental space needed for quick decision-making and prevents the session from derailing due to missing supplies or distractions.
Pre-Session Preparation Steps
- Gather basic supplies (trash bags, donation box, sorting containers)
- Set a timer for 30 minutes
- Put on energizing music
- Have a plan for items that need to leave the space
- Remove distractions (phone notifications, etc.)
Assessing What Needs to Be Done
Before diving into any organizing session, I spend 2-3 minutes doing a professional assessment of the space. This isn’t just about identifying what’s messy—it’s about understanding the root causes of clutter and how organization in one area affects others. I teach clients to see their homes as interconnected systems rather than isolated rooms.
One client’s breakthrough came when we realized their entryway clutter was actually a symptom of poor kitchen organization. Items were piling up by the door because they had no designated home in the kitchen. This assessment revealed the true priority area, making our 30-minute session incredibly impactful.
Pre-Organization Assessment Questions
- What bothers you most about this space?
- What function should this area serve?
- What items naturally belong here?
- What items are creating the most visual clutter?
- Where do misplaced items actually belong?
The Quick-Impact Method: Where to Focus Your Efforts
My professional assessment process focuses on identifying “quick win” areas that will show visible results within 30 minutes. These are spaces that cause visual stress when disorganized but create immediate calm when organized. I call this my “visibility principle”—tackling areas that your eyes naturally gravitate toward when you enter a space.
I’ve learned that certain areas provide more psychological relief than others. A client once told me that organizing their coffee table transformed how they felt about their entire living room, even though we only worked on that one surface. This demonstrates the power of choosing the right focal point for your 30-minute session.
The key is building momentum through early wins. When you start with high-impact areas, you create a positive feedback loop that motivates continued effort. I’ve seen clients gain confidence from one successful 30-minute session that carried them through months of consistent organizing.
| High-Impact Areas (30-min sessions) | Low-Impact Areas (longer sessions needed) |
|---|---|
| Coffee tables and side tables | Entire closet systems |
| Kitchen counters and islands | Basement storage areas |
| Entryway surfaces | Garage organization |
| Bathroom counters and sinks | Attic cleanouts |
| Bedroom dressers and nightstands | Photo and document sorting |
Zone-Based Approach for Different Rooms
I teach clients to “map” their homes into zones that can realistically be tackled in 30 minutes. This approach prevents the overwhelming feeling that comes from trying to organize an entire room at once. Each zone should be small enough to complete successfully within the time limit while being large enough to create visible improvement.
In my own home, I’ve divided my kitchen into five zones: the coffee station, the cooking prep area, the cleaning zone around the sink, the pantry section, and the breakfast nook. This zoning strategy allows me to maintain organization with just one focused session per week, rotating through different zones.
For bedrooms, I typically create zones around the bed area, the dresser section, the closet entrance, and any seating areas. Living rooms might be divided into the entertainment center zone, the main seating area, and the reading nook. The key is making each zone small enough that you can see it through to completion, creating a sense of accomplishment that motivates continued effort.
Create a Sorting System
My professional sorting system has evolved through years of helping clients make decisions quickly and confidently. The traditional “Keep, Donate, Toss” method works, but I’ve added nuances that prevent the common pitfall of just moving things around. My “likes with likes” approach ensures that similar items get grouped together, making it easier to see what you actually have.
The breakthrough moment for many clients comes when they realize that effective sorting isn’t about finding the perfect home for everything—it’s about making quick decisions based on clear criteria. One client finally conquered their paper clutter when we established simple categories: Action Required, Reference, and Trash. This system eliminated the paralysis that had kept them from making any progress.
Essential Sorting Categories
- Keep Here: Items that belong in this specific zone
- Relocate: Items that belong elsewhere in the home
- Donate: Items in good condition that no longer serve you
- Trash: Items that are broken, expired, or unusable
- Decide Later: Items requiring more thought (limit to 3-5 items)
My 5-Step System for 30-Minute Organization
This signature system emerged from hundreds of organizing projects and represents the most efficient sequence for transforming any space. Each step builds on the previous one, creating momentum while preventing the “worse before better” problem that derails many organizing attempts.
I’ve used this exact system with overwhelmed clients who thought their spaces were hopeless. The structure provides a clear roadmap that eliminates decision fatigue about what to do next. One client said this system finally gave them the confidence to tackle organizing independently because they knew exactly what to do at each stage.
The time allocations are guidelines based on typical spaces, but the sequence remains consistent regardless of the specific area you’re organizing. The beauty of this system is its flexibility—you can adapt it to any space while maintaining the proven workflow that delivers results.
What makes this system particularly effective is that each step has a specific purpose and clear endpoint. You’re not just randomly tidying—you’re following a professional methodology that ensures every minute is productive and moves you toward your goal.
The 5-Step System Breakdown
- Assess (2 minutes): Quick evaluation of the space and decision on focus area
- Sort (10 minutes): Rapid categorization using the sorting system
- Decide (8 minutes): Apply decision-making shortcuts to each category
- Arrange (7 minutes): Place remaining items in logical, functional locations
- Maintain (3 minutes): Set up simple systems to prevent re-accumulation
Decision-Making Shortcuts to Save Time
The decision-making frameworks I teach in my organizing workshops eliminate the emotional paralysis that slows down organizing sessions. My “10-second rule” requires making a decision about each item within 10 seconds, preventing the overthinking that kills momentum. This technique works because most organizing decisions are actually straightforward—we just overcomplicate them.
I help clients navigate tough decisions by reframing the question from “What if I need this someday?” to “Is this item actively serving my current lifestyle?” This shift has helped countless clients release items they were keeping out of guilt or fear rather than genuine need or love.
Quick Decision-Making Questions
- When was the last time this was used?
- Would I buy this again today?
- What’s the worst that could happen if I let this go?
- Does this item deserve the space it’s taking up?
- Is this item actively serving my current lifestyle?
Make a Quick Sweep
My “quick sweep” technique is always the first thing I do when working with clients because it creates immediate momentum and dramatic visual improvement. This involves rapidly removing obvious trash and clearly misplaced items—things that don’t require any difficult decisions but create significant visual clutter.
I once worked with a client whose home office looked completely chaotic, but a 5-minute quick sweep revealed that 70% of the visual clutter was actually just obvious trash and items that belonged in other rooms. This simple step created such immediate relief that the client was energized to tackle the remaining organizing tasks with enthusiasm.
How to Clean a Messy Room in 30 Minutes
Bedrooms present unique challenges because they often become dumping grounds for clothing, personal items, and miscellaneous belongings. My specialized approach for bedrooms focuses on creating immediate visual calm through strategic surface clearing, starting with the bed as the room’s focal point.
I helped a client transform their chronically messy bedroom using my “bed clearing” technique as the foundation. By making the bed the first priority and keeping it clear throughout the session, we created a visual anchor that made the rest of the room feel more organized even as we worked on other areas.
The key to bedroom organization is understanding that clothing typically represents the biggest challenge, so I’ve developed rapid sorting methods specifically for wardrobe items. My approach prevents the common problem of moving clothing piles from one location to another without actually making decisions about what to keep.
Bedroom Organization Sequence
- Clear the bed first: Horizontal surfaces create visual calm
- Rapid clothing sort: Keep, launder, donate categories
- Floor clearing: Work in one direction around the room
- Surface organization: Nightstands, dressers, desks
- Quick reset: Pillows, throw blankets, final touches
Stay Focused: Breaking Down Spaces Into Manageable Zones
My zone-focus approach helps clients who repeatedly abandon organizing projects midway through because they become overwhelmed by the scope of work. By breaking spaces into micro-zones, you can maintain concentration and see progress quickly, which sustains motivation throughout the session.
I teach clients to work in a clockwise direction around their chosen zone, which prevents the scattered approach that leads to multiple half-finished areas. This systematic method ensures that you complete each micro-zone before moving to the next, creating a sense of accomplishment that carries you through the entire session.
The psychological benefit of zone-focus cannot be overstated. When you can see clear progress in one defined area, it builds confidence and momentum. I’ve watched clients transform from feeling hopeless about their organizing abilities to confidently tackling new spaces using this focused approach.
Maintaining Your Organized Space
The maintenance systems I install for clients prevent the frustrating cycle of organizing and re-organizing the same spaces repeatedly. My “2-minute rule” is simple: if something takes less than 2 minutes to put away properly, do it immediately rather than setting it down to deal with later.
My personal daily maintenance routine takes just 10 minutes each evening but prevents major clutter accumulation. This evening reset has become so automatic that I barely think about it, yet it maintains the organized spaces I’ve created through my 30-minute sessions.
Daily Maintenance Habits
- One-in-one-out practice: For new purchases, remove something else
- Evening reset routine: 5-minute tidy of main living areas
- “Don’t put it down, put it away” rule: Handle items once
- Mail processing system: Daily sorting prevents paper piles
- “Catch-all” basket: Weekly emptying prevents accumulation
Building a Sustainable Organization Routine
Sustainable routines are built on your specific lifestyle and needs, not generic advice. I help clients identify their natural rhythms and energy patterns to create organizing routines that feel manageable rather than burdensome. My “habit stacking” technique links new organizing behaviors to existing habits, making them more likely to stick.
One client transformed from chronically disorganized to consistently maintained by implementing a simple routine: every Sunday evening, they choose three zones for the upcoming week and schedule 30-minute sessions like appointments. This structure provided the accountability and planning that had been missing from their previous attempts.
| Frequency | Tasks | Duration | Impact |
|---|---|---|---|
| Daily | Evening reset, mail processing | 5-10 minutes | Prevents accumulation |
| Weekly | One 30-minute zone session | 30 minutes | Maintains order |
| Monthly | Donation bag review, deep clean one area | 45 minutes | Prevents buildup |
| Seasonal | Clothing rotation, holiday decoration organization | 2-3 hours | Manages seasonal changes |
Solo or Team Work: Which Is Better?
The decision between solo and collaborative organizing depends on the specific space and relationships involved. I’ve mediated between couples with different organizing styles and learned that shared spaces require clear guidelines and mutual respect for different approaches. Solo organizing offers complete control and eliminates negotiation time, while team organizing can provide motivation and shared accountability.
When working with couples, I establish ground rules before beginning: one person cannot make decisions about the other’s belongings, and criticism is replaced with constructive suggestions. These guidelines prevent the conflicts that can derail collaborative organizing sessions and help partners support each other’s efforts.
| Solo Organizing | Team Organizing |
|---|---|
| Advantages: Complete control, no negotiation time, work at your own pace | Advantages: Shared accountability, motivation, different perspectives |
| Challenges: No external accountability, decision fatigue, heavy lifting alone | Challenges: Conflicting styles, slower decisions, potential conflicts |
| Best for: Personal spaces, initial decluttering, busy schedules | Best for: Shared spaces, motivation challenges, large projects |
Keep It Fun: Making Organization Enjoyable
I’ve learned that making organizing sessions enjoyable dramatically improves both completion rates and long-term success. My “gamification” approaches work especially well with clients who previously dreaded organizing. Simple changes like upbeat music, reward systems, or combining sessions with enjoyable activities transform the experience from chore to satisfaction.
My personal routine includes creating energizing playlists and setting up small rewards for completing sessions. I also combine organizing with audiobooks or podcasts, which makes the time pass quickly and gives me something to look forward to. These small changes have made maintaining my own home feel less like work and more like self-care.
Ways to Make Organizing More Enjoyable
- Create energizing playlists that match your 30-minute sessions
- Set up a reward system for completed zones
- Combine with audiobooks or podcasts for mental stimulation
- Make it a friendly competition with family or friends
- Celebrate visible progress with before-and-after photos
Common Pitfalls to Avoid
Through years of coaching clients, I’ve identified the most common obstacles that derail organizing sessions. Getting distracted by memorabilia is perhaps the biggest time-waster—I’ve seen 30-minute sessions turn into 2-hour memory trips. The solution is scheduling separate time specifically for reminiscing about sentimental items.
Early in my organizing career, I made the mistake of buying organizing products before understanding what I actually needed. This led to a closet full of unused bins and baskets that became clutter themselves. Now I always organize first, then buy only what’s necessary to maintain the systems I’ve created.
Common Pitfalls and Solutions
- Getting distracted by memorabilia: Schedule separate time for memory items
- Trying to organize without deciding: Decisions first, then organization
- Perfectionism paralysis: Progress over perfection mindset
- Organizing without systems: Simple containers and labels
- Buying organizing products too soon: Organize first, buy second
Final Thoughts: Transform Your Home in Minutes, Not Days
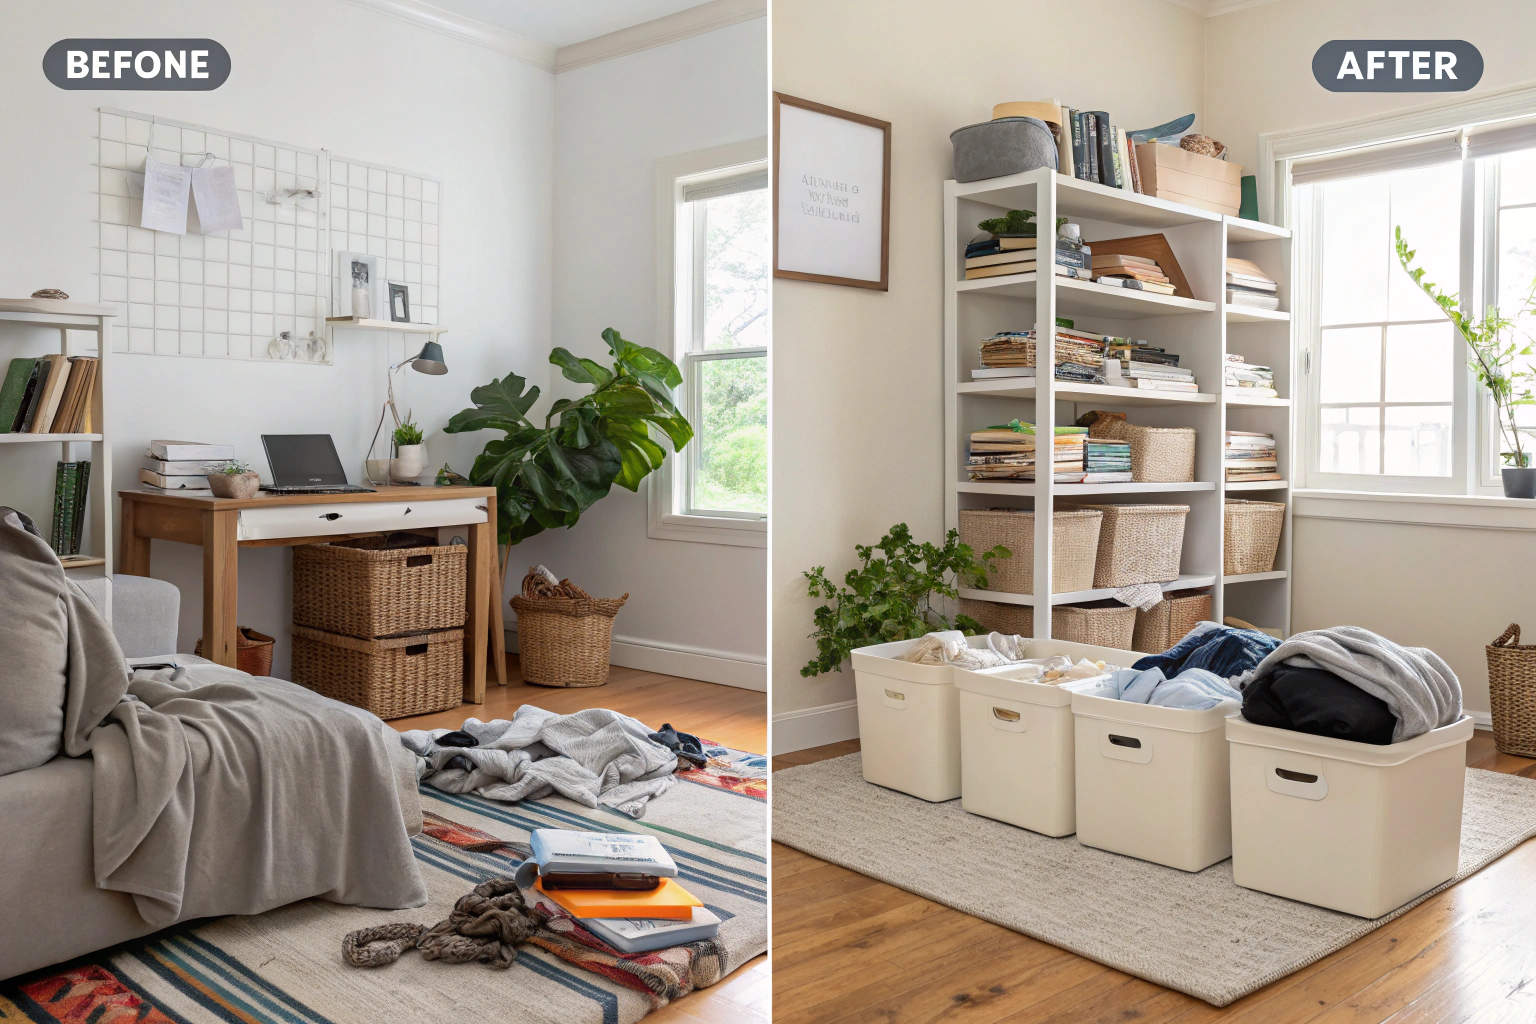
The cumulative effect of consistent 30-minute organizing sessions has transformed more homes than any weekend marathon I’ve ever witnessed. One client’s entire home was revolutionized over six months through just one focused session per week. The before-and-after photos looked like a complete renovation, but it was achieved through small, consistent efforts that fit into a busy lifestyle.
My parting advice to every organizing client is simple: consistency beats intensity every time. Your home doesn’t need a complete overhaul—it needs regular attention in manageable doses. Start with just one 30-minute session this week, and you’ll be amazed at how much progress you can make when you focus your efforts strategically.
Your organized home is part of a larger system of family wellbeing. For more ways to create intentional moments with your child, explore these conversation starters: Fun Questions to Ask Kids.
If you’re designing or reorganizing a nursery, thoughtful color choices can support calm and development. Get inspired by our guide to soothing palettes: Nursery Colour Schemes.
For families on the go, organization extends beyond the home. Plan stress-free trips with our complete checklist: Travel Packing Checklist for Family Trips.
If you’re creating custom storage solutions like handmade quilts or embroidered labels, ensure your sewing machine is properly set up: Set Up Sewing Machine.
Wondering how much fabric you’ll need for DIY organizers? This guide breaks down exactly how big a yard of fabric is: How Big Is a Yard of Fabric?.
Frequently Asked Questions
How to organize your home in 30 minutes?
Use my 5-step system: Assess (2 minutes), Sort (10 minutes), Decide (8 minutes), Arrange (7 minutes), and Maintain (3 minutes). Focus on one zone at a time rather than trying to tackle entire rooms.
What areas of my home can I realistically organize in just 30 minutes?
High-impact areas like coffee tables, kitchen counters, bathroom vanities, bedroom dressers, and entryway surfaces work best for 30-minute sessions. Avoid large storage areas like entire closets or basements.
How do you create an effective sorting system for quick decluttering?
Use five categories: Keep Here, Relocate, Donate, Trash, and Decide Later (limited to 3-5 items). This system prevents the paralysis that comes from too many options while ensuring nothing gets overlooked.
What tools or supplies should I have on hand before starting a 30-minute organization session?
Gather trash bags, a donation box, sorting containers, a timer, and have energizing music ready. Remove distractions like phone notifications and know where donated items will go after the session.
How can I maintain organization after my 30-minute decluttering session?
Implement the 2-minute rule (if it takes less than 2 minutes to put away, do it immediately), establish a daily evening reset routine, and schedule regular 30-minute maintenance sessions to prevent re-accumulation.
Why should you set a timer when organizing your home?
A timer creates urgency that prevents perfectionism and overthinking. It also makes the task feel more manageable and helps you stay focused on high-impact activities rather than getting distracted by less important details.
How do you stay focused during a 30-minute organizing session?
Break your chosen area into micro-zones and work clockwise around the space. Remove distractions, use energizing music, and remember that the goal is progress, not perfection.
What should you do with items you’re unsure about keeping or discarding?
Limit these items to 3-5 per session and place them in a “Decide Later” category. Schedule specific time outside your organizing session to thoughtfully consider these items without derailing your momentum.
How do I prioritize which areas of my home to organize first?
Start with high-visibility areas that cause you the most visual stress when disorganized. These “quick win” areas provide immediate psychological relief and build motivation for tackling additional spaces.
What are the most common mistakes people make when trying to organize their home quickly?
The biggest mistakes are getting distracted by memorabilia, buying organizing products before decluttering, trying to organize without making decisions, and attempting to tackle areas too large for the time available.