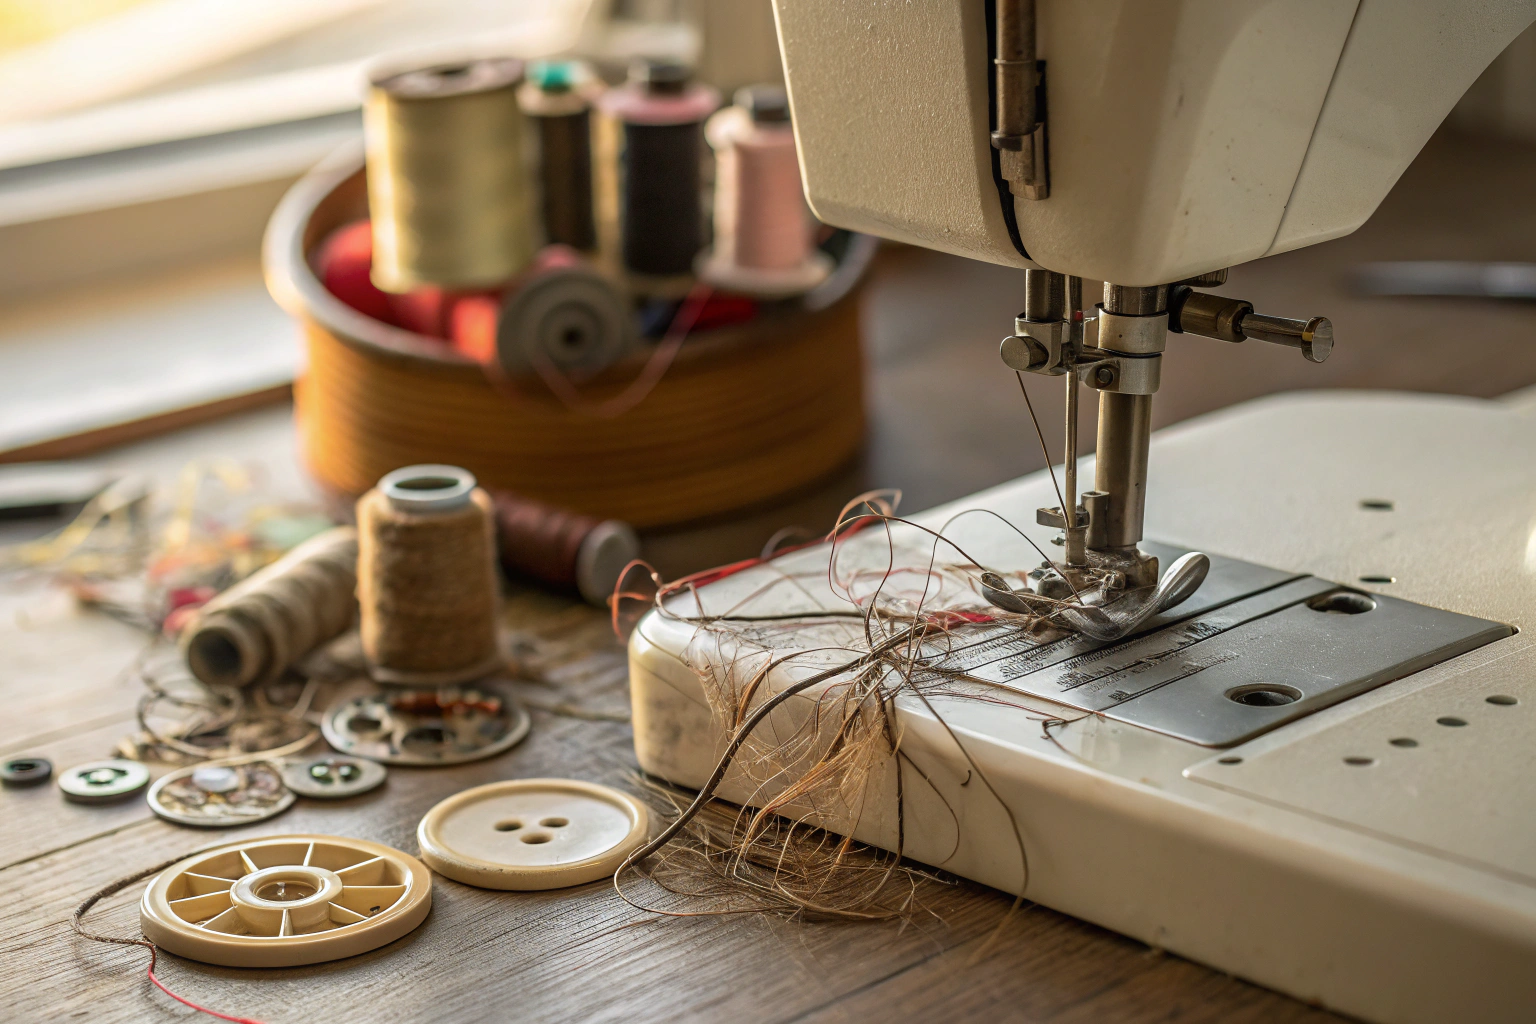
A sewing machine skipping stitches is a common problem where the needle thread and bobbin thread fail to interlock, creating gaps in your seam. This issue often results from a simple setup error, such as using a dull, bent, or incorrect type of needle for your fabric. It can also be caused by improper machine threading or incorrect tension, leading to frustration and weak seams. Fixing skipped stitches is usually straightforward and doesn’t require a professional repair.
Key Benefits at a Glance
- Stronger Seams: Prevent weak points in your stitching that can easily unravel, ensuring your finished projects are durable and long-lasting.
- Save Time & Frustration: Avoid the tedious task of unpicking and re-sewing seams, allowing you to complete your projects faster and with less stress.
- Professional-Looking Results: Achieve clean, continuous stitch lines that give your garments, quilts, and crafts a high-quality, polished appearance.
- Protect Your Fabric: Using the correct needle and settings prevents snags, holes, and damage, especially when working with delicate or specialty materials.
- Extend Machine Life: Regular troubleshooting and maintenance, like cleaning lint buildup, reduce unnecessary wear and tear on your machine’s motor and internal parts.
Purpose of this guide
This guide is designed for home sewists, from beginners to experienced crafters, who need to quickly resolve the problem of a sewing machine skipping stitches. It breaks down the most common causes—such as needle issues, threading errors, and tension problems—and provides simple, step-by-step solutions to fix them. By following these tips, you will learn how to diagnose your machine’s issue, avoid common troubleshooting mistakes, and restore smooth, consistent stitching, ensuring your projects turn out perfectly every time.
Why is my sewing machine skipping stitches my expert troubleshooting guide
I remember the frustration I felt when preparing for a fashion show deadline and my trusty machine started skipping stitches. After twenty-five years of working with everything from vintage Singer machines to modern computerized models, I've encountered this problem countless times in my sewing workshops and repair sessions.
Skipped stitches are one of the most common problems I encounter when teaching students and servicing machines. Through my experience working with hundreds of different machines, I've developed a systematic approach that solves this frustrating issue quickly and effectively.
- Needle issues cause 60% of skipped stitch problems
- Threading path problems are the second most common cause
- Simple maintenance prevents most stitch issues
- Professional help needed only for timing problems
Understanding why sewing machines skip stitches
A properly formed stitch requires precise timing between the needle and the hook mechanism beneath your fabric. When everything works correctly, the needle pierces the fabric, creates a loop that the hook catches, and pulls the bobbin thread through to form a lockstitch. This intricate dance happens dozens of times per second in modern machines.
In my experience, understanding this mechanical process makes troubleshooting much easier. When stitches skip, it means the hook isn't catching the needle thread loop at the right moment. This breakdown can happen due to several factors, from simple needle problems to complex timing issues that I've encountered in my restoration projects.
Common causes of skipped stitches
Through my years of teaching and repairing machines, I've found that skipped stitches typically stem from a handful of common causes. Based on my workshop experience, I can categorize these issues into predictable patterns that make troubleshooting more systematic and effective.
Needle issues the most common culprit
In my professional observation, needle issues account for approximately 60% of skipped stitch problems I encounter in my repair shop. When working on a denim project last month, I discovered that even a slightly bent needle was causing sporadic skipped stitches that had puzzled the machine owner for weeks.
“If stitches are skipping, more often than not, it’s a needle issue. Sewing machine needles have a finite life. Over time they get bent, dulled, and scratched, which impairs their ability to form a proper stitch.”
— Sie Macht Sewing Blog, November 2022
Source link
Always use the correct needle type and size for your fabric—mismatched needles cause skipped stitches and damage: How to Set Up a Sewing Machine.
The wrong needle type for your fabric can also cause persistent skipping. I've seen countless students struggle with ballpoint needles on woven fabrics or universal needles on delicate knits. Each fabric type requires a specific needle design to penetrate properly without deflecting or damaging the material.
- Universal needles: Cotton, polyester, lightweight fabrics
- Ballpoint needles: Knits, jersey, stretch fabrics
- Sharp needles: Woven fabrics, silk, microfibers
- Denim needles: Heavy fabrics, canvas, multiple layers
- Leather needles: Leather, vinyl, heavy non-woven materials
Worn out or damaged needle
I've developed a finger test for detecting bent needles that aren't visibly damaged – I gently roll the needle on a flat surface and watch for wobbling. Even microscopic bends can disrupt the precise timing needed for proper stitch formation. My personal rule is to change needles after every major project or eight hours of sewing, regardless of how they look.
“A bent needle—even one that is ever so slightly bent—can negatively affect the machine’s needle-hook clearance and cause skipped stitches. Whenever I experience skipped stitches, the first thing I do is insert a new needle and see if that solves the problem.”
— The Sewing Machine Newsletter (sewingmachineman.substack.com), May 2024
Source link
I once had a student whose machine skipped stitches intermittently for months. Multiple repair shops couldn't find the problem, but when I examined her needle under magnification, I discovered tiny burrs on the needle eye that were catching the thread. These subtle damages aren't always visible to the naked eye but can cause significant problems.
Threading path problems that cause skips
My personal "from-scratch" threading method has solved more mysterious skipping problems than any other technique in my arsenal. I completely remove all thread from the machine and start over, following each guide point methodically. This approach revealed a threading shortcut that a client had been using for years, which finally explained her persistent stitch problems.
Re-thread your machine carefully, following the manufacturer’s path—clean thread cuts and proper tension are essential: Thread Tension Guide.
One memorable case involved a vintage machine that had stumped three different repair technicians. The owner insisted the machine was threaded correctly, but when I performed my detailed threading inspection, I found the thread had jumped out of a nearly invisible guide near the tension assembly. This single missed step was causing intermittent skipped stitches that appeared random.
I always check my threading path clearance by running my finger along the entire thread route. Any deviation from the intended path can create just enough disruption to cause skipped stitches, especially when combined with other minor issues.
The pull test my go to diagnostic tool
With the presser foot raised, I thread the machine normally using contrasting thread and perform a gentle pull test from the needle end. This diagnostic technique tells me immediately if there's resistance, catching, or binding anywhere in the thread path. The feel should be smooth and consistent without sudden releases or snags.
- Raise the presser foot completely
- Thread the machine normally with contrasting thread
- Gently pull the thread from the needle end
- Feel for smooth, consistent resistance
- Note any catches, snags, or sudden releases
- Use compressed air to clear detected obstructions
This test has helped me identify issues that weren't obvious through visual inspection alone. When I feel irregular resistance, I use compressed air to clean hard-to-reach areas in the tension discs and thread guides. Sometimes lint or thread fragments create just enough obstruction to disrupt stitch formation without completely blocking thread flow.
Check for obstructions along the thread path
My inspection routine covers the entire thread path from spool to needle, including areas that most sewists never think to check. I've found everything from adhesive residue from thread labels to tiny fabric fibers wrapped around tension discs. These seemingly minor obstructions can cause enough thread irregularity to skip stitches.
- Spool pin and cap alignment
- Thread guide positions and clearance
- Tension disc area for lint or thread bits
- Take-up lever movement and clearance
- Needle bar and needle clamp tightness
- Bobbin case area for thread tangles
My technique for testing thread flow involves watching the thread movement during slow manual operation. I look for any hesitation, jumping, or irregular motion that indicates an obstruction. Even checking for needle strikes on the needle plate can reveal alignment issues that contribute to skipped stitches.
Bobbin and tension troubles
I teach a "bobbin drop test" in my sewing classes where students drop their threaded bobbin case and observe how it falls. A properly tensioned bobbin should drop smoothly with a slight pull on the thread, not fall freely or bind completely. This simple test reveals tension problems that aren't obvious during regular sewing.
Bobbin winding quality significantly affects stitch formation in ways many sewists don't realize. I've seen bobbins wound too loosely, too tightly, or unevenly cause intermittent skipped stitches. My personal bobbin winding technique involves consistent speed and tension that creates evenly layered thread without gaps or bulges.
Through years of experience, I've learned to adjust bobbin tension differently than manufacturer recommendations for certain thread types and fabrics. Metallic threads, for example, often require slightly looser bobbin tension than the manual suggests, while heavy threads may need tighter adjustment to maintain proper stitch balance.
Improper tension settings
My methodical approach to tension adjustment starts with understanding that upper and lower tensions work together as a system. I use a two-color thread test – different colors in the needle and bobbin – to see exactly where the threads are locking together. This visual feedback shows me whether tension adjustments are actually improving stitch formation.
| Fabric Type | Upper Tension | Signs of Correct Tension |
|---|---|---|
| Lightweight cotton | 3-4 | Threads lock between fabric layers |
| Medium weight cotton | 4-5 | No puckering, smooth seams |
| Denim/Heavy fabrics | 5-6 | Strong seam, no thread breaks |
| Knit fabrics | 3-4 | Seam stretches with fabric |
| Silk/Delicate | 2-3 | No fabric damage, even stitches |
When tension is the true cause of skipped stitches, I can usually identify it by examining the thread behavior during stitch formation. Inconsistent tension often creates irregular thread loops that the hook mechanism can't catch reliably, resulting in intermittent skipped stitches rather than complete stitch failure.
Maintenance issues I frequently find
The "hidden" lint areas I always check include the bobbin race, behind the needle bar, and inside the upper tension assembly. These locations accumulate debris that gradually affects machine performance in subtle ways. I once restored a vintage machine where lint packed behind the needle bar was causing enough deflection to skip stitches intermittently.
Clean lint from the bobbin area after every project to prevent jams and skipped stitches: Why Does My Sewing Machine Keep Jamming?.
Machine timing issues present unique challenges that I've encountered in several restoration projects. A 1960s Bernina came to my shop with mysterious skipped stitches that only occurred on certain fabric weights. After careful examination, I discovered the timing had drifted just enough to cause problems with heavier fabrics but worked fine on lightweight materials.
My maintenance schedule for my own professional machines includes weekly cleaning of lint-prone areas, monthly deep cleaning with compressed air, and quarterly lubrication of moving parts. This preventive approach has eliminated most stitch problems before they develop into frustrating issues during important projects.
Needle position and timing
Identifying timing issues in my repair work requires understanding the precise relationship between needle position and hook movement. When I suspect timing problems, I watch the hook point as it passes behind the needle – it should catch the thread loop when the needle is at a specific position during its upward travel.
The indicators that tell me a timing issue is present include skipped stitches that occur consistently with certain fabrics, unusual needle deflection during stitching, or thread loops that form but aren't caught by the hook. These symptoms distinguish timing problems from simpler issues like bent needles or threading errors.
My step by step troubleshooting process
I developed this systematic approach after years of helping students and clients with their machines, starting with the simplest and most common fixes first. My philosophy is that 80% of skipped stitch problems can be solved with basic maintenance and adjustments, making complex diagnosis unnecessary in most cases.
First response quick fixes I try immediately
My exact process for checking needles includes the "finger test" I mentioned earlier, plus visual inspection under good lighting for any signs of damage. I keep a variety of needle sizes and types in my immediate toolkit because needle replacement solves the majority of skipped stitch problems I encounter.
- Replace needle with new, correct size for fabric
- Re-thread entire machine from scratch
- Clean bobbin area and remove lint buildup
- Check bobbin winding and proper insertion
- Test on fabric scrap before continuing project
My complete rethreading process includes removing the spool, cleaning the spool pin, and following every thread guide in the exact sequence specified for that machine model. This thorough approach has revealed threading shortcuts and missed guides that caused persistent problems for students who thought they were threading correctly.
The quick-clean technique I use for the bobbin area involves removing the bobbin case, using a lint brush on all accessible surfaces, and checking for thread tangles or debris. Even small amounts of accumulated lint can disrupt the delicate timing needed for proper stitch formation.
Re thread your machine
My personal rethreading sequence differs from manufacturer instructions in one key way – I always clean the thread path before inserting new thread. This extra step removes any residual lint or thread fragments that might cause problems with the fresh threading.
A specific instance where my special threading technique solved a persistent problem involved a student whose machine worked perfectly in class but skipped stitches at home. I discovered she was threading with the presser foot down, which prevented proper thread seating in the tension discs. This subtle difference was causing intermittent tension irregularities.
For threading the needle eye more easily, I use bright lighting and sometimes a needle threader, but I always pull enough thread through to prevent the tail from being pulled back during the first few stitches. This extra thread length prevents threading disruption when starting to sew.
Clean your machine
My personal cleaning routine involves specific tools that I've found work better than the standard accessories most machines include. I prefer a high-quality lint brush, canned air with a precision tip, and small vacuum attachments designed for electronics cleaning.
I once had what seemed like a "miraculous" fix on a machine that had been to two repair shops without success. The owner brought it to me as a last resort before replacement, and thorough cleaning of neglected areas behind the needle bar completely eliminated the skipped stitches. Sometimes the simplest solutions are overlooked in favor of complex diagnoses.
My cleaning sequence follows a specific order based on my repair experience – I start with the bobbin area, move to the upper threading path, then finish with the needle bar and presser foot mechanism. This order prevents cleaned debris from falling into areas I've already serviced.
Check bobbin winding and placement
My technique for assessing bobbin winding quality involves examining the thread layers for evenness and checking that the thread isn't packed too tightly or wound too loosely. Poor winding creates irregular thread delivery that can cause intermittent stitch problems.
My method for inserting the bobbin prevents many common issues I see in my classes. I ensure the bobbin rotates in the correct direction for that specific machine model and that the thread tail is properly positioned according to the bobbin case markings. Even experienced sewists sometimes insert bobbins incorrectly when switching between different machine brands.
Examples of bobbin case problems I've identified in my repair work include worn tension springs, damaged thread guides, and accumulated lint in the race area. These issues often develop gradually, making them difficult for machine owners to notice until skipped stitches become frequent.
Advanced tension adjustments I recommend
My methodical approach to tension adjustment begins with establishing a baseline using medium-weight cotton fabric and quality thread. I make small adjustments – no more than half a number at a time – and test each change thoroughly before proceeding.
My personal tension testing method using different colored threads reveals exactly where the upper and lower threads are meeting. When properly balanced, the thread junction should occur within the fabric layers, not on either surface. This visual feedback guides my adjustment decisions more accurately than relying solely on stitch appearance.
For problematic fabrics like stretch knits or slippery materials, I've developed specific tension combinations that work reliably across different machine brands. These settings often differ from manual recommendations because they account for real-world variables like thread quality, humidity, and machine age.
Preventative measures I follow religiously
My professional maintenance schedule developed over years of intensive machine use includes daily cleaning of the bobbin area, weekly lint removal from threading paths, and monthly deep cleaning with compressed air. This routine prevents the gradual accumulation of debris that causes most stitch problems.
- Quality thread and needles appropriate for fabric
- Lint brush and small vacuum for regular cleaning
- Machine oil recommended by manufacturer
- Seam ripper for removing thread tangles safely
- Magnifying glass for detailed inspections
My "pre-flight check" before starting any important project includes needle replacement, fresh threading, bobbin inspection, and a test seam on fabric scraps. This five-minute routine has prevented countless project disasters by catching problems before they affect finished work.
My seasonal deep-cleaning process involves complete disassembly of accessible parts, thorough cleaning with appropriate solvents, and careful lubrication of all moving components. This level of maintenance keeps my professional machines running smoothly through intensive daily use.
When I recommend seeking professional help
Through my repair experience, I've learned to recognize when a problem extends beyond DIY fixes into mechanical issues requiring professional attention. Persistent skipped stitches after completing all basic troubleshooting steps usually indicate timing problems or internal wear that needs specialized tools and expertise.
- Skipped stitches persist after all basic fixes
- Needle hits needle plate or bobbin case
- Unusual mechanical noises during operation
- Thread breaks repeatedly with proper threading
- Stitch length varies unpredictably
I ask specific questions to assess severity before recommending professional service: Does the problem occur with all fabrics or just certain types? Are the skipped stitches random or in a pattern? Has the machine been dropped or damaged recently? These answers help me determine whether the issue requires mechanical repair or just needs more thorough troubleshooting.
Conclusion keeping your stitches perfect
The main causes we've covered – needle problems, threading issues, tension imbalances, and maintenance neglect – account for the vast majority of skipped stitch problems I encounter in my professional work. Understanding these fundamental causes empowers you to diagnose and fix most issues without expensive repair visits.
- Always start with needle replacement and rethreading
- Clean your machine regularly to prevent problems
- Match needle type and size to your fabric
- Check bobbin winding and placement carefully
- Seek professional help for persistent mechanical issues
Addressing skipped stitches systematically has improved my own sewing quality immeasurably and can do the same for you. With these troubleshooting techniques in your toolkit, you'll spend less time fighting your machine and more time creating beautiful projects. I encourage you to share your own experiences and questions in the comments – helping fellow sewists solve their machine problems is one of my favorite aspects of this craft.
Frequently Asked Questions
Skipped stitches on your sewing machine often occur due to issues like a dull or bent needle, incorrect threading, or improper tension settings, which can disrupt the smooth formation of stitches. When working on projects like sewing patterns for clothing, such as learning how to measure waist for men to ensure a perfect fit, these problems can ruin your quilting machine’s output. To prevent this, regularly check and maintain your machine’s components for optimal performance.
Common causes include a worn-out needle, mismatched thread and fabric types, or bobbin winding issues that affect the stitch loop formation. For enthusiasts using a quilting machine on sewing patterns, understanding how to measure waist for men accurately can help select the right fabric, but machine maintenance is key to avoiding skips. Dirt buildup or using the wrong needle size for thick materials also contributes frequently.
Start by replacing the needle with a new, appropriate one for your fabric, then rethread the machine carefully and adjust the tension as needed. If you’re sewing patterns that require precision, like those involving how to measure waist for men for custom fits, a well-maintained quilting machine ensures even stitches. Test on scrap fabric and clean the bobbin area to resolve persistent issues.
Yes, a worn-out or damaged needle is a primary cause of skipped stitches, as it fails to properly pierce the fabric and form the stitch loop with the bobbin thread. When creating sewing patterns, such as garments where you need to know how to measure waist for men accurately, using a fresh needle on your quilting machine prevents these frustrations. Always inspect and replace needles regularly to maintain stitch quality.
Improper tension can lead to loose or tight stitches, causing skips by preventing the upper and lower threads from interlocking correctly. In projects like quilting machine work on sewing patterns, where precise fits like how to measure waist for men matter, balanced tension ensures professional results. Adjust the dial gradually while testing on similar fabric to achieve the ideal setting.
The best remedies include changing the needle, rethreading the machine, and ensuring the bobbin is wound and inserted correctly. For those using a quilting machine with sewing patterns that involve steps like how to measure waist for men, these fixes restore smooth operation quickly. If issues persist, consult your machine’s manual or a professional for deeper troubleshooting.