
What is fusible interfacing? It is a non-woven or woven material coated on one side with a heat-activated adhesive that is ironed onto the “wrong” side of fabric. It adds body, stiffness, and stability to garment pieces like collars, cuffs, and waistbands, preventing them from stretching or sagging. Common user concerns include choosing the correct weight for their fabric and applying it smoothly without creating bubbles or damaging the material with too much heat.
Key Benefits at a Glance
- Fast Application: Save significant time by simply ironing the interfacing onto your fabric in seconds, eliminating the need for tedious sew-in basting.
- Professional Finish: Achieve crisp, structured collars, cuffs, and plackets, giving your homemade garments a polished, high-quality look.
- Ease of Use: Perfect for beginners, as it requires only a standard household iron for application, making it far more accessible than sew-in alternatives.
- Prevents Stretching: Stabilizes delicate or stretchy fabrics around buttonholes, necklines, and zippers, ensuring they hold their shape during sewing and wear.
- Versatile Compatibility: Available in many weights (light, medium, heavy) and types (woven, non-woven, knit) to properly support almost any fabric, from sheer silks to heavy wools.
Purpose of this guide
This guide is for home sewers and crafters, especially beginners, who want to improve the structure and finish of their projects. It solves the problem of limp, unprofessional-looking garments by explaining how to add stability easily. Here, you will learn how to select the right type of fusible interfacing for your fabric, master the correct application technique with an iron, and avoid common mistakes like bubbling or incorrect temperature settings. Following these steps will help you create durable, polished clothing with clean lines and stable details.
Introduction
I'll never forget the day I discovered the transformative power of fusible interfacing. It was during my third attempt at making a button-down shirt – the first two had been disasters with limp, unprofessional-looking collars that refused to hold their shape. After hours of careful stitching, I was devastated to see another project destined for the scrap pile. That's when an experienced seamstress at my local fabric store introduced me to fusible interfacing, explaining how this thin, seemingly insignificant material could be the difference between amateur and professional-quality sewing. Within minutes of applying it to my collar pieces, I watched in amazement as my fabric transformed from floppy cotton into a crisp, structured foundation that looked like it belonged on a store-bought garment. That moment changed everything about how I approached sewing, and it revealed the secret ingredient that had been missing from all my previous projects.
Key takeaways
- Fusible interfacing is a fabric stabilizer with heat-activated adhesive that bonds to fabric when pressed with an iron
- Choose interfacing weight to match your fabric – lightweight for delicate fabrics, heavyweight for structured projects
- Always identify the bumpy adhesive side before application to avoid the most common beginner mistake
- Use dry heat for most interfacing types, steam only when manufacturer specifically recommends it
- Proper cutting and preparation prevents bubbles and ensures professional-quality results
What is fusible interfacing and my journey with the backbone of quality sewing
Fusible interfacing is essentially the backbone of professional sewing – a thin base material coated with heat-activated adhesive dots that bonds permanently to fabric when pressed with an iron. Think of it as the invisible foundation that gives structure, stability, and shape to areas of your garments that need to maintain their form. When I first started sewing, I couldn't understand why my handmade clothes looked homemade compared to store-bought items. The answer lay in this often-overlooked component that transforms ordinary fabric into something with professional structure and longevity.
Interfacing often requires precise ironing—keep your steam iron clean for best results: How to Clean a Steam Iron.
“Fusible interfacing is a thin non-woven material that adds structure and stability to fabric. It’s great for projects where you need your fabric to hold its shape – such as collars, cuffs, or T-Shirt quilts.”
— The Patch Workshop, Unknown 2024
Source link
The science behind fusible interfacing is beautifully simple. The base material – whether woven, non-woven, or knit – provides the structural support, while tiny dots of thermoplastic adhesive create the bonding mechanism. When heat from an iron reaches the proper temperature, these adhesive dots melt and penetrate the fabric fibers, creating a permanent bond as they cool. This process transforms two separate materials into one cohesive unit with enhanced properties that neither possessed alone.
What makes fusible interfacing indispensable in quality garment construction is its ability to provide support without adding significant bulk or weight. Unlike traditional sew-in interfacing that requires additional stitching and can create thick seam allowances, fusible interfacing becomes one with your fabric, maintaining the original drape while adding exactly the amount of structure needed. I've learned through years of experience that the difference between a collar that looks crisp after multiple washes and one that becomes limp and shapeless lies entirely in the quality and proper application of fusible interfacing.
Types of fusible interfacing I use in my projects
Understanding the different types of fusible interfacing available has been crucial to achieving professional results in my sewing projects. Each type serves specific purposes, and choosing the wrong one can mean the difference between a project that looks handmade in the best way versus one that screams amateur. Through years of trial and error, I've learned that the three main categories – woven, non-woven, and knit – each have distinct characteristics that make them suitable for different applications.
- Woven interfacing – Has grain direction like fabric, maintains drape, best for structured garments
- Non-woven interfacing – No grain direction, versatile application, most common type for general sewing
- Knit interfacing – Stretches with fabric, ideal for knit garments and curved seams
- Specialty interfacing – Water-soluble, tear-away, and other specialized types for advanced techniques
The key to professional results lies in matching the interfacing characteristics to your fabric and intended use. I've seen too many sewers grab whatever interfacing they have on hand, only to end up with projects that are either too stiff, too flimsy, or have an unnatural feel. The investment in learning about these different types pays dividends in every project you complete.
Woven vs non-woven interfacing and what I have learned about their differences
The distinction between woven and non-woven interfacing fundamentally changes how your finished project behaves, and understanding this difference has revolutionized my approach to garment construction. Woven interfacing, constructed like regular fabric with interlaced threads, maintains grain direction and moves with your fabric in predictable ways. Non-woven interfacing, created by bonding fibers together rather than weaving them, offers stability in all directions but can sometimes create a stiffer feel.
| Property | Woven Interfacing | Non-Woven Interfacing |
|---|---|---|
| Grain Direction | Has grain like fabric | No grain direction |
| Stretch | Minimal stretch | Can stretch in all directions |
| Best For | Structured garments, tailoring | General sewing, curves, bias cuts |
| Drape | Maintains fabric drape | Can add stiffness |
| Cost | More expensive | Budget-friendly |
| Durability | Very durable | Good for most projects |
I learned this lesson the hard way when making a silk blouse with a structured collar. My first attempt using non-woven interfacing created a collar that looked artificially stiff against the fluid drape of the silk. When I switched to a lightweight woven interfacing that matched the silk's grain, the collar maintained its structure while moving naturally with the fabric. This experience taught me that woven interfacing is worth the extra cost when working with high-quality fabrics or when the natural drape of the garment is paramount.
“This lightweight, high-quality interfacing is designed to provide strength and stability to your sewing projects. Easy to apply with a hot iron.”
— Sew Yours, Unknown 2024
Source link
The tactile differences between these interfacing types are immediately apparent when you handle them. Woven interfacing feels like a very thin, crisp fabric with a definite grain direction – you can feel the difference when you pull it lengthwise versus crosswise. Non-woven interfacing has a more uniform texture and tears easily in any direction, lacking the structural integrity that comes from interwoven threads. Learn more about interfacing types for additional insights.
Weight matters and how I choose from lightweight to heavyweight for my projects
Matching interfacing weight to your fabric is perhaps the most critical decision in achieving professional results, and it's where I see most sewers make costly mistakes. The weight classification system runs from lightweight through medium to heavyweight, but the key is understanding that the interfacing should support your fabric without overpowering it. I've developed a simple rule over the years: your interfacing should be lighter than your fabric, never heavier, unless you're specifically trying to change the fabric's characteristics dramatically.
| Interfacing Weight | Fabric Types | Best Projects |
|---|---|---|
| Lightweight | Silk, chiffon, voile, lightweight cotton | Blouses, scarves, delicate garments |
| Medium Weight | Cotton, linen, wool suiting, denim | Shirts, dresses, structured tops |
| Heavyweight | Canvas, upholstery fabric, thick wool | Bags, belts, structured jackets, home decor |
My most memorable weight-selection mistake happened early in my sewing career when I was making a cotton sundress. Eager to ensure the bodice would hold its shape, I used heavyweight interfacing throughout the entire front panel. The result was a bodice so stiff it could practically stand on its own – completely destroying the casual, flowing nature of the summer dress design. That expensive lesson taught me to always test interfacing weights on fabric scraps before committing to the entire project.
The key insight I've gained is that you can always add more structure with multiple layers of lightweight interfacing, but you can't easily remove the stiffness from interfacing that's too heavy. For delicate fabrics like silk or chiffon, I often use the lightest weight available and apply it only to the areas that absolutely need structure, like button bands or necklines. For medium-weight fabrics like cotton shirting, a medium-weight interfacing provides the perfect balance of support and natural drape.
Fusible interfacing vs fusible fleece and how I decide which to use
The confusion between fusible interfacing and fusible fleece is one of the most common misconceptions I encounter when teaching sewing, and understanding the distinction is crucial for choosing the right product for your project. While both materials bond to fabric with heat-activated adhesive, they serve completely different purposes in construction. Fusible interfacing provides structure and stability without adding bulk, while fusible fleece adds padding, cushioning, and thermal properties to your projects.
| Feature | Fusible Interfacing | Fusible Fleece |
|---|---|---|
| Purpose | Structure and stability | Padding and cushioning |
| Thickness | Thin, minimal bulk | Thick, adds loft |
| Best For | Collars, cuffs, waistbands | Quilting, pot holders, bags |
| Feel | Crisp, structured | Soft, padded |
| Washability | Machine washable | Machine washable |
I discovered the power of combining both materials when creating a structured tote bag that needed both support and comfort. The bag's handles required fusible interfacing to maintain their shape and prevent stretching under weight, while the body of the bag benefited from fusible fleece to create a padded, professional appearance and protect the contents. Using interfacing alone would have created a bag that was structured but harsh to the touch, while fleece alone wouldn't have provided adequate support for the handles.
The decision process I use is straightforward: if the project needs to maintain its shape and provide structural support, I reach for fusible interfacing. If the project needs cushioning, warmth, or a soft, padded feel, fusible fleece is the answer. For projects that need both properties, I layer them strategically, always applying the interfacing first to the fabric, then adding fleece on top if needed.
Specialty interfacings I use for advanced projects
As my sewing skills evolved, I discovered a world of specialty interfacings that opened up entirely new possibilities for creative projects. These specialized products solve specific technical challenges that standard interfacing cannot address, and while they represent a higher investment, they're invaluable for achieving professional results in advanced techniques. Water-soluble interfacing revolutionized my appliqué work, while tear-away interfacing transformed my embroidery projects from amateur attempts to professional-quality results.
- Water-soluble interfacing – Dissolves completely in water, perfect for temporary stabilization in appliqué and lace-making
- Tear-away interfacing – Removes cleanly after stitching, essential for machine embroidery on delicate fabrics
- Cut-away interfacing – Permanent stabilization for dense embroidery designs that need ongoing support
- Heat-removable interfacing – Disappears with iron heat, ideal for temporary pattern marking and basting
- Stretch interfacing – Maintains fabric stretch while adding stability, crucial for knit garment construction
My introduction to specialty interfacing came through a challenging appliqué project where traditional interfacing created visible bulk and stiffness around the delicate design elements. Water-soluble interfacing allowed me to stabilize the fabric during the intricate stitching process, then completely disappear with a simple water rinse, leaving behind only the beautifully executed appliqué work. This experience taught me that specialty interfacings aren't luxury items – they're professional tools that enable techniques impossible with standard materials.
The cost-benefit analysis for specialty interfacings depends heavily on your project scope and skill level. For occasional hobbyists, borrowing or purchasing small quantities for specific projects makes sense. However, if you're serious about advancing your sewing skills or working on client projects, investing in a basic selection of specialty interfacings pays for itself in the professional quality of your finished work and the time saved troubleshooting problems that the right interfacing prevents entirely.
How I identify the fusible side and avoiding the number one beginner mistake
The most devastating mistake I see beginners make – and one I made myself early in my sewing journey – is applying fusible interfacing with the adhesive side facing away from the fabric. This error is particularly heartbreaking because you don't discover it until after you've invested time in cutting, positioning, and pressing, only to find that nothing has bonded. The interfacing peels away easily, leaving you with wasted materials and the need to start over completely.
Learning to identify the fusible side reliably has become second nature through years of practice, but I remember the uncertainty I felt as a beginner. The adhesive side has a distinctly different texture from the base material – it feels slightly bumpy or rough to the touch, with tiny raised dots that are the heat-activated adhesive. The non-adhesive side feels smooth and uniform, matching the texture of the base interfacing material. I've developed a foolproof identification method: I gently run my fingertips across both sides of the interfacing, and the side that feels like it has tiny grains of sand scattered across it is always the adhesive side.
- Feel both sides with your fingertips – the adhesive side has a bumpy, textured feel from the glue dots
- Look at the interfacing under good lighting – adhesive dots often have a slight sheen or different color
- The adhesive side may appear slightly duller or have a different surface finish than the smooth side
- When in doubt, test a small corner piece on fabric scraps before applying to your project
- Mark the adhesive side with a small pencil dot if you’re cutting multiple pieces and might lose track
My most memorable wrong-side application disaster happened during a rush to complete a jacket for a special event. In my haste, I applied all the interfacing pieces to the wrong side, discovering my mistake only when I tried to press the collar pieces together and nothing stuck. The interfacing had essentially been wasted, and I had to remove it all and start over with new materials. This expensive lesson taught me to always double-check the adhesive side identification, no matter how experienced I've become or how rushed I feel.
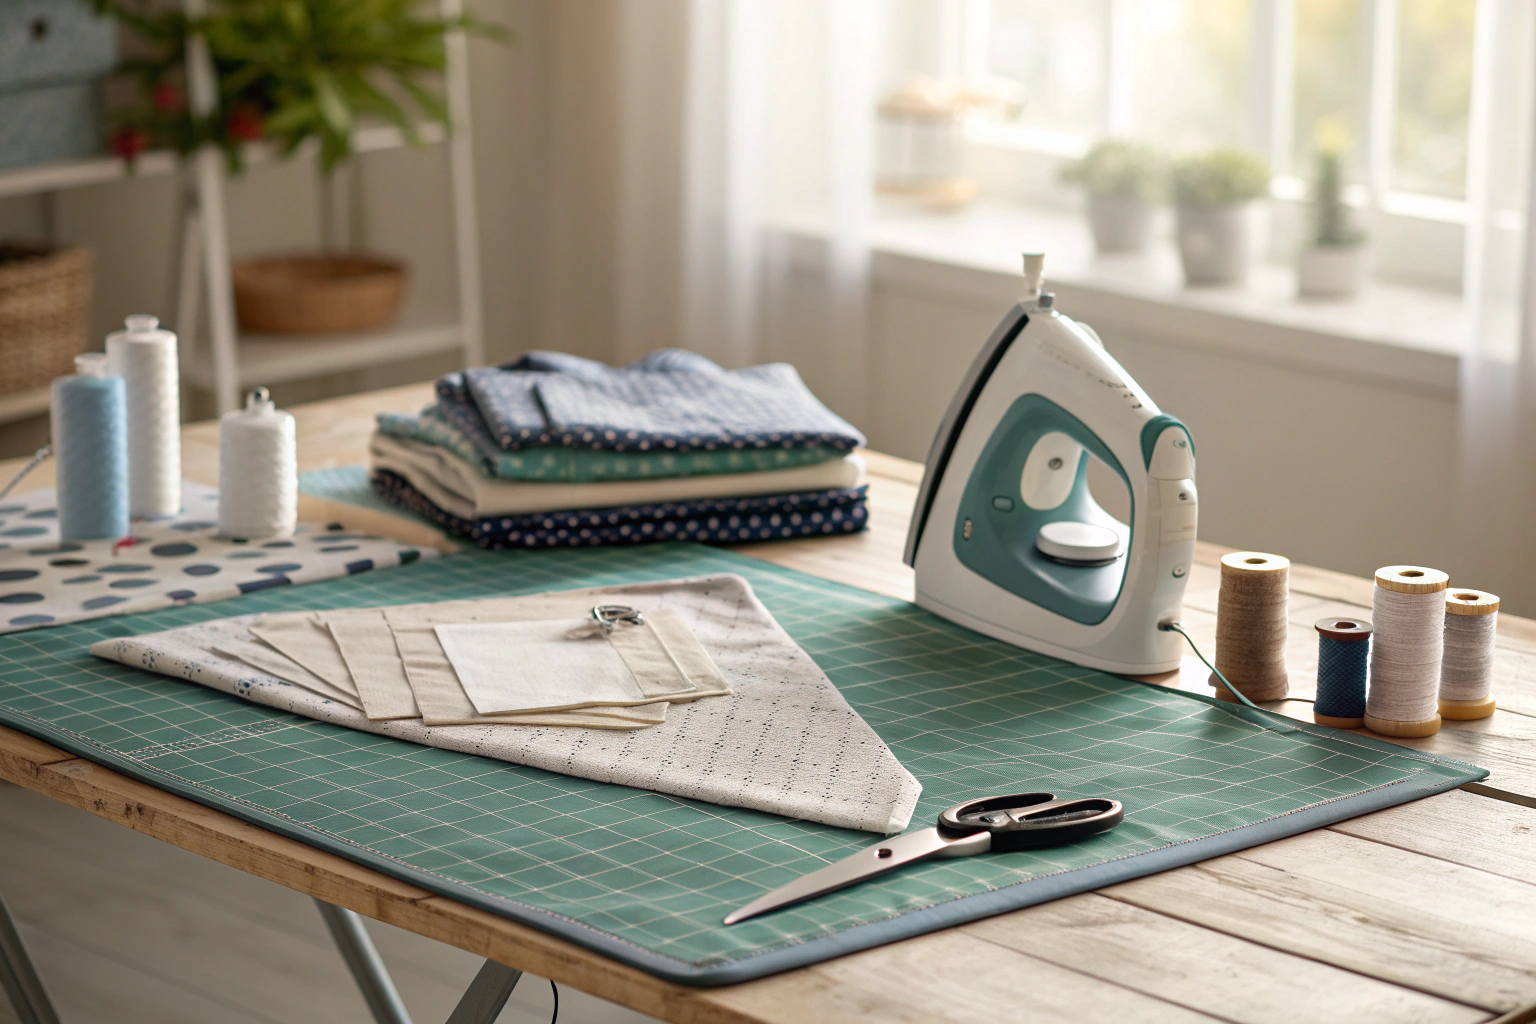
My method for properly cutting and preparing fusible interfacing
Proper preparation of fusible interfacing before application is where professional results begin, and it's a step that many sewers rush through to their detriment. Over the years, I've developed a systematic approach to cutting and preparing interfacing that prevents most of the common problems I see in both student work and online tutorials. The precision invested in this preparation stage pays dividends in the final appearance and durability of your finished project.
- Lay pattern pieces on interfacing with grain direction matching fabric (for woven types)
- Cut interfacing 1/8 inch smaller than pattern piece on all sides to prevent show-through
- Mark any notches or placement marks on interfacing before removing pattern
- Check that you’re cutting from the non-adhesive (smooth) side
- Pre-test interfacing on fabric scraps to confirm compatibility
The most critical aspect of cutting interfacing is understanding when to cut it slightly smaller than your pattern pieces. This technique, which I learned from a master tailor, prevents the interfacing from extending into seam allowances where it can create bulk and interfere with clean finishing. For most applications, cutting the interfacing 1/8 inch smaller on all sides creates the perfect balance – enough coverage to provide structure where needed, but not so much that it complicates construction or shows through to the right side of lightweight fabrics.
My cutting setup includes a dedicated cutting mat marked with grid lines, which helps ensure accurate grain alignment when working with woven interfacing. I always cut interfacing pieces immediately after cutting the corresponding fabric pieces, while the pattern is still fresh in my mind and the workspace is organized. This systematic approach prevents the frustrating situation of having cut fabric pieces but forgotten to prepare the corresponding interfacing, which inevitably leads to rushed preparation and potential mistakes.
The pre-testing step cannot be overstated in importance. Every new combination of fabric and interfacing gets tested on scraps before I commit to the actual project pieces. This test reveals not only whether the adhesion will be successful, but also how the combination affects the fabric's drape, color, and texture. Some interfacings can cause slight color changes in light-colored fabrics, while others might create more stiffness than expected – issues that are much easier to address at the testing stage than after application to your project pieces.
My perfect application technique and how I fuse interfacing every time
The application technique I've perfected over years of professional sewing ensures consistent, bubble-free results that bond permanently on the first attempt. This method combines optimal heat settings, proper timing, and strategic pressure application to activate the adhesive completely while protecting both the fabric and the interfacing from damage. The key insight that transformed my interfacing application was understanding that the bonding process continues even after you lift the iron, which means patience during the cooling phase is just as important as proper heat application.
- Set iron to appropriate temperature for your fabric type (cotton setting for most interfacing)
- Place interfacing adhesive-side down on wrong side of fabric
- Cover with pressing cloth to protect fabric surface
- Press firmly for 10-15 seconds, applying steady pressure without sliding iron
- Lift iron and move to next section, overlapping slightly
- Allow to cool completely before handling – bond strengthens as it cools
- Test bond by gently lifting corner – should be firmly attached
The pressing cloth is non-negotiable in my application process, even when working with sturdy fabrics. This protective layer prevents the iron's direct contact with the fabric surface, eliminating the risk of shine on synthetic fabrics or scorch marks on natural fibers. I use a lightweight cotton pressing cloth that allows heat transfer while providing protection, and I keep several clean ones on hand since they occasionally pick up adhesive residue that needs to be washed away.
Temperature control represents the most critical variable in successful interfacing application. Too little heat fails to fully activate the adhesive, resulting in poor bonding that will fail during use or washing. Too much heat can damage the fabric or cause the adhesive to migrate beyond its intended boundaries, creating stiff spots or visible marks on the right side of the fabric. I've found that the cotton setting on most irons provides the ideal balance for standard fusible interfacing, but I always refer to manufacturer instructions for specialty products. For application tips, check fusible techniques.
The cooling phase requires discipline that many sewers lack. The urge to immediately handle and examine your work is strong, but moving the fabric before the adhesive has completely cooled and set can compromise the bond or create wrinkles that become permanent. I use this cooling time productively by preparing the next pieces for application or organizing my workspace, but I never touch the freshly fused pieces until they've reached room temperature.
Steam or no steam and my secret to getting the best bond
The steam versus dry heat debate in interfacing application has generated more confusion than almost any other aspect of the process, and I've learned through extensive experimentation that the answer depends entirely on the specific interfacing and fabric combination you're using. The general rule I follow is to use dry heat for most fusible interfacing applications, as steam can interfere with proper adhesive activation and create bonding problems that are difficult to correct.
Always prewash fabric before applying interfacing to prevent post-sewing shrinkage: Turn Prewash Into the Essential Laundry Step.
| Interfacing Type | Steam Recommendation | Reason |
|---|---|---|
| Standard Non-woven | Dry heat only | Steam prevents proper adhesive activation |
| Woven Cotton | Light steam acceptable | Natural fibers respond well to moisture |
| Synthetic Specialty | Check manufacturer instructions | Varies by adhesive formulation |
| Stretch/Knit Types | Dry heat preferred | Steam can cause stretching during application |
- Use dry heat for most fusible interfacing – steam can prevent proper bonding
- Check manufacturer instructions – some specialty interfacing requires steam
- Steam works well with natural fiber interfacing on natural fiber fabrics
- Avoid steam with synthetic interfacing as it may cause bubbling
- When in doubt, test on scraps first with both steam and dry heat
My understanding of steam's role in interfacing application changed dramatically after a project where following the manufacturer's steam recommendation resulted in perfect bonding, contrary to my usual dry-heat approach. The interfacing was a natural fiber woven type designed specifically for use with wool suiting, and the manufacturer explicitly recommended steam application. The result was superior to any dry-heat application I had achieved with similar materials, teaching me that blanket rules don't apply to all interfacing types.
The key insight I've gained is that steam affects different adhesive formulations in different ways. Traditional thermoplastic adhesives used in most fusible interfacing can be diluted or cooled prematurely by steam, preventing proper activation and bonding. However, some specialty interfacings use adhesive systems that actually benefit from the moisture and additional heat that steam provides. This is why testing on scraps with your specific combination of fabric, interfacing, and application method is invaluable.
How I troubleshoot common issues with fusible interfacing
Even with perfect preparation and application technique, fusible interfacing can present challenges that require systematic troubleshooting to resolve. Over the years, I've encountered virtually every problem that can occur with fusible interfacing, from minor adhesion issues to complete application failures that seemed to ruin entire projects. The key to successful troubleshooting is understanding that most interfacing problems are fixable if you diagnose the cause correctly and apply the appropriate solution methodically.
| Problem | Cause | Solution |
|---|---|---|
| Bubbling | Too much steam or heat | Use dry iron, lower temperature |
| Poor adhesion | Insufficient heat or pressure | Increase temperature, press longer |
| Creases/wrinkles | Interfacing shifted during pressing | Reheat, reposition, press again |
| Too stiff | Wrong weight interfacing | Remove and replace with lighter weight |
| Peeling edges | Interfacing cut too large | Trim edges, re-press with pressing cloth |
The most dramatic troubleshooting success I experienced involved a client's wedding dress where the interfacing in the bodice had bubbled extensively during application. The seamstress who had started the project was ready to scrap the expensive silk fabric, but I recognized the problem as steam-related bubbling that could be corrected. By carefully reheating the affected areas with a dry iron and using strategic pressure application, I was able to smooth out the bubbles and achieve perfect adhesion. This experience taught me that even seemingly catastrophic interfacing failures can often be salvaged with the right approach.
My systematic troubleshooting process begins with identifying whether the problem occurred during application or developed afterward. Application problems like bubbling, creasing, or poor initial adhesion usually indicate issues with heat, steam, pressure, or timing. Problems that develop later, such as peeling or adhesion failure after washing, typically point to incompatible materials, inadequate initial bonding, or interfacing that has exceeded its shelf life.
The most important lesson I've learned about troubleshooting is that patience and methodical approach succeed where rushed fixes fail. Many interfacing problems can be corrected, but the correction process requires the same careful attention to temperature, timing, and technique as the original application. Attempting to fix problems quickly or with excessive heat often compounds the original issue and can damage the fabric permanently.
My technique for removing creases from fusible interfacing
Creases in fusible interfacing can transform a professional-looking project into an obviously homemade one, but they're among the most correctable problems you'll encounter. The key insight that revolutionized my approach to crease removal was understanding that fusible interfacing remains somewhat repositionable even after initial application, as long as you reheat the adhesive to its activation temperature. This repositionability allows for corrections that would be impossible with permanently set adhesives.
- Reheat the creased area with iron to soften adhesive
- Gently lift interfacing while adhesive is warm and pliable
- Smooth out creases with your hands on both interfacing and fabric
- Reposition interfacing carefully, ensuring no new wrinkles form
- Press again with firm pressure for 15 seconds
- Allow to cool completely before moving fabric
My most memorable crease removal success involved a silk blouse where the interfacing in one collar point had developed a severe diagonal crease during application. The crease was so pronounced that it created a visible line on the right side of the collar, completely compromising the professional appearance I was trying to achieve. Rather than cutting new pieces and starting over, I decided to attempt a correction using the reheating technique I had been developing.
The process required patience and a light touch. I used the tip of my iron to heat just the creased area, working slowly to soften the adhesive without overheating the delicate silk. As soon as I felt the adhesive becoming pliable, I gently lifted the interfacing and smoothed out the crease with my fingers. The key was working quickly while the adhesive remained warm, but not so quickly that I created new problems. After repositioning and re-pressing, the crease disappeared completely, and the collar looked perfect.
This experience taught me that crease removal is most successful when attempted immediately after discovering the problem. As interfacing cools and the adhesive fully sets, creases become increasingly difficult to remove without damaging the fabric. For this reason, I always examine my work carefully while the interfacing is still cooling, when corrections are easiest to make.
How I fix poor adhesion problems
Poor adhesion represents one of the most frustrating interfacing problems because it often doesn't become apparent until you're well into the construction process. The interfacing may seem properly applied initially, only to start peeling away during handling or after the first wash. Understanding the causes of adhesion failure and having reliable techniques for correction has saved countless projects that might otherwise have been abandoned.
- Old interfacing loses adhesive strength – check expiration dates
- Fabric finishes can prevent bonding – pre-wash when possible
- Insufficient heat is the most common cause of adhesion failure
- Pressing too quickly doesn’t allow adhesive to fully activate
- Some synthetic fabrics require higher temperatures than cotton setting
The most challenging adhesion problem I encountered involved a batch of interfacing that had been stored improperly and had lost much of its adhesive strength. The interfacing appeared normal and felt normal to the touch, but it simply wouldn't bond properly no matter how carefully I applied it. After wasting several pieces of expensive fabric trying different application techniques, I realized that the interfacing itself was the problem. This experience taught me to always test interfacing on scraps before using it on projects, especially if the interfacing has been in storage for an extended period.
My systematic approach to fixing adhesion problems begins with identifying the cause. If the interfacing is peeling immediately after application, the issue is usually insufficient heat, inadequate pressure, or contaminated fabric surface. If the adhesion failure occurs later, the problem might be incompatible materials, old interfacing, or washing conditions that exceed the adhesive's capabilities. For immediate adhesion failures, I clean the fabric surface if necessary, then reapply heat with increased temperature and extended pressing time.
The key to successful adhesion repair is understanding that you often get only one chance to correct the problem. Repeated heating and cooling cycles can break down the adhesive or damage the fabric, so it's crucial to diagnose the cause correctly and apply the appropriate fix on the first attempt. This is why I always keep detailed notes about which interfacing brands and types work best with different fabrics – information that becomes invaluable when troubleshooting similar problems in the future.
Creative projects I have enhanced with fusible interfacing
The versatility of fusible interfacing extends far beyond traditional garment applications, and exploring creative uses has been one of the most rewarding aspects of my sewing journey. Over the years, I've discovered that interfacing can transform ordinary fabrics into structural elements for home decor, accessories, and art pieces that would be impossible to create otherwise. These non-traditional applications have not only expanded my creative possibilities but also deepened my understanding of how interfacing affects fabric behavior in different contexts.
Structured drawstring bags benefit greatly from interfacing in the casing: How to Sew a Drawstring Bag.
One of my most successful creative applications involved making fabric storage boxes for my sewing room. By applying heavyweight interfacing to cotton duck canvas, I created boxes that were sturdy enough to hold heavy supplies while maintaining the soft, fabric aesthetic I wanted. The interfacing provided the structural integrity needed for the boxes to hold their shape when filled, while the fabric exterior allowed me to coordinate with my room's decor. This project taught me that interfacing could replace traditional stiffening materials like cardboard or plastic, creating solutions that were both functional and beautiful.
- Fabric bowls and baskets – Heavyweight interfacing creates structure for decorative storage solutions
- Wall art and sculptures – Interfacing allows fabric to hold dimensional shapes for artistic applications
- Structured accessories – Belts, headbands, and jewelry benefit from interfacing’s shape-retention properties
- Home decor elements – Lampshades, picture frames, and decorative panels gain stability from interfacing
- Quilted projects – Interfacing provides foundation for complex quilting techniques and dimensional effects
My exploration of interfacing in quilting opened up entirely new creative possibilities. By strategically applying interfacing to specific areas of quilt blocks, I could create dimensional effects and texture variations that would be impossible with fabric alone. One memorable project involved creating a landscape quilt where interfacing in the mountain areas provided subtle dimensionality that enhanced the three-dimensional illusion. The interfacing was completely invisible in the finished piece, but its structural contribution was essential to the overall effect.
The key insight I've gained from these creative applications is that interfacing's primary value lies not in being seen, but in enabling other materials to perform beyond their natural capabilities. Whether it's allowing a soft fabric to hold a rigid shape or providing the foundation for complex construction techniques, interfacing serves as an invisible partner that makes ambitious projects achievable. This understanding has influenced how I approach all my sewing projects, looking for opportunities to use interfacing creatively rather than just conventionally.
My recommended brands and where I buy quality interfacing
Through years of testing different brands and products, I've developed strong preferences based on consistent performance, reliable adhesion, and good value for the investment. The interfacing market includes everything from budget options that work adequately for simple projects to premium products that deliver professional results worthy of high-end garments. Understanding which brands excel in different applications has been crucial to achieving consistent results across diverse projects.
- Pellon – Reliable adhesion, widely available, good for beginners
- Vlieseline – Premium quality, excellent for professional work
- HTC – Budget-friendly option with consistent results
- Bosal – Specialty interfacing for quilting and crafts
- Freespirit – Eco-friendly options for sustainable sewing
Pellon has been my go-to brand for standard applications because of its consistent quality and widespread availability. Their SF101 lightweight fusible interfacing has never failed me, providing reliable adhesion across a wide range of fabric types. For professional work where absolute reliability is essential, I invest in Vlieseline products, particularly their G700 medium-weight interfacing, which offers superior adhesion and maintains excellent fabric hand even after multiple washings.
My purchasing strategy has evolved to include both online and brick-and-mortar sources, each offering distinct advantages. Local fabric stores allow me to feel the interfacing before purchasing, which is invaluable when matching weight and texture to specific fabrics. However, online suppliers often offer better prices and selection, particularly for specialty types that local stores don't carry. I maintain relationships with both types of suppliers to ensure I can always access the right interfacing for any project.
The evolution of my brand preferences reflects both changes in product quality and my own increasing expertise. Brands that seemed adequate when I was learning basic techniques no longer meet my standards for professional work, while products that once seemed unnecessarily expensive now represent good value when I consider the time and materials they help me avoid wasting. This progression has taught me that interfacing, like other sewing supplies, is worth investing in at a level that matches your skill development and project ambitions.
How mastering fusible interfacing transformed my sewing
Looking back on my sewing journey, I can identify mastering fusible interfacing as the single most transformative skill development in my progression from enthusiastic amateur to confident professional. The difference wasn't just in the technical quality of my finished projects, though that improvement was dramatic and immediate. More importantly, understanding interfacing gave me the confidence to attempt ambitious projects that I had previously considered beyond my abilities.
The transformation began with that first successful shirt collar, but it extended far beyond garment construction. Once I understood how interfacing could provide structure and support, I started seeing possibilities everywhere. Bags that had seemed impossibly complex became achievable when I realized how interfacing could provide the necessary framework. Home decor projects that required structural elements became simple applications of the same principles I was using in garment construction.
For crisp shirt collars or cuffs, interfacing ensures professional results—just like proper hemming: How to Hem Pants.
The professional recognition that followed my improved work opened doors I hadn't expected. Clients began seeking me out specifically for structured garments and complex projects, trusting that I could deliver results that looked professionally made. This reputation was built entirely on the foundation of properly applied interfacing – the invisible element that made all the difference in the finished appearance and durability of my work.
- Start with quality materials – cheap interfacing often creates more problems than it solves
- Always test new combinations of fabric and interfacing on scraps before committing to your project
- Take time to properly identify the adhesive side – this simple step prevents the most common mistakes
- Invest in proper tools like pressing cloths and temperature-controlled irons for consistent results
- View interfacing as a creative partner, not just a functional necessity, to unlock new project possibilities
My advice to sewers at any level is to approach interfacing with the same attention and respect you give to fabric selection and construction techniques. This often-overlooked component has the power to elevate your work dramatically, but only if you understand its properties and apply it correctly. The investment in learning these skills pays dividends in every project you complete, creating a foundation of professional quality that becomes the signature of your work.
The journey from seeing interfacing as a mysterious necessity to understanding it as a powerful creative tool has been one of the most rewarding aspects of my sewing education. Every project now benefits from this knowledge, and the confidence that comes from mastering this fundamental skill continues to open new creative possibilities. Whether you're just beginning your sewing journey or looking to elevate work you've been doing for years, mastering fusible interfacing will transform your results in ways that extend far beyond what you might expect from such a seemingly simple material.
Frequently Asked Questions
Fusible interfacing is a material used in sewing to add structure and stability to fabrics, featuring an adhesive side that bonds when heated with an iron. It comes in various weights and is commonly applied to areas like collars, cuffs, and waistbands to prevent stretching or sagging. When considering projects like tailoring pants, understanding how to measure waist men can help in selecting the right interfacing for a perfect fit.
The main purpose of fusible interfacing is to provide support, shape, and durability to fabric pieces without adding bulk. It helps maintain the structure of garments, such as in buttonholes or hems, ensuring they hold up well over time. For men’s clothing, like shirts or trousers, it can enhance areas where precise measurements, including how to measure waist for men, are crucial for a tailored look.
The fusible side of interfacing is the one with a shiny or rough texture, coated with heat-activated adhesive. Always place this side against the wrong side of your fabric to ensure proper bonding. Identifying it correctly is key, especially in projects requiring accurate sizing, such as learning how to measure waist for men in garment construction.
To apply fusible interfacing, cut it to match your fabric piece, place the adhesive side down on the wrong side of the fabric, and press with a hot iron using steam or a pressing cloth for 10-15 seconds. Move the iron in sections to avoid bubbles, and let it cool before handling. This technique is useful in sewing tasks where structure matters, like reinforcing waistbands after determining how to measure waist men accurately.
Fusible interfacing has an adhesive layer that bonds to fabric with heat, making application quicker and easier, while non-fusible interfacing requires sewing in place for attachment. Non-fusible types offer more flexibility and are better for heat-sensitive fabrics, but fusible is ideal for most projects needing firm support. In men’s apparel design, choosing the right type can complement steps like how to measure waist for men to achieve professional results.


