
The best fabric for beginner sewing projects is a stable, medium-weight woven material like quilting cotton, chambray, or broadcloth. These fabrics don’t slip or stretch, making them very easy to cut, pin, and guide through a sewing machine. This helps new sewers avoid common frustrations like puckered seams and uneven stitches, allowing them to focus on learning fundamental techniques without a difficult material getting in the way. It ensures a smoother, more enjoyable first experience.
Key Benefits at a Glance
- Benefit 1: Stable woven fabrics like cotton don’t slip or warp, leading to straighter cuts and neater seams, which saves time and prevents frustrating rework.
- Benefit 2: Successfully finishing projects with manageable materials encourages you to keep learning and gives you the confidence to tackle more complex patterns later on.
- Benefit 3: Beginner-friendly fabrics press crisply and hold their shape well, helping you achieve clean lines and a polished, professional look for your finished items.
- Benefit 4: The stable nature of these fabrics reduces frustrating issues like skipped stitches, fabric puckering, and unwanted stretching that often discourage newcomers.
- Benefit 5: Materials like quilting cotton are affordable and widely available, allowing for stress-free practice on projects without a significant financial investment.
Purpose of this guide
This guide is for anyone new to sewing who feels overwhelmed by the vast wall of fabric choices at the store. It solves the critical problem of selecting materials that set you up for success, helping you avoid common pitfalls that can derail your first project. You will learn the characteristics of the best fabrics for beginner sewing projects, such as crisp cottons and flannel, and understand why slippery or stretchy materials should be avoided initially. This knowledge will enable you to confidently choose the right fabric for simple garments, home decor, and accessories, ensuring a positive and rewarding experience.
Introduction: Why I believe fabric choice is your key to success
After teaching sewing for over fifteen years, I've witnessed the same scenario countless times: an enthusiastic beginner walks into my workshop with their first project pattern, excited to start their sewing journey. They've chosen a beautiful silk charmeuse for their first blouse, convinced that expensive fabric equals better results. Within thirty minutes, they're frustrated to tears as the slippery material shifts under their scissors and refuses to stay put under the presser foot.
This experience taught me that fabric choice is the single most critical factor in beginner sewing success. The right fabric can transform a challenging pattern into an enjoyable learning experience, while the wrong fabric can derail even the simplest project. In my years of teaching, I've seen confident students become discouraged by fabric choices that worked against them, and hesitant beginners bloom when working with cooperative materials.
The relationship between sewing skills and fabric selection is deeply interconnected. When you understand which textiles will support your learning rather than fight against it, you set yourself up for the kind of early successes that build lasting confidence and enthusiasm for this wonderful craft.
- Cotton is the gold standard for beginners – stable, forgiving, and easy to handle
- Medium-weight fabrics (100-150 GSM) provide the perfect balance for learning
- Stable, non-stretch fabrics prevent common beginner mistakes and build confidence
What makes a fabric beginner-friendly in my experience
Through years of observing students work with different materials, I've identified specific characteristics that consistently lead to successful first projects. Beginner-friendly fabrics share common attributes that make them cooperative partners in the learning process, rather than obstacles to overcome.
The most important quality I look for is dimensional stability – how well a fabric maintains its shape during handling, cutting, and sewing. Fabrics with good dimensional stability don't stretch out of shape when you pin them, don't distort when you cut them, and create even seams without puckering or pulling. This stability gives beginners the predictable behavior they need to build fundamental skills.
Weight plays an equally crucial role in fabric selection. Medium-weight fabrics, typically ranging from 100-150 grams per square meter (GSM), provide the perfect balance for learning. They're substantial enough to handle confidently without being flimsy, yet not so heavy that they create bulk in seams or strain your sewing machine.
The fabric's surface texture and weave structure also significantly impact the beginner experience. Smooth, tightly woven fabrics with minimal surface texture are easier to cut accurately and feed smoothly through the sewing machine. They also show stitching lines clearly, helping beginners maintain consistent seam allowances and straight lines.
- Dimensional stability – fabric holds its shape during cutting and sewing
- Minimal stretch – prevents distortion and uneven seams
- Easy to cut cleanly without fraying excessively
- Forgiving of small mistakes and tension issues
- Medium weight for good structure without bulk
Understanding fabric weight and weave: My teaching approach
One of the most confusing aspects for new sewists is understanding fabric weight and how it affects their projects. I always start by explaining GSM (grams per square meter) as a concrete way to measure fabric weight. This measurement tells you how much one square meter of fabric weighs, giving you a standardized way to compare different materials.
In my workshops, I have students handle fabric samples of different weights to feel the difference. A lightweight cotton lawn at 80 GSM feels completely different from a medium-weight quilting cotton at 140 GSM, even though they're both 100% cotton. This hands-on experience helps them understand why weight matters so much in fabric selection.
I remember one student who struggled with her first tote bag project because she chose a beautiful but lightweight cotton voile. The fabric was so thin that it wouldn't hold the bag's shape, and the seams puckered despite her careful sewing. When we switched to a medium-weight quilting cotton for her second attempt, the difference was remarkable – clean seams, professional-looking results, and a huge boost in confidence.
| Weight Category | GSM Range | Pros for Beginners | Cons for Beginners | Best Project Types |
|---|---|---|---|---|
| Lightweight | 50-100 GSM | Easy to handle, less bulk | Can be flimsy, hard to control | Scarves, linings |
| Medium-weight | 100-150 GSM | Perfect stability, forgiving | None for beginners | Shirts, skirts, bags |
| Heavyweight | 150+ GSM | Very stable, professional look | Hard to sew, bulky seams | Jackets, home decor |
Weave structure is equally important but often overlooked. Plain weave fabrics, where threads cross over and under in a simple alternating pattern, are the most stable and beginner-friendly. They don't stretch on the bias as much as other weaves, they cut cleanly, and they're less likely to fray excessively. This is why cotton poplin and quilting cotton, both plain weave fabrics, consistently top my recommendation list.
My three essential qualities for beginner-friendly fabrics
After years of teaching, I've developed a simple three-point checklist that I share with every new student. These qualities have proven themselves time and again in helping beginners achieve success with their first projects.
The fabric selection process becomes much simpler when you focus on these three non-negotiable qualities. I've watched students who followed this checklist consistently produce better results than those who chose fabrics based on appearance alone.
- Medium thickness – not too thick to sew through, not too thin to handle confidently
- Stable with minimal stretch – maintains shape during cutting and prevents seam distortion
- No complex pattern matching required – solid colors or simple prints that don’t need alignment
The first quality – medium thickness – eliminates many potential problems. Fabrics that are too thin become difficult to control and may pucker or distort during sewing. Fabrics that are too thick can be challenging for beginners to sew through cleanly and create bulky seams that are hard to press flat.
Stability is perhaps the most critical quality. When fabric stretches unpredictably during cutting or sewing, it throws off measurements and creates uneven results. I've seen too many promising first projects derailed by fabrics that stretched out of shape during construction.
The third quality – avoiding complex patterns – might seem purely aesthetic, but it has practical implications. Plaids, stripes, and large-scale patterns often require matching at seams, adding complexity that can overwhelm beginners. Starting with solids or simple, small-scale prints allows students to focus on mastering basic construction techniques.
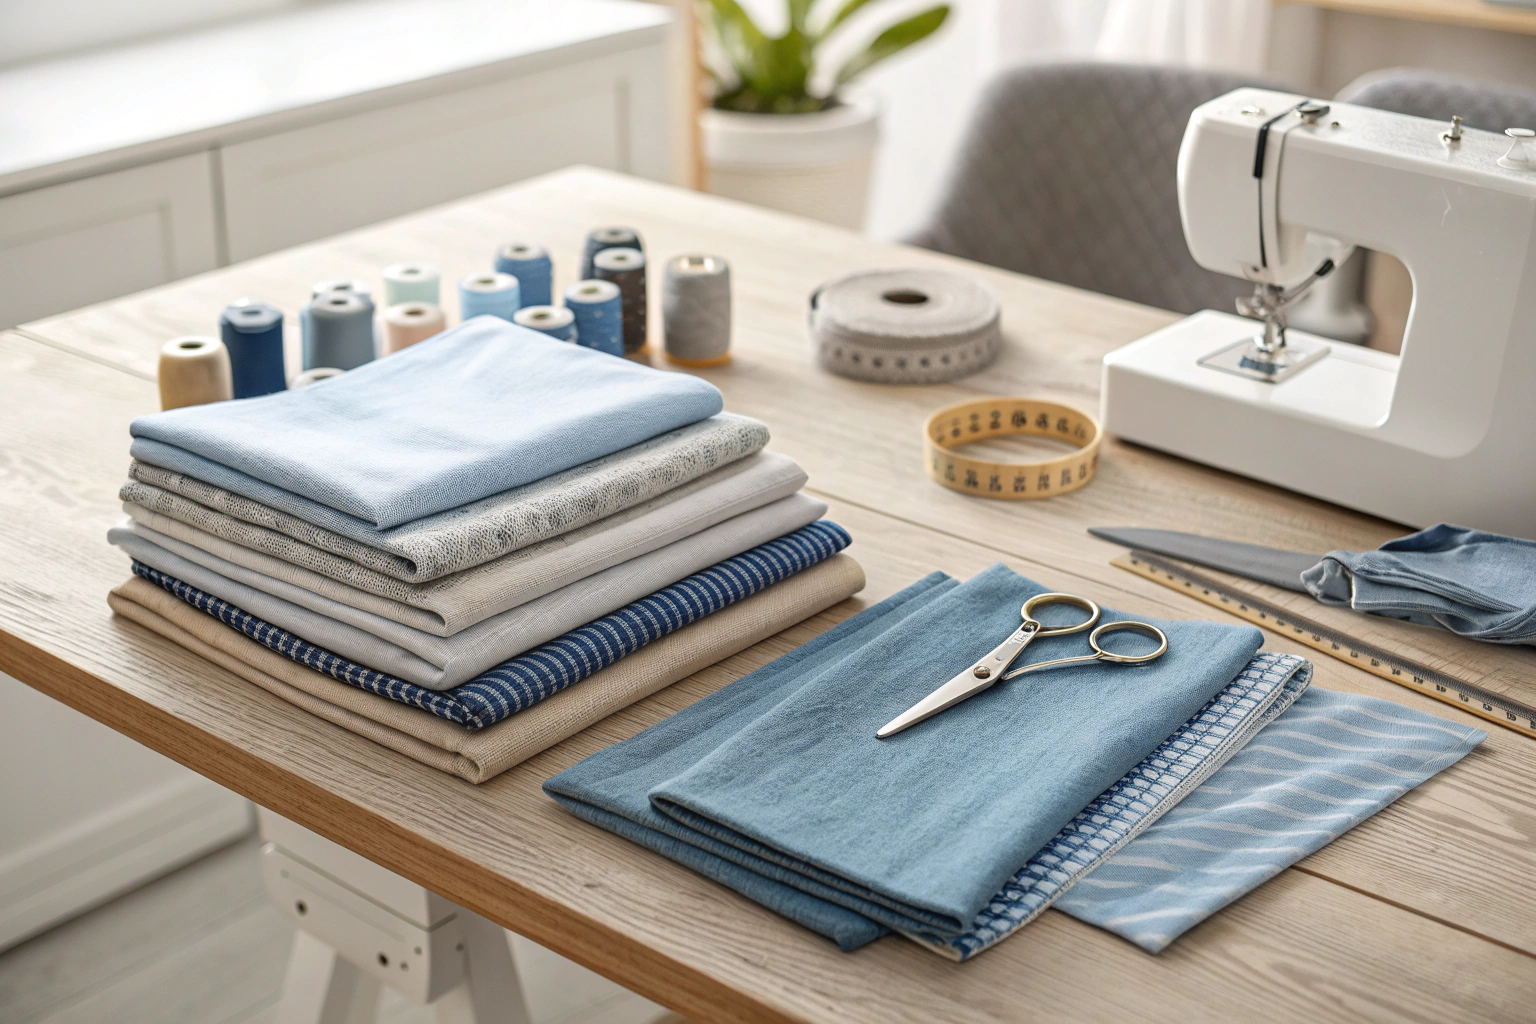
My top 7 fabric recommendations for beginner sewists
Over the years, I've refined my fabric recommendations based on watching hundreds of students work with different materials. These seven fabrics consistently produce the best results for beginners, each offering unique benefits while maintaining the essential qualities of stability, appropriate weight, and ease of handling.
I always tell my students that choosing the right fabric is like choosing the right dance partner – you want someone who will support you, move with you, and make you look good. These fabrics are reliable partners that will help you build skills and confidence with every project.
Each fabric on this list has earned its place through real-world testing in my workshops. I've seen nervous beginners create beautiful, professional-looking projects with these materials, often surprising themselves with what they could accomplish when working with cooperative fabrics.
100% cotton: Why I consider it the gold standard for beginners
Cotton fabric is unquestionably the best starting point for new sewists, and there's solid reasoning behind this recommendation. As a natural fiber, cotton offers breathability, absorbency, and an easy-to-cut texture that responds predictably to both scissors and sewing machine needles. Its natural properties create a stable, workable surface that forgives small mistakes while still producing professional-looking results.
The beauty of cotton lies in its consistency. Unlike synthetic fabrics that can behave differently depending on their specific composition, cotton has predictable characteristics that beginners can rely on. It presses well, creating crisp seams and clean edges. It doesn't shift or slide during cutting like slippery synthetics, and it feeds smoothly through the sewing machine without jamming or puckering.
I remember Sarah, one of my students who was convinced she "wasn't good at sewing" after struggling with a polyester blend for her first project. When we switched to a quality quilting cotton for her second attempt at the same pattern, her transformation was remarkable. The cotton's stability allowed her natural skills to shine through, and she completed a beautiful tote bag that she still uses years later.
- Quilting cotton – structured, stable, perfect for bags and structured garments
- Cotton poplin – smooth finish, ideal for shirts and dresses
- Cotton lawn – lightweight but stable, great for blouses and summer garments
- Cotton twill – diagonal weave adds durability, excellent for pants and jackets
The variety within the cotton family means you can choose the specific type that best matches your project needs. Quilting cotton offers maximum stability for structured projects, while cotton lawn provides a more fluid drape for garments. Cotton poplin strikes a perfect middle ground with its smooth finish and medium weight, making it ideal for shirts and simple dresses.
Cotton-linen blends: My favorite natural fibers with added stability
When students are ready to move beyond pure cotton, I often recommend cotton-linen blends as their next step. These blends combine cotton's stability and ease of handling with linen's natural strength and beautiful texture, creating a fabric that's both forgiving for beginners and sophisticated enough for advanced projects.
The addition of linen fibers to cotton creates a fabric with enhanced dimensional stability. Pure linen can be challenging for beginners because it wrinkles easily and can be somewhat stiff to work with. However, when blended with cotton, usually in ratios like 55% linen/45% cotton, the resulting fabric maintains linen's desirable qualities while becoming much more manageable.
I particularly appreciate how cotton-linen blends press. They hold creases beautifully, making it easy to create sharp, professional-looking seams and hems. The natural fiber content means they're comfortable to wear and improve with age, developing a lovely soft hand after washing.
In my workshops, I've noticed that students often choose cotton-linen blends for their second or third projects because they offer a step up in sophistication without a significant increase in difficulty. The fabric behaves predictably during cutting and sewing, but the finished projects have a more refined appearance that students are proud to wear or display.
Quilting cotton: Why I find it structured and forgiving
Quilting cotton deserves special recognition among cotton fabrics because of its specific characteristics that make it exceptionally beginner-friendly. This fabric is manufactured to meet the exacting standards of quilters, who require precise cutting, stable seaming, and consistent behavior across large projects.
The structure of quilting cotton comes from its specific weight (usually around 140 GSM) and tight plain weave construction. This creates a fabric that holds its shape beautifully during cutting and sewing, making it nearly impossible to stretch out of shape accidentally. The fabric has enough body to support structured projects like bags and home decor items, yet it's not so thick that it creates bulk in seams.
One of the most forgiving aspects of quilting cotton is how it handles mistakes. If you need to use a seam ripper, quilting cotton typically doesn't show needle holes or distortion after correction. This quality is invaluable for beginners who are still learning and may need to redo seams occasionally.
“Cotton lawn is one of the easiest fabrics to work with and it can also provide the best results. It behaves well when cutting and sewing but also has a beautiful drape and range of movement.”
— S.O Sew Dressmaking, Unknown 2024
Source link
I've watched countless students create their first successful projects using quilting cotton. The fabric's predictable behavior allows them to focus on learning proper sewing techniques rather than fighting with difficult materials. Many of my students continue to choose quilting cotton for projects even after they've mastered more challenging fabrics, simply because it's so reliable and produces consistently excellent results.
Chambray: How I introduce denim's friendly cousin
Chambray offers all the aesthetic appeal of denim with significantly better beginner-friendly characteristics. This woven cotton fabric mimics denim's appearance with its blue and white thread combination, but at a much lighter weight that's easier for beginners to handle.
The key advantage of chambray over true denim lies in its weight and structure. While denim can be thick and challenging to sew through cleanly, chambray typically weighs around 120-140 GSM, making it comfortable to work with on standard sewing machines. It doesn't require special heavy-duty needles or adjustments to machine settings, yet it still provides the structured, professional appearance that makes denim so appealing.
In my workshops, I often introduce chambray when students express interest in making shirts or casual dresses with a more tailored appearance. The fabric's stability makes it excellent for learning techniques like buttonholes, collar construction, and topstitching, all of which can be challenging with less stable fabrics.
Chambray also presses beautifully, creating crisp edges and professional-looking seams. The fabric's plain weave construction means it doesn't stretch unexpectedly, and its medium weight provides enough structure to support details like pockets and collars without overwhelming novice sewists.
Flannel: Why I consider it cozy and cooperative
Flannel holds a special place in my beginner fabric recommendations, particularly for students working on their first garment projects. The soft, brushed surface of flannel creates natural grip that prevents the fabric from sliding around during cutting and pinning, making it much easier for beginners to achieve accurate cuts and consistent seam allowances.
This natural grip quality extends to sewing as well. Flannel feeds smoothly through the sewing machine without the shifting or puckering that can plague beginners working with smoother fabrics. The brushed surface also helps hide small imperfections in stitching, making it an incredibly forgiving choice for those still developing their sewing skills.
I particularly recommend flannel for pajamas, baby items, and cozy home accessories because the fabric's intended use aligns perfectly with beginner project types. The casual nature of these projects means that small imperfections won't detract from the finished item's functionality or appeal.
When working with flannel, I do share a few technical tips with my students. The fabric works best with a slightly larger needle (size 90/14 instead of the standard 80/12) and may require a slight reduction in upper thread tension to prevent puckering. However, these minor adjustments are easy to make and help students learn about adapting their techniques to different fabric types.
Medium-weight linen: My recommendation for a step up
While I don't typically recommend linen for absolute beginners, medium-weight linen serves as an excellent "second fabric" for students who have completed a few successful projects with cotton. As a natural fiber, linen offers exceptional strength, breathability, and a beautiful, relaxed drape that improves with each washing.
The key to success with linen lies in timing and expectations. I usually introduce linen to students after they've completed at least three projects with more stable fabrics and have developed confidence in their basic skills. Medium-weight linen (around 150-180 GSM) provides enough structure to be manageable while still offering the characteristic linen texture and appearance.
One of linen's greatest challenges for beginners is its tendency to wrinkle easily. However, I've found that students who understand this characteristic and learn to work with it rather than against it can create beautiful projects. The key is embracing linen's natural relaxed appearance rather than fighting to achieve the crisp precision possible with cotton.
I often recommend linen for simple, unstructured garments like loose-fitting tops, casual pants, or home decor items where the fabric's natural drape enhances the design. The fabric's absorbent qualities and breathability make it particularly appealing for summer garments, and students are often thrilled with the professional, sophisticated appearance of their finished linen projects.
Muslin: Why I consider it perfect for practice
Muslin occupies a unique position in my fabric recommendations as the ultimate practice and testing material. This inexpensive, plain-weave cotton fabric allows beginners to test techniques, practice new skills, and make mistakes without the stress of potentially ruining expensive materials.
The relationship between muslin and cotton makes it an ideal stepping stone for beginners. Since muslin is made from cotton fibers, it behaves similarly to other cotton fabrics in terms of cutting, sewing, and pressing. However, its lower cost and utilitarian purpose remove the pressure that can make beginners overly cautious or nervous when working with their "good" fabric.
In my teaching methodology, I always encourage students to make a muslin version of any new pattern or technique before cutting into their final fabric. This practice builds confidence, reveals fit issues, and allows students to refine their skills without consequences. Many students discover that their muslin versions, while intended as practice pieces, turn out well enough to use as finished items.
Muslin also serves as an excellent fabric for learning basic techniques like seam finishes, hemming methods, and pressing techniques. Its plain, neutral appearance allows students to focus entirely on the construction process without being distracted by patterns or colors. The fabric's forgiving nature means that imperfect practice stitches don't detract from the learning experience.
Fabrics I recommend approaching with caution as a beginner
While I believe in encouraging new sewists to eventually explore all types of fabrics, certain materials present challenges that can derail early sewing success. These fabrics aren't permanently off-limits, but I recommend waiting until you've built solid foundational skills before attempting to work with them.
The key distinction here is timing rather than ability. Many of these challenging fabrics can produce stunning results in experienced hands, but they require specific techniques, tools, or handling methods that beginners haven't yet developed. Attempting to work with them too early can lead to frustration and discouragement that might prevent students from continuing their sewing journey.
I always frame this discussion as "not yet" rather than "never" because I want students to see these fabrics as goals to work toward rather than permanent limitations. Each challenging fabric represents an opportunity for skill development and growth as a sewist.
- Silk – slippery surface makes cutting and pinning difficult
- Jersey knits – excessive stretch causes seam distortion
- Chiffon – transparent and shifty, nearly impossible to cut accurately
- Velvet – pile direction affects appearance, requires special handling
- Leather – cannot be unpicked, requires specialized needles and techniques
I remember one enthusiastic student who insisted on making her first dress from a beautiful silk crepe de chine despite my gentle suggestions to start with cotton. Within the first hour, she had accidentally cut through her pattern paper twice because the silk was so slippery, and her seams were puckering despite careful attention to tension settings. The experience was so frustrating that she didn't return to sewing for six months. When she finally came back, we started with quilting cotton, and she discovered the joy of successful sewing.
“My favourite fabric to sew with is a wool or wool mix as it doesn’t slide around, it has got a good weight to it and it’s just very satisfying to sew with.”
— The Sewing Retreat, Unknown 2024
Source link
The fabrics on this caution list share common characteristics that make them challenging: they may be slippery, stretchy, transparent, or require special handling techniques. Some, like leather, are unforgiving of mistakes because you cannot remove stitches without leaving permanent holes. Others, like jersey knits, require different sewing techniques and specialized equipment that beginners typically don't have.
How I match fabrics to your first projects
The relationship between fabric choice and project type is crucial for beginner success, yet it's often overlooked in pattern instructions. Different project types require different fabric characteristics, and understanding these relationships will help you make better fabric choices for consistently successful results.
When matching fabrics to projects, I consider several factors: the structural requirements of the finished item, the sewing techniques involved, and the skill level required for proper execution. A tote bag, for example, needs fabric with good dimensional stability and enough body to hold its shape when filled. A flowing skirt, on the other hand, benefits from fabric with some drape and movement.
I've developed a systematic approach to fabric-project matching that I share with all my students. This framework takes the guesswork out of fabric selection and helps beginners understand why certain fabrics work better for specific project types.
| Project Type | Best Fabric Choice | Difficulty Level | Time Investment |
|---|---|---|---|
| Tote bag | Quilting cotton or canvas | Beginner | 2-3 hours |
| Pillowcase | Cotton poplin or quilting cotton | Beginner | 1-2 hours |
| Simple A-line skirt | Cotton or cotton-linen blend | Beginner+ | 3-4 hours |
| Button-up shirt | Cotton poplin or chambray | Intermediate | 6-8 hours |
| Pajama pants | Flannel or cotton | Beginner | 2-3 hours |
For structured projects like bags and home decor items, I always recommend fabrics with excellent dimensional stability and minimal drape. These projects need to hold their shape and provide structure, making quilting cotton and similar stable fabrics ideal choices. The fabric's ability to maintain its shape directly impacts the finished project's appearance and functionality.
Garment projects require more nuanced fabric selection. Simple, unstructured garments like elastic-waist skirts or loose-fitting tops can work with a wider range of fabrics, while fitted garments require more careful consideration of drape and stretch properties. Beginning sewists should start with loose-fitting garments that don't require precise fit, allowing them to focus on construction techniques rather than fitting challenges.
My essential tips for working with beginner fabrics
Even the most beginner-friendly fabrics require proper handling techniques to achieve the best results. These fundamental skills, developed through years of teaching workshops, can make the difference between frustrating struggles and satisfying successes, regardless of your experience level.
The preparation phase is where many beginners unknowingly sabotage their projects. Proper fabric preparation ensures that your finished item will maintain its shape and appearance after washing, while poor preparation can lead to distorted seams, puckered surfaces, or size changes that ruin otherwise well-constructed projects.
I've learned that students who take time to properly prepare their fabric consistently produce better results than those who rush into cutting and sewing. This investment of time in preparation pays dividends throughout the construction process and in the longevity of the finished item.
- Pre-wash fabric in the same temperature you’ll wash the finished garment
- Press fabric smooth with appropriate heat setting before cutting
- Use sharp fabric scissors and cut in long, confident strokes
- Pin perpendicular to seam lines every 2-3 inches for stability
- Test stitch tension and length on fabric scraps before sewing project
Each step in this preparation process serves a specific purpose. Pre-washing removes sizing chemicals that can affect how the fabric behaves during sewing and prevents shrinkage that could distort your finished project. Pressing ensures accurate cutting by removing wrinkles and fold lines that can throw off pattern placement.
Sharp scissors are absolutely critical for clean, accurate cuts. Dull scissors can drag fabric threads, creating frayed edges that are difficult to sew cleanly. I always tell my students that good scissors are an investment in every project they'll ever make.
Tools that make a difference in my classroom
The right tools can transform the fabric handling experience, making even challenging techniques manageable for beginners. While you don't need an extensive collection of specialized equipment to start sewing, certain key tools significantly improve your results and make the process more enjoyable.
In my workshops, I've observed how the same student can struggle with a technique using inadequate tools, then immediately succeed when provided with proper equipment. This isn't about expensive tools necessarily, but about having tools that are appropriate for the task and maintained in good working condition.
The sewing machine itself is obviously the most important tool, but its effectiveness depends greatly on proper maintenance and appropriate settings for your fabric. A well-maintained basic machine will produce better results than an expensive machine that hasn't been properly cared for.
- Sharp fabric scissors – clean cuts prevent fraying and ensure accuracy
- Rotary cutter and mat – faster, more accurate cutting for straight lines
- Glass-head pins – won’t melt under iron, easier to see and remove
- Seam ripper – essential for fixing mistakes without damaging fabric
- Universal needles size 80/12 – works with most beginner fabrics
I particularly emphasize the importance of sharp cutting tools because this is where many beginners unknowingly create problems for themselves. Dull scissors or rotary cutters can pull and distort fabric during cutting, leading to pieces that don't fit together properly during construction. The frustration of trying to sew pieces that were poorly cut can overshadow all other aspects of the project.
Glass-head pins might seem like a small detail, but they make a significant difference in the pressing process. Plastic-head pins can melt under the iron, creating permanent damage to both the pins and the fabric. Glass-head pins also tend to be sharper and easier to insert, reducing fabric distortion during pinning.
What I include in my beginner's sewing kit
Over the years, I've refined the essential supplies list I provide to new students, focusing on items that provide the best value and versatility for beginners. This curated kit contains everything needed to successfully complete most beginner projects without overwhelming new sewists with unnecessary specialized tools.
The key to a good beginner's kit is balancing completeness with simplicity. Too few tools and students encounter frustrating limitations; too many tools and they become overwhelmed by choices and expense. This list represents the sweet spot of essential items that will support skill development and project success.
- Universal needles (sizes 70/10, 80/12, 90/14)
- All-purpose polyester thread in basic colors
- Fabric scissors (8-inch minimum)
- Seam ripper and small scissors
- Measuring tape and clear ruler
- Glass-head pins and magnetic pin cushion
The needle selection covers the range needed for most beginner fabrics. Size 70/10 works well with lightweight cottons, 80/12 is perfect for medium-weight cottons and cotton blends, and 90/14 handles heavier fabrics like denim and canvas. Having the right needle size prevents many common stitching problems and ensures clean, even seams.
All-purpose polyester thread provides excellent strength and versatility for most projects. While cotton thread has its applications, polyester thread works well with all the recommended beginner fabrics and is less likely to break during sewing. Starting with basic colors – white, black, navy, and beige – covers most beginner project needs.
How I pre-wash and prepare fabric for my projects
Fabric preparation is perhaps the most overlooked aspect of successful sewing, yet it's one of the most critical for achieving professional results. Proper pre-washing and preparation prevent most of the common problems that can ruin otherwise well-constructed projects.
The pre-washing process serves multiple purposes beyond simple cleanliness. It removes sizing chemicals applied during manufacturing that can affect how the fabric behaves during sewing. It also allows for any shrinkage to occur before cutting, ensuring that your finished project maintains its intended size and proportions after washing.
I always share both success stories and disaster stories with my students to illustrate why this step matters. One student skipped pre-washing her cotton fabric and ended up with a beautiful dress that shrank two sizes after its first wash, while another student's careful preparation resulted in a garment that looked as good after twenty washes as it did when first completed.
- Check fabric care label and pre-wash accordingly
- Dry fabric completely and press while slightly damp
- Square up fabric edges using rotary cutter and ruler
- Lay out pattern pieces following grainline arrows
- Pin pattern securely and cut with sharp scissors
The care label provides crucial information about appropriate washing temperature, drying method, and ironing settings. Following these guidelines during pre-washing ensures that you're treating the fabric the same way you'll treat the finished garment. This consistency prevents unpleasant surprises after your project is complete.
Pressing while the fabric is slightly damp helps remove wrinkles more effectively and creates a smooth surface for accurate pattern layout. However, be careful not to stretch the fabric while it's damp, as this can distort the grain and affect how pattern pieces fit together.
Your fabric journey: How I guide students to more challenging materials
Learning to work with different fabrics is a journey rather than a destination, and I've found that students who understand this progression are more likely to stick with sewing long-term. The key is building skills systematically, using each successful project as a foundation for tackling slightly more challenging materials.
In my experience, students who try to advance too quickly often become discouraged and may even quit sewing altogether. However, those who follow a logical progression develop both the technical skills and confidence needed to eventually work with any fabric they choose. The satisfaction of mastering a new fabric type is one of the great joys of developing as a sewist.
I typically recommend that students complete at least five successful projects with beginner-friendly fabrics before attempting their first challenging material. This foundation ensures they've developed muscle memory for basic techniques and built enough confidence to handle the inevitable learning curve that comes with new fabric types.
- Start with quilting cotton for first 3-5 projects to build confidence
- Progress to cotton blends and chambray for varied textures
- Add flannel and medium-weight linen for seasonal projects
- Advance to lightweight cottons and stable knits after 10+ projects
- Tackle challenging fabrics like silk and chiffon with solid foundation
This progression allows students to gradually expand their skills while maintaining the confidence that comes from working with cooperative materials. Each stage introduces new challenges while building on previously mastered techniques. By the time students reach challenging fabrics, they have the foundation needed to handle the additional complexity successfully.
The timeline for this progression varies significantly among students. Some may feel ready to advance after completing just a few projects, while others prefer to work extensively with familiar fabrics before branching out. The important thing is that each student moves at their own pace and doesn't feel pressured to advance before they're ready.
I always emphasize that there's no shame in returning to easier fabrics for certain projects. Even experienced sewists often choose quilting cotton for quick projects or when they want to focus on learning a new technique without the added complexity of challenging fabric. Fabric choice should always serve the project goals and the sewist's current skill level and confidence.
Frequently Asked Questions
Beginner-friendly fabrics are typically stable, non-slippery, and easy to cut and sew without fraying excessively. They often have a medium weight that handles well under a sewing machine and forgives minor errors like uneven seams. Examples include cotton, which is ideal for projects like learning how to measure waist for men when making simple garments.
As a beginner, start with fabrics like cotton, linen, or flannel, which are stable and easy to work with. Avoid slippery materials like silk or stretchy knits until you gain more experience. These choices help build confidence, especially in projects involving basic measurements such as how to measure waist for men.
Natural fibers like cotton and wool are often better for beginners because they are more predictable and less prone to static or slipping compared to synthetics like polyester. However, some synthetics can be forgiving if they have a stable weave. Ultimately, choose based on your project, such as using cotton for items requiring precise fits like how to measure waist for men.
Fabrics like cotton quilting material, fleece, and medium-weight denim are most forgiving as they hide uneven stitches and don’t pucker easily. They allow beginners to rip out seams without damaging the fabric significantly. This is helpful for practice projects, including those involving body measurements like how to measure waist for men.
Always pre-wash and dry your fabric to prevent shrinkage after sewing, then iron it flat to remove wrinkles. Check for the grainline to ensure straight cuts and align patterns properly. This preparation is key for accurate results, such as in garments where you need to know how to measure waist for men correctly.


