
Learning how to fix a hole in a sweater without sewing involves using materials like fusible bonding web or fabric glue to patch the damage. This method is ideal for anyone who doesn’t own a sewing kit or lacks sewing skills, providing a quick and durable repair for small snags and holes. It works by using heat or adhesive to bond a patch to the inside of the garment, making the repair nearly invisible from the outside and preventing further unraveling.
Key Benefits at a Glance
- Speed & Convenience: Repair your favorite sweater in minutes without needing to thread a needle or learn complex stitches.
- Cost-Effective Solution: Avoid the high cost of professional tailoring or replacing the garment by using affordable, widely available fabric glue or fusible web.
- No Skills Required: These methods are perfect for beginners, as they don’t require any prior sewing experience to achieve a clean, lasting finish.
- Durable & Washable: Modern fabric adhesives create a strong, flexible bond that can withstand regular washing and wearing, ensuring your repair holds up over time.
- Nearly Invisible Repair: By applying a patch from the inside of the sweater, the mend is barely noticeable from the outside, preserving your garment’s original look.
Purpose of this guide
This guide is for anyone who wants to salvage a damaged sweater without using a needle and thread. It solves the common problem of small holes or snags ruining a beloved garment by providing straightforward, no-sew alternatives. You will learn step-by-step techniques using fusible web and fabric glue, discover common mistakes to avoid like using too much adhesive, and be able to confidently perform a long-lasting repair that keeps your knitwear looking its best for years to come.
How to fix a hole in a sweater without sewing
There’s nothing quite like discovering a hole in your favorite sweater. I’ll never forget the moment I found a moth-eaten hole in my grandmother’s cashmere cardigan – the one I’d inherited and treasured for years. Traditional sewing seemed too risky for such a delicate piece, and I was terrified of making it worse. That’s when I discovered the world of no-sew repair methods that would revolutionize how I approach sweater maintenance.
After fifteen years working in textile preservation and countless hours experimenting with different techniques, I’ve developed a comprehensive system for fixing holes without ever picking up a needle. These methods aren’t just convenient alternatives – they’re often more effective than traditional sewing for certain types of damage, especially on knit fabrics where maintaining stretch and drape is crucial.
Whether you’re dealing with a tiny snag that just appeared or a more substantial hole that’s been growing over time, no-sew repair methods can restore your sweater to wearable condition. The key lies in understanding your specific damage type and selecting the right approach. From quick fabric glue fixes that take minutes to more advanced fusible bonding techniques for larger repairs, these solutions work with the natural properties of knit fabrics rather than against them.
Understanding different types of sweater holes before attempting repairs
Before reaching for any repair materials, successful hole repair requires proper diagnosis. Not all sweater damage is created equal, and the type of hole you’re dealing with directly determines which repair method will be most effective. This diagnostic step is crucial because using the wrong technique can actually make the damage worse.
Snag holes are the most common type I encounter, typically caused by catching the sweater on jewelry, rough surfaces, or sharp objects. These holes usually have clean edges and occur suddenly. The good news is they’re often the easiest to repair because the surrounding fabric remains intact and strong.
Moth damage presents a different challenge entirely. These holes tend to have irregular, eaten-away edges and often appear in clusters. Moths prefer natural fibers like wool and cashmere, and their feeding patterns create damage that requires more substantial repair approaches. The edges are typically weakened, making simple glue repairs less effective.
Wear holes develop gradually over time, usually in high-friction areas like elbows, cuffs, or where bags constantly rub against the fabric. These holes have frayed edges and the surrounding fabric is often thinned from repeated stress. They require reinforcement techniques rather than simple edge-to-edge bonding.
| Hole Type | Cause | Edge Condition | Best Repair Method |
|---|---|---|---|
| Small snag | Catching on sharp object | Clean edges | Fabric glue |
| Moth damage | Insect feeding | Irregular edges | Fusible web with fiber |
| Wear hole | Friction over time | Frayed edges | Iron-on patch |
| Tear | Sudden force | Jagged edges | Professional repair |
The size assessment is equally important. Holes smaller than a dime typically respond well to direct bonding methods, while larger holes may require patches or reinforcement. I always measure the hole and examine the surrounding fabric for weakness before selecting my repair strategy.
Edge condition analysis reveals crucial information about repair feasibility. Clean, stable edges indicate the damage is contained and suitable for DIY repair. Frayed or continuing-to-unravel edges suggest the damage is active and may require stabilization before repair. Severely weakened surrounding fabric often indicates the need for professional intervention.
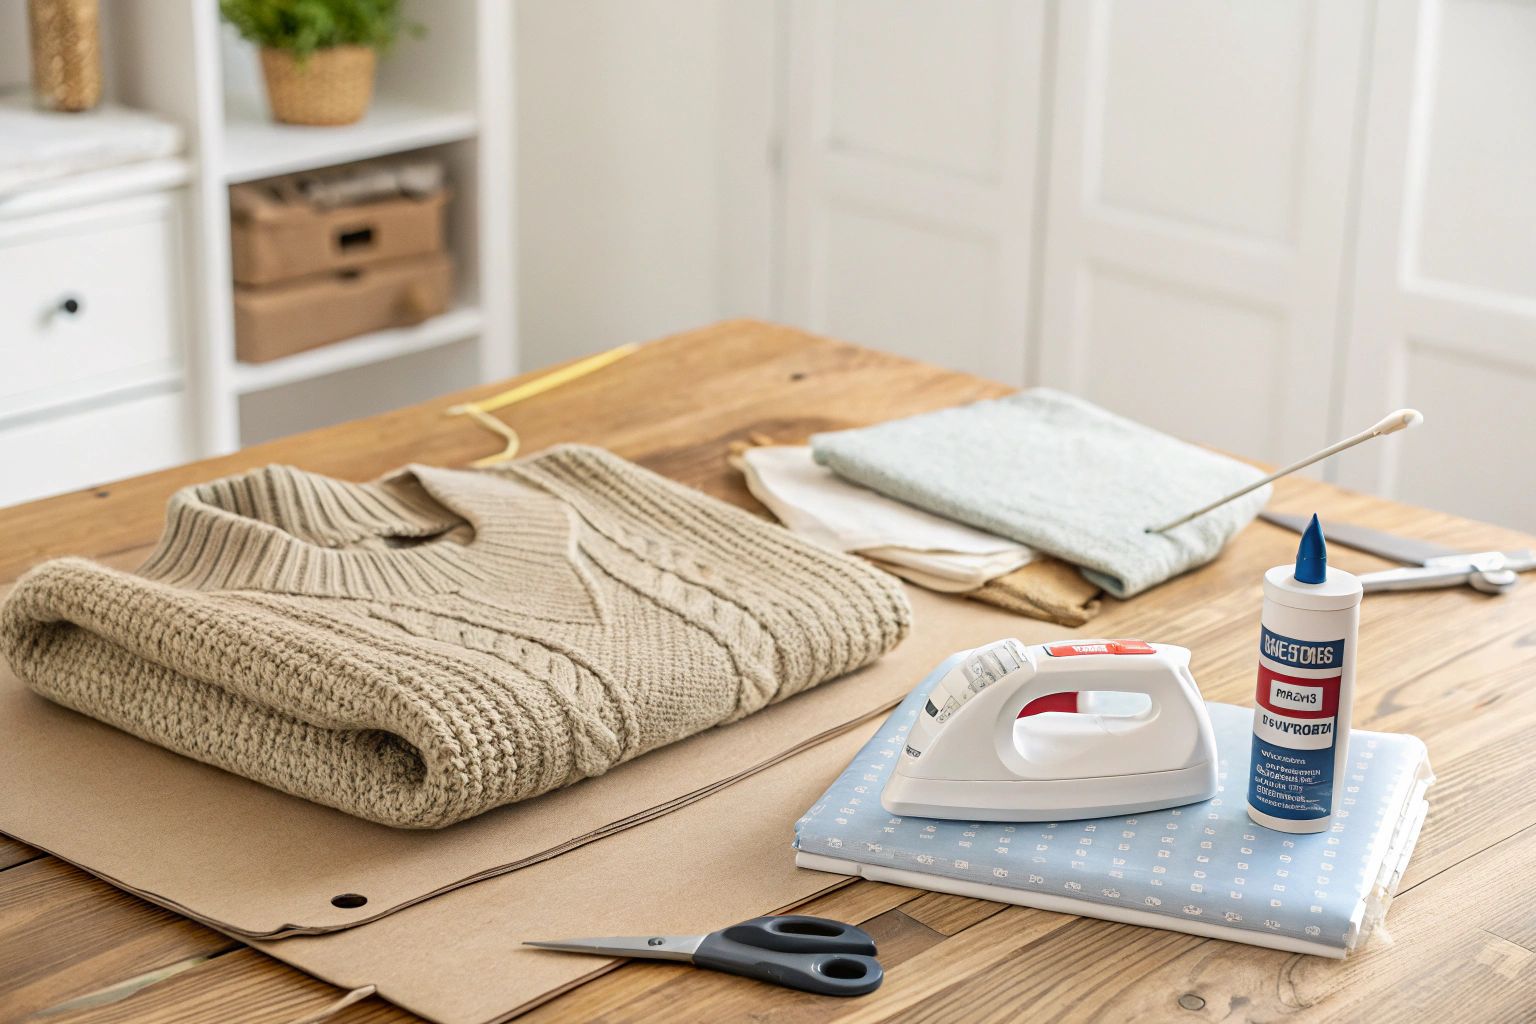
Essential materials for your no sew repair kit
Building an effective repair kit starts with understanding which tools and materials deliver professional results. After testing dozens of products over the years, I’ve narrowed down the essentials that every sweater owner should have on hand. These aren’t expensive specialty items – most can be found at craft stores or online retailers.
Fabric glue forms the foundation of most no-sew repairs. Not all fabric glues are created equal, and I’ve learned this through some disappointing early attempts. Aleene’s Fabric Fusion and E6000 Fabri-Fuse are my top recommendations because they dry clear, remain flexible after curing, and withstand repeated washing. Avoid craft glues or super glues, which create rigid repairs that crack with the natural movement of knit fabrics.
- Fabric glue (Aleene’s Fabric Fusion or E6000 Fabri-Fuse)
- Fusible bonding powder (HeatnBond Ultra Hold)
- Iron-on patches in neutral colors
- Precision applicator tools (toothpicks, tweezers)
- Wax paper or parchment paper
- Small scissors for trimming
- Furniture touch-up markers for concealing residue
Once you have your repair kit ready, it’s just as important to protect the rest of your sweaters from new damage. For smart storage ideas, see How to Store Knitted Items in the Summer.
Fusible web and bonding powders represent the next level of repair sophistication. HeatnBond Ultra Hold is my preferred choice because it activates at relatively low temperatures, making it safe for delicate fibers. The powder form allows for precise application and creates nearly invisible repairs when used correctly.
Iron-on patches serve dual purposes in my repair kit. Beyond their obvious use as visible patches, they can be cut into custom shapes and used as reinforcement backing for other repair methods. I keep a selection of neutral colors – black, white, gray, and beige – that complement most sweater colors.
The precision tools make the difference between amateur and professional-looking repairs. Toothpicks allow controlled glue application, while tweezers help position small fibers or patches exactly where needed. Small scissors with sharp points are essential for trimming excess materials without disturbing the repair.
Protective materials like wax paper and parchment paper prevent repairs from bonding to work surfaces or irons. I learned this lesson the hard way when I accidentally glued a sweater to my kitchen table during an early repair attempt.
Quick no sew fixes for small holes
When you discover a small hole in your sweater, speed often matters more than perfection. These quick fixes can restore wearability in under an hour, buying you time to decide whether a more permanent repair is needed later. The key to success with quick fixes is acting before the damage spreads.
“Using Speed-Sew Premium Fabric Glue, you can quickly repair a hole in your sweater or shirt’s armpit without sewing. Simply apply the glue to the edges of the hole, pinch together, let it set, and your sweater will be wearable again.”
— Speed-Sew, October 2025
Source link
Small snag holes respond beautifully to immediate intervention. The moment you notice a snag, resist the urge to pull on it. Instead, gently push the snagged thread to the inside of the garment and secure it there. This prevents a minor snag from becoming a major hole.
Fabric glue repairs work exceptionally well for holes smaller than a pencil eraser. The trick is using just enough glue to bond the edges without creating visible residue. I’ve found that the “less is more” principle applies strongly here – you can always add more glue, but removing excess is much more difficult.
For emergency repairs when you need to wear the sweater immediately, clear nail polish can serve as a temporary fix. Apply a thin coat around the hole’s edges to prevent further unraveling. This isn’t a permanent solution, but it will stabilize the damage until you can apply a proper repair.
Catching snags before they become holes
Snag prevention and early intervention save countless sweaters from developing holes. I’ve developed what I call the “three-second rule” – the moment you feel a snag happen, stop whatever you’re doing and address it immediately. Those three seconds of attention can prevent hours of repair work later.
The key to snag repair lies in understanding how knit fabrics are constructed. When a thread gets caught and pulled, it disrupts the interlocked loop structure. Rather than cutting the snag, which creates a weak point, the goal is to redistribute the tension and secure the displaced thread.
- Stop wearing the garment immediately when you notice a snag
- Gently push the snagged thread to the inside of the garment
- Use a crochet hook or needle to pull loose threads through to the back
- Apply a tiny dot of clear nail polish to secure the thread ends
- Allow to dry completely before wearing again
Thread redistribution works because knit fabrics have natural elasticity. By gently working the pulled thread back into the fabric structure, you can often eliminate the snag entirely. Use a blunt needle or small crochet hook to coax the thread back into position, working from both sides of the fabric.
Securing techniques ensure the repair stays put. A tiny drop of clear nail polish on the thread ends prevents them from working loose again. For valuable garments, I prefer using a small amount of fabric glue instead of nail polish, as it’s more easily reversible if needed.
Using fabric glue for instant repairs
Fabric glue application requires precision and patience for invisible results. The difference between a professional-looking repair and an obvious patch often comes down to glue placement and quantity. Too much glue creates shiny spots that catch light differently than the surrounding fabric, while too little fails to create a durable bond.
Many people also consult the fabric glue reference for in-depth repair guidance. The toothpick technique revolutionized my glue application method. Instead of applying glue directly from the bottle, I dispense a small amount onto wax paper and use a toothpick to transfer precisely the amount needed to each section of the hole’s perimeter.
- Work on a flat surface with wax paper underneath to prevent sticking
- Apply glue sparingly – less is always more for invisible repairs
- Use a toothpick to control glue placement precisely
- Press edges together gently and hold for 30 seconds
- Allow 24 hours drying time before washing
Drying time varies significantly between glue types and environmental conditions. While most fabric glues feel dry to the touch within an hour, full cure strength takes 24 hours. Rushing this process by washing or wearing the garment too soon can cause the repair to fail.
Temperature and humidity affect glue performance more than most people realize. High humidity can extend drying time, while very dry conditions may cause the glue to skin over before proper bonding occurs. I always check weather conditions before starting repairs and adjust my technique accordingly.
The fabric glue method for medium sized holes
For holes between dime and quarter size, fabric glue becomes my primary repair method. These medium-sized holes require more sophisticated techniques than simple edge-bonding, but they’re still well within the capabilities of quality fabric adhesives. The key is creating a repair that’s both structurally sound and visually acceptable.
Medium hole repairs demand a different approach than small fixes. Instead of simply gluing edges together, you need to create a bridge across the gap that matches the surrounding fabric’s stretch and appearance. This is where understanding fabric structure becomes crucial for successful repairs.
The layered application method I’ve developed over years of experimentation involves building the repair in stages rather than attempting to fill the entire hole at once. This approach creates stronger, more flexible repairs that move naturally with the garment.
Pattern matching separates amateur repairs from professional-looking results. Knit fabrics have directional patterns, and successful repairs maintain these visual lines. I spend considerable time studying the surrounding fabric before beginning any repair, identifying the dominant stitch direction and planning my approach accordingly.
Step by step guide to a professional looking glue repair
Professional glue repairs follow a systematic process that ensures consistent results. This six-step method represents years of refinement and addresses the most common failure points I’ve observed in DIY repairs.
Preparation sets the foundation for success. Clean holes repair better than dirty ones, and stable work surfaces prevent accidental damage during the repair process. I always work in good lighting and allow plenty of time – rushing leads to mistakes.
- Clean the hole area of any loose threads or debris
- Place cardboard inside the sweater to prevent glue seepage
- Apply thin layer of fabric glue using toothpick around hole edges
- Align knit pattern carefully before pressing edges together
- Hold firmly for 60 seconds, then place under heavy book overnight
- Trim any excess dried glue with small scissors
Cardboard backing prevents glue from seeping through to the back of the sweater or bonding front and back panels together. Cut the cardboard slightly larger than the repair area and slide it between the layers before beginning work.
Pattern alignment requires patience but makes the difference between invisible and obvious repairs. Knit fabrics have natural grain lines, and maintaining these during repair keeps the fix from being visually disruptive. Take time to study the surrounding pattern and match it as closely as possible.
Pressure application must be firm but not excessive. Too little pressure fails to create proper bonding, while too much can squeeze out necessary glue or distort the fabric. The overnight book-pressing technique ensures consistent pressure without constant attention.
Fixing glue residue problems
Glue residue represents the most common complaint about fabric glue repairs. Those telltale shiny spots catch light differently than the surrounding fabric and immediately announce “this has been repaired.” Fortunately, most residue problems are preventable and many are correctable.
Prevention strategies work better than correction methods. Using the right amount of glue, applied precisely where needed, eliminates most residue issues. However, when excess glue does create shiny spots, several techniques can minimize their visibility.
- Never attempt to remove dried glue by pulling – this can create larger holes
- Test furniture markers on hidden area first to ensure color match
- Work in good lighting to avoid over-application of concealing products
- Allow each layer to dry completely before adding more coverage
Furniture marker technique represents my most successful residue concealment method. Wood stain markers, available at hardware stores, come in colors that match most sweater tones. The key is selecting a marker slightly darker than the fabric and applying it sparingly to reduce the contrast between shiny glue and matte fabric.
Fabric texture restoration sometimes helps disguise residue by breaking up the smooth, reflective surface. Very light sandpaper (400-grit or finer) can carefully roughen the glue surface, but this technique requires extreme caution to avoid damaging the surrounding fabric.
Fusible bonding products for larger holes
When holes exceed quarter-size or when fabric glue alone isn’t sufficient, fusible bonding products offer superior strength and versatility. These heat-activated adhesives create bonds that are often stronger than the original fabric, making them ideal for high-stress areas or valuable garments that need long-lasting repairs.
“For small to medium holes, iron-on fabric patches and bonding glue offer durable repairs without thread. Place a patch on the inside of your sweater, apply washable fabric glue, let it dry, and your garment is ready to wear again.”
— Red Hanger, April 2024
Source link
Fusible web technology works by melting adhesive fibers when heated, creating a permanent bond as they cool. Unlike liquid glues that can create rigid spots, quality fusible products maintain fabric flexibility and breathability. This makes them particularly suitable for knit garments that need to stretch and move naturally.
My discovery story with fusible products began with what seemed like an “unfixable” cashmere sweater. A client brought me a vintage piece with multiple moth holes, convinced it was destined for the donation pile. Using fusible bonding powder combined with fibers from the sweater itself, I created repairs so invisible that even she couldn’t locate them afterward. That success convinced me these products deserve a place in every serious repair toolkit.
Product selection matters enormously with fusible adhesives. Cheap products often fail to bond properly or create stiff, uncomfortable repairs. HeatnBond Ultra Hold has proven most reliable in my experience, though several other quality brands perform well when used correctly.
Using fusible bonding powder for invisible repairs
Bonding powder represents the pinnacle of invisible repair techniques. When combined with fibers from the garment itself, this method can create repairs that are virtually undetectable even under close examination. The technique requires patience and practice but delivers results that often surpass the original fabric’s appearance.
Fiber collection from the sweater itself ensures perfect color and texture matching. The best source is lint from washing the garment – those annoying fuzzy bits that collect in the dryer are actually perfect repair material. I save this lint in small containers labeled with the garment description for future use.
- Collect lint from sweater’s dryer cycle or gentle brushing
- Sprinkle bonding powder lightly over the hole area
- Layer collected lint over the powder, matching color and texture
- Cover with parchment paper and press with warm iron for 15 seconds
- Allow to cool completely before removing paper
- Brush gently to blend repair with surrounding fabric
Application technique requires building the repair in thin layers rather than attempting to fill the hole completely in one application. Multiple light applications create more natural-looking repairs than single heavy applications. Each layer should be barely visible before adding the next.
Heat activation must be carefully controlled to avoid damage to delicate fibers. Most sweater materials require medium-low heat settings, and using a pressing cloth prevents direct iron contact. The 15-second timing comes from extensive testing – shorter times don’t fully activate the adhesive, while longer times risk fiber damage.
Blending technique integrates the repair with surrounding fabric texture. After the repair cools completely, gentle brushing with a soft-bristled brush helps the repaired fibers mesh with the original fabric nap. This final step often makes the difference between good and invisible repairs.
Working with iron on patches for sweaters
Iron-on patches offer durability and versatility for larger repairs, though they require careful application to avoid heat damage to delicate sweater materials. The key to success lies in understanding how different fibers respond to heat and adjusting technique accordingly.
Heat sensitivity varies dramatically between fiber types, and using the wrong temperature can cause irreversible damage. I learned this lesson painfully when I accidentally melted a section of cashmere while applying excessive heat. That mistake taught me the importance of testing and gradual temperature increase.
| Sweater Material | Iron Temperature | Press Time | Special Considerations |
|---|---|---|---|
| Cotton | Medium-high | 30 seconds | Can handle direct heat |
| Wool | Low-medium | 15 seconds | Use pressing cloth |
| Cashmere | Low | 10 seconds | Minimal pressure, test first |
| Synthetic blend | Medium | 20 seconds | Check care label first |
Patch placement requires strategic thinking beyond simply covering the hole. Consider the garment’s design lines, wear patterns, and overall aesthetic. A well-placed patch can look intentional, while a poorly positioned one immediately screams “repair job.”
Adhesion quality depends on proper preparation and technique. Clean fabric bonds better than fabric with residues from fabric softeners or dryer sheets. Light pressing initially, followed by increased pressure as the adhesive warms, creates stronger bonds than immediate heavy pressure.
Creative patching methods for damage into design
Decorative patching transforms repairs from necessary evils into design opportunities. This mindset shift changes everything about how you approach visible damage – instead of trying to hide problems, you’re creating intentional design elements that enhance the garment’s character and uniqueness.
Design transformation requires thinking like a fashion designer rather than a repair technician. The hole becomes a canvas for creativity, and the patch becomes an opportunity to add visual interest, color, or texture that wasn’t present in the original garment.
If your favorite sweater has already suffered from moths or friction, prevention becomes the next priority. Learn how to keep future holes away in How to Store a Knitted Sweater to Keep Moths Away.
I’ll never forget the compliments I received on a repaired cardigan where moth damage became the inspiration for a constellation of small star patches. What started as an unfortunate accident became one of my most complimented pieces. This experience taught me that visible repairs don’t have to be embarrassments – they can be enhancements.
Strategic placement makes decorative patches look intentional rather than corrective. Consider the garment’s natural design lines, symmetry opportunities, and how patches might create visual flow across the garment. Sometimes adding patches in undamaged areas helps the repair patches look like planned design elements.
No sew appliqué techniques for stylish coverage
Appliqué creation without sewing opens up endless design possibilities while providing effective hole coverage. The key is selecting or creating patches that complement the garment’s style and color palette while effectively concealing the underlying damage.
Custom patch creation allows perfect integration with the garment’s existing aesthetic. I often create patches from coordinating fabrics or even from sections of damaged garments that are beyond repair. This approach ensures color compatibility and often creates more interesting results than store-bought patches.
- Position patches to look intentional – consider garment’s natural design lines
- Layer different sized patches for dimensional effect
- Choose colors that complement rather than exactly match the sweater
- Apply largest patch first, then add smaller decorative elements
- Consider the garment’s overall style when selecting patch shapes
Layering techniques create visual depth and interest while providing extra coverage for larger holes. Start with the largest patch as a base, then add smaller decorative elements in coordinating colors or patterns. This approach can transform simple repairs into sophisticated design features.
Adhesive selection for decorative patches must balance holding power with repositioning flexibility. Some decorative elements benefit from temporary positioning before final bonding, allowing design adjustments. Heat-activated adhesives often work better than liquid glues for decorative work because they don’t show through thin patch materials.
Special techniques for wool and vintage sweaters
Wool and vintage garments require specialized approaches that respect their unique properties and value. These pieces often represent significant investments or sentimental value, making proper repair technique crucial for preservation and continued enjoyment.
Fiber characteristics of wool and cashmere create both challenges and opportunities for repair. These natural fibers felt when exposed to heat and moisture, but this same property can be harnessed for nearly invisible repairs when properly controlled. Understanding these characteristics allows for repair techniques impossible with synthetic materials.
My museum exhibition story illustrates the importance of proper vintage repair techniques. While consulting for a textile exhibition, I encountered a 1940s cashmere cardigan with multiple small holes that threatened to prevent its display. Using specialized felting techniques with the sweater’s own fibers, I created repairs so invisible that museum curators couldn’t locate them without magnification. This experience reinforced my belief that proper technique can preserve both function and value in vintage pieces.
Value preservation considerations affect every aspect of vintage garment repair. Techniques and materials must be reversible when possible, and repairs should enhance rather than detract from the garment’s historical authenticity and collector value.
Repairing wool sweaters using their own fibers
Wool fiber repair represents one of the most sophisticated no-sew techniques available. By using fibers from the garment itself, you can create repairs that are virtually undetectable and perfectly matched in color, texture, and behavior.
Fiber collection requires patience but provides perfect repair material. The best source is the lint trap after washing the damaged garment. These loose fibers are perfectly matched to the original and already softened by the washing process. I also collect fibers by gently brushing the garment with a soft brush over a clean cloth.
- Collect wool fibers from lint trap after washing the damaged sweater
- Separate fibers by color to match the repair area precisely
- Apply small amount of fusible web or use felting needle technique
- Layer matching fibers over the bonding agent in thin, even coats
- Work fibers into the existing knit pattern using gentle circular motions
- Heat-set with iron on low temperature through pressing cloth
Felting needle technique offers an alternative to heat-activated bonding for wool repairs. Felting needles have barbed tips that mechanically entangle fibers, creating strong bonds without adhesives or heat. This technique is particularly valuable for vintage pieces where heat sensitivity is a concern.
Integration method focuses on making repaired areas blend seamlessly with surrounding fabric. The goal is matching not just color but also texture, density, and directional pattern. This requires working slowly and building the repair gradually rather than trying to complete it quickly.
Working with vintage knitwear
Vintage garment repair demands respect for the piece’s history, construction methods, and material composition. These garments often use fiber blends or construction techniques no longer common, requiring adapted repair approaches.
Era-appropriate materials help maintain authenticity when repairs will be visible. Research the garment’s probable age and original construction to select compatible repair materials. Modern synthetics can look obviously out of place on authentic vintage pieces.
- DO test any repair method on an inconspicuous area first
- DO research the sweater’s era to understand fiber composition
- DO document the repair process with photos for future reference
- DON’T attempt repairs on museum-quality or extremely valuable pieces
- DON’T use modern synthetic materials on authentic vintage garments
- DON’T rush vintage repairs – take time to source appropriate materials
Professional consultation becomes important when dealing with truly valuable vintage pieces. Some repairs are best left to textile conservators who specialize in historical garments. Knowing when to stop and seek professional help protects both the garment’s value and your investment in it.
Documentation of repair work helps preserve the garment’s history and provides valuable information for future care. Photograph the damage before repair, document materials and techniques used, and date the work. This information becomes part of the garment’s provenance and can be valuable for insurance or resale purposes.
Preventative care for stopping small holes from getting bigger
Prevention strategies prove far more effective than repair techniques for maintaining sweater condition. Early detection and intervention can prevent minor issues from becoming major problems, saving both time and money while preserving your favorite garments longer.
For additional tips, see the reuse basics page. Early detection requires regular inspection routines that catch problems before they become visible during normal wear. I recommend monthly detailed inspections of frequently worn sweaters, focusing on high-stress areas like elbows, cuffs, and areas where bags or jewelry might cause friction.
Many tiny holes appear after harsh washing routines or the wrong detergent. To avoid this, check out 5 Mistakes When Washing Knitted Items – and How to Avoid Them.
The “first sign intervention” rule has saved countless garments in my experience. The moment you notice a loose thread, tiny hole, or area of thinning, address it immediately. These early interventions take minutes but can prevent hours of repair work later.
- Inspect sweaters monthly for early signs of wear or damage
- Store knits folded rather than hung to prevent stretching
- Use cedar blocks or lavender sachets to deter moths naturally
- Wash sweaters inside mesh bags to reduce friction damage
- Address any snags or loose threads immediately before they worsen
Storage considerations dramatically affect sweater longevity. Hanging knit garments causes shoulder distortion and stretching that creates weak points prone to hole development. Proper folding with acid-free tissue paper prevents creases that can become wear lines over time.
Moth prevention requires understanding these pests’ preferences and habits. Moths prefer natural fibers and are attracted to food stains, perspiration, and dirty fabric. Regular cleaning and proper storage in sealed containers or with natural deterrents like cedar or lavender significantly reduce moth damage risk.
When to skip DIY and seek professional help
Damage assessment requires honest evaluation of both the problem’s scope and your skill level. While no-sew methods can handle many repair situations, some damage exceeds DIY capabilities or involves garments too valuable to risk amateur repair attempts.
Size thresholds provide clear guidelines for professional referral. Holes larger than a quarter, multiple holes in the same garment, or damage that extends to seams or structural elements typically require professional intervention. These repairs need techniques and equipment beyond typical home capabilities.
| Damage Type | DIY Appropriate | Professional Required | Reason |
|---|---|---|---|
| Holes under 1 inch | Yes | No | Manageable with no-sew methods |
| Multiple large holes | No | Yes | Requires structural reconstruction |
| Vintage designer pieces | No | Yes | Preservation of value and authenticity |
| Unraveling seams | No | Yes | Needs proper stitching techniques |
| Cashmere with large tears | No | Yes | Delicate fiber requires expertise |
Value considerations help determine when professional repair justifies its cost. A $20 sweater with extensive damage might not warrant a $50 professional repair, while a $200 cashmere piece or sentimental family heirloom clearly does. Consider both monetary and emotional value when making this decision.
Cautionary experience taught me the importance of knowing my limits. Early in my repair journey, I attempted to fix a complex unraveling problem on a vintage Aran sweater, convinced I could handle anything. The result was additional damage that made professional repair more expensive and less effective. That expensive lesson reinforced the wisdom of seeking help when repairs exceed your demonstrated capabilities.
Professional referrals vary by location, but dry cleaners often provide or can recommend textile repair services. Tailors and alterations specialists may also handle sweater repairs, though their expertise varies. For valuable vintage pieces, textile conservators provide the highest level of expertise, though their services command premium prices.
Conclusion
No-sew repair methods have revolutionized how we can extend the life of beloved sweaters without requiring traditional sewing skills. From quick fabric glue fixes for small holes to sophisticated fusible bonding techniques for larger damage, these approaches offer effective solutions for most common sweater problems.
The techniques covered in this guide represent years of experimentation, refinement, and real-world testing on hundreds of garments. Fabric glue methods provide quick, reliable fixes for small to medium holes, while fusible bonding products offer superior strength for larger repairs. Creative patching approaches transform necessary repairs into design opportunities, and specialized techniques for wool and vintage pieces preserve both function and value.
Preventative care remains the most effective strategy for maintaining sweater condition, but when damage does occur, these no-sew methods provide accessible alternatives to disposal or expensive professional repair. The key to success lies in proper damage assessment, technique selection, and patient application of proven methods.
Remember that garment care extends far beyond repair techniques. Proper storage, regular inspection, and immediate intervention when problems arise will keep your sweaters in excellent condition for years longer than neglect followed by major repairs. These techniques empower you to maintain your wardrobe investment while developing skills that serve you throughout life.
Whether you’re rescuing a favorite sweater or preserving a family heirloom, these no-sew repair methods offer hope where traditional sewing might seem intimidating or impractical. Start with small repairs to build confidence, and gradually tackle more challenging projects as your skills develop. Your favorite knitwear – and your wallet – will thank you for the effort.
Frequently Asked Questions
To learn how to measure waist for men, start by standing straight and finding the natural waistline, which is typically just above the belly button. Use a flexible tape measure, wrap it around your waist snugly without pulling too tight, and note the measurement in inches or centimeters. This method ensures accurate sizing for clothing like pants and belts, helping you avoid common fitting issues.
The waist on a man is generally located at the narrowest part of the torso, right above the hips and below the ribcage, often around the navel area. When figuring out how to measure waist for men, locating this spot correctly is crucial for precise results. This positioning helps in getting the right fit for apparel and monitoring health metrics like waist circumference.
For how to measure waist men accurately, you’ll need a flexible measuring tape, which is soft and can conform to your body shape. A mirror can help ensure the tape is level all around, and wearing minimal clothing ensures the measurement is precise. Avoid using string or rigid rulers, as they won’t provide the snug fit needed for correct waist sizing.
Measuring your waist is important for health reasons, as it can indicate risks for conditions like heart disease when using methods like how to measure waist for men. It also ensures better-fitting clothes, preventing discomfort from ill-sized pants or shirts. Regular checks can track changes in body composition over time.
When learning how to measure waist men for pants, position the tape at the level where the pants will sit, usually slightly below the natural waist. Keep the tape parallel to the floor and breathe normally to avoid inaccuracies. This approach guarantees pants that fit comfortably without being too loose or tight.


