
Knowing how to use hem tape provides a simple, no-sew solution for altering clothing and curtains. This heat-activated adhesive strip is placed inside a folded hem and pressed with a hot iron, creating a strong bond that holds fabric together. It’s a fast, affordable alternative to sewing, ideal for quick repairs or adjustments on pants, skirts, and drapes. A common concern is whether the bond will hold, but proper application results in a durable, machine-washable finish.
Key Benefits at a Glance
- No-Sew Convenience: Instantly repairs or creates hems in minutes without needing a sewing machine, needle, or thread, perfect for quick fixes.
- Cost-Effective Alterations: Saves significant money on professional tailoring services for simple hemming jobs on pants, curtains, and skirts.
- Clean, Invisible Finish: When applied correctly, the tape creates a durable bond that lies flat and remains hidden for a professional-looking result.
- Fabric-Safe & Washable: Works on a wide variety of common fabrics like cotton, denim, and polyester and holds up through washing and drying cycles.
- Adjustable & Reversible: Most hem tapes can be easily removed by reheating the area with an iron, allowing for simple adjustments if you make a mistake.
Purpose of this guide
This guide is for anyone needing a fast, easy method for hemming garments or home decor without sewing skills. It is designed for beginners and solves the common problem of clothing being the wrong length or having a fallen hem. Here, you will learn the correct step-by-step process for applying hem tape with an iron, how to choose the right tape for your fabric, and what mistakes to avoid, like using too much heat or creating a crooked line. Following these instructions ensures you achieve a strong, durable hem that looks clean and professional.
What is hem tape and why I recommend it
I discovered hem tape during a particularly stressful week when I had five client alterations due and my sewing machine decided to break down. What started as a desperate solution became a game-changer in my alteration business. Hem tape is a specialized adhesive strip designed to create professional hems without traditional sewing, using heat or pressure to bond fabric layers together permanently or temporarily.
The beauty of hem tape lies in its simplicity and effectiveness. This innovative adhesive technology transforms the relationship between garments and alterations, making professional-quality hems accessible to anyone with an iron. I've watched clients who were intimidated by needles and thread confidently tackle their own alterations using this no-sew approach.
“1 roll contains 5 yards of fusible tape.”
— MadamSew, 2025
Source link
After five years of using hem tape professionally, I can confidently say it has revolutionized how I approach garment alterations. The adhesive creates a strong, washable bond that holds up to regular wear and laundering when applied correctly. What once took me 30 minutes per garment with traditional sewing now takes just 5-10 minutes with hem tape.
- No sewing skills required
- Quick alterations in minutes
- Professional-looking results
- Washable and durable
- Cost-effective solution
- Reversible for temporary needs
Types of hem tape how I choose the right option for each project
Understanding the different varieties of hem tape is crucial for achieving professional results. Through extensive testing with various fabric types and client projects, I've identified two primary categories that form the foundation of successful no-sew alterations.
Double-sided hem tape represents the pressure-sensitive category, featuring adhesive on both surfaces. This type creates an invisible bond by adhering to both fabric layers simultaneously. I prefer this option for quick fixes and temporary alterations because its pressure-sensitive adhesive allows for repositioning during application and easier removal when needed.
Iron-on hem tape, also known as fusible hem tape, uses heat-activated adhesive technology. This single-sided option requires an iron to activate the bonding agent, creating a permanent connection between fabric layers. I recommend this type for long-term alterations where maximum durability is essential.
For detailed product guidelines on weights and fabrics, check manufacturer specifications.
| Type | Application Method | Best For | Durability | Removability |
|---|---|---|---|---|
| Double-sided | Pressure-sensitive | Quick fixes, temporary hems | Medium | Easy |
| Iron-on | Heat-activated | Permanent alterations | High | Difficult |
| Fusible web | Heat-activated | Lightweight fabrics | High | Permanent |
Fusible web represents a specialized category of iron-on hem tape designed specifically for lightweight fabrics. This ultra-thin adhesive web melts completely when heated, creating an almost invisible bond perfect for delicate materials like silk or chiffon.
My brand preferences have evolved through trial and error with client projects. For double-sided hem tape, I consistently reach for brands that offer both temporary and permanent adhesive strength options. For iron-on varieties, I prioritize manufacturers that provide clear temperature guidelines and consistent adhesive distribution across the tape width.
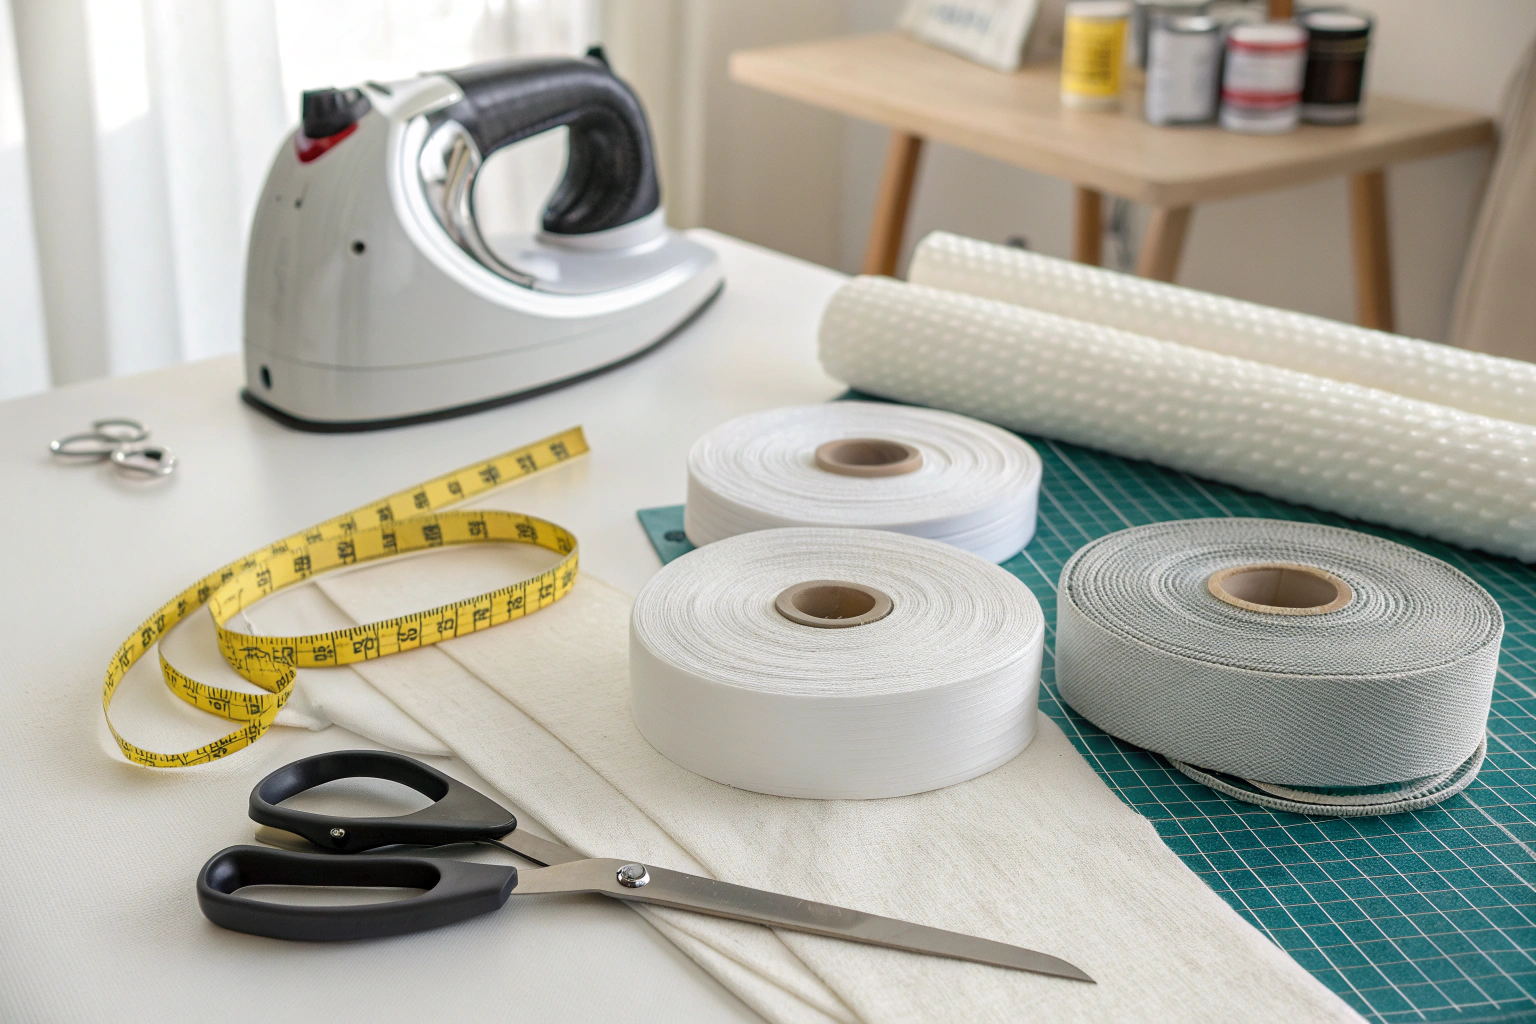
My essential tools and materials for hem tape success
Building the right toolkit transformed my hem tape results from adequate to professional quality. After years of refinement, I've identified the essential tools that make the difference between frustrating attempts and consistently successful alterations.
The iron stands as the most critical tool in your arsenal. Temperature control capabilities are non-negotiable – different fabric types require precise heat settings for optimal adhesive activation. I recommend a model with clearly marked temperature settings and reliable heat distribution. Steam functionality proves invaluable for certain applications, though you'll often work with the steam function disabled.
Scissors quality directly impacts your finished results. Sharp fabric scissors ensure clean tape cuts without frayed edges that could compromise the adhesive bond. I maintain separate scissors exclusively for hem tape work to preserve their sharpness and prevent adhesive residue buildup.
Measurement tools provide the accuracy foundation for professional results. A flexible measuring tape allows you to follow garment curves, while a clear ruler helps mark straight lines and consistent seam allowances. Precision in measurement translates directly to even, professional-looking hems.
- Iron with temperature control
- Sharp fabric scissors
- Measuring tape or ruler
- Press cloth or tea towel
- Ironing board
- Seam ripper (for corrections)
- Fabric marking tools
The press cloth deserves special mention as an often-overlooked but essential component. This protective barrier prevents direct contact between your iron and hem tape, eliminating the risk of adhesive transfer to your iron's soleplate. I use clean cotton tea towels, slightly dampened for optimal steam generation.
Your ironing board provides the stable, heat-resistant surface necessary for proper adhesive activation. A well-padded surface ensures even heat distribution and prevents unwanted creases in your garment during the hemming process.
My step by step guide to using hem tape
Last month, I faced a particularly challenging project that perfectly illustrates the power of proper hem tape technique. A client brought me a vintage silk dress that needed hemming for her daughter's wedding – the fabric was so delicate that traditional sewing risked permanent damage. Using my refined hem tape process, I achieved a flawless hem that looked professionally sewn while preserving the garment's integrity.
This experience reinforced my confidence in the hem tape alteration process. The garment underwent a complete transformation through careful application of hem tape, demonstrating how this adhesive technology can solve challenging alteration problems that traditional methods struggle to address.
Hem tape provides a no-sew solution for garments and fabrics by fusing layers with heat. Begin by pre-washing fabric without softener, measuring the hem allowance—typically adding tape width plus ⅛ inch—and pressing a crease. Cut tape to length, position it inside the fold with glue side down if backed, and iron in sections using medium heat without steam for 3-20 seconds per area, protecting with a damp cloth if needed. Allow cooling before testing adhesion; it's often permanent for durability on items like trousers or curtains.
The following subsections detail each critical phase of my proven process, from initial garment preparation through final bond testing. Mastering these individual techniques ensures consistent, professional results regardless of fabric type or garment style.
How I prepare garments for hemming
Proper preparation sets the foundation for every successful hem tape application. Through years of client work, I've learned that rushing this phase inevitably leads to uneven hems and frustrated do-overs. My systematic approach ensures accuracy and professional results every time.
Always prewash the garment before applying hem tape—just as you would before sewing a permanent hem—to avoid post-application shrinkage that can warp the bond.
Fabric preparation begins before you even touch the garment. Pre-washing eliminates shrinkage surprises that could ruin your carefully measured hem. I always wash and dry garments according to their care instructions, then allow them to cool completely before beginning alterations.
The measuring phase requires patience and precision. I have my clients try on the garment with appropriate shoes and undergarments to determine the ideal hem length. Using measurement tools, I mark the desired length with small pins or fabric-safe markers, ensuring consistent measurements around the entire garment.
“We recommend 10 to 20 cm depending on how thick you would like your hem to be.”
— Caprice Australia, July 2025
Source link
My consistency trick involves using a hem gauge or ruler to maintain uniform measurements. I measure up from the floor at multiple points around the garment, marking each measurement point. This technique accounts for natural variations in garment hang and ensures an even hem line.
- Pre-wash and dry the garment
- Try on garment and mark desired hem length
- Measure and mark hem line evenly around garment
- Cut excess fabric leaving 1-2 inch seam allowance
- Press fold line with iron
- Check measurements one final time
Creating the fold line requires careful iron work. I press a sharp crease along the marked hem line, using appropriate heat settings for the fabric type. This crease serves as your guide during tape application and ensures a crisp, professional-looking finished hem.
My technique for applying double sided hem tape
Double-sided hem tape excels in situations requiring precision and flexibility. Its pressure-sensitive adhesive allows for positioning adjustments during application, making it ideal for complex garments or when working with challenging fabric textures.
The positioning technique forms the core of successful double-sided application. I place the tape between the fabric layers, ensuring the adhesive contacts both surfaces evenly. The tape should sit just inside the fold line, completely hidden when the hem is finished.
A recent client project perfectly demonstrated this technique's effectiveness. Working with a pleated skirt that required multiple hem sections, the double-sided hem tape's repositioning capability allowed me to achieve perfect alignment across all pleats. The pressure-sensitive adhesive held each section securely while I adjusted the remaining areas.
For expert application tips, consult professional guides.
- Cut hem tape to required lengths
- Position tape between fabric layers
- Press firmly to activate adhesive
- Work in small sections for even application
- Smooth out any air bubbles
- Allow to set for recommended time
The adhesive activation requires firm, even pressure across the entire tape surface. I work in small sections, applying consistent pressure to ensure complete contact between the adhesive and both fabric layers. This methodical approach prevents air bubbles and ensures invisible tape placement.
How I work with single sided hem tape
Single-sided hem tape represents the iron-on category, utilizing heat-activated adhesive for permanent bonding. I prefer this method for garments requiring maximum durability and when working with fabrics that respond well to heat activation.
The positioning differs significantly from double-sided applications. With single-sided tape, the adhesive surface contacts only one fabric layer initially. I position the tape on the wrong side of the fabric, aligning it carefully with the hem fold line before applying heat.
Heat activation transforms the adhesive from a solid state to a molten bond that penetrates fabric fibers. This chemical change creates a permanent connection that withstands repeated washing and wearing. The iron-on process requires precise temperature control and timing to achieve optimal results.
- Position tape on wrong side of fabric
- Align with hem fold line
- Cover with damp press cloth
- Apply iron with appropriate heat setting
- Hold for recommended time
- Allow to cool completely
My specialized technique for single-sided applications involves a two-step heating process. First, I lightly tack the tape in position with brief heat application. Then, I apply full heat and pressure for the manufacturer's recommended duration, ensuring complete adhesive activation throughout the tape width.
My professional method for turning garments inside out
Proper garment handling during preparation prevents unnecessary wrinkles and fabric damage. Through years of working with various fabric types, I've developed techniques that protect delicate materials while providing access to hem areas.
The inside-out turning process requires special attention to fabric grain and construction details. I support the garment weight during turning to prevent stretching, particularly important with knit fabrics or loose weaves. Seams and construction details guide my handling approach for each garment type.
My technique varies based on fabric characteristics. Silk and other delicate fabrics require gentle manipulation and minimal handling. Heavy fabrics like denim need firm support to prevent distortion. Stretch fabrics demand careful attention to prevent unwanted stretching during the turning process.
Edge positioning becomes critical once the garment is inside out. I ensure the hem area lies flat and accessible, smoothing any wrinkles that could interfere with tape application. Proper edge alignment at this stage prevents uneven hem lines in the finished alteration.
How I activate the adhesive for perfect results
Adhesive activation represents the critical moment where proper technique determines success or failure. Temperature control, timing, and pressure application must align perfectly to achieve the strong, durable bond that characterizes professional hem tape work.
Iron temperature settings vary dramatically based on fabric composition and care requirements. Cotton and linen tolerate high heat settings that ensure complete adhesive activation. Synthetic fabrics require lower temperatures to prevent heat damage while still achieving proper bonding.
The role of steam in adhesive activation depends on both fabric type and hem tape variety. Some iron-on tapes benefit from steam's moisture content, which helps the adhesive penetrate fabric fibers more effectively. Other applications require dry heat to prevent adhesive dilution.
| Fabric Type | Iron Temperature | Time | Steam Setting |
|---|---|---|---|
| Cotton | High (400°F) | 15-20 seconds | Steam on |
| Polyester | Medium (275°F) | 10-15 seconds | Steam off |
| Silk | Low (200°F) | 8-10 seconds | Steam off |
| Denim | High (400°F) | 20-25 seconds | Steam on |
| Wool | Medium (300°F) | 12-15 seconds | Steam on |
Common mistakes I've helped clients correct include insufficient heat application and inadequate pressure duration. Adhesive activation requires sustained heat and pressure – brief contact doesn't allow complete bonding. Conversely, excessive heat can damage fabric or cause adhesive to become brittle and lose bonding strength.
Why I always use a damp press cloth
The damp press cloth technique saved a client's expensive silk blouse from heat damage while ensuring perfect adhesive activation. This protective barrier method has become standard practice in my work, providing consistent results across all fabric types while preventing costly mistakes.
Steam generated by the damp cloth creates optimal conditions for adhesive activation. The moisture content softens fabric fibers, allowing deeper adhesive penetration and stronger bonding. Simultaneously, the cloth protects delicate fabrics from direct iron contact and potential heat damage.
My dampness determination process considers fabric care instructions and adhesive requirements. Delicate fabrics need minimal moisture to prevent water staining, while heavy fabrics benefit from additional steam generation. The cloth should feel damp but not dripping wet.
- Dampen clean cotton cloth or tea towel
- Wring out excess water until slightly damp
- Place over hem tape area
- Apply iron through cloth
- Remove cloth while still warm
- Check bond strength
The protective relationship between press cloth and sensitive fabric types cannot be overstated. I once witnessed a client's vintage dress survive a hemming process that would have been impossible with direct iron contact. The press cloth distributed heat evenly while the generated steam activated the adhesive perfectly.
How I test for a strong bond every time
Quality control through proper bond testing prevents garment failures and client disappointment. My testing method evaluates adhesive bonding strength without compromising fabric integrity, ensuring the hem will withstand normal wear and care.
The cooling period proves crucial for accurate bond assessment. Adhesive continues setting for several minutes after heat application, reaching full strength only after complete cooling. Testing too early provides false results and may damage the developing bond.
I learned this lesson during an early client project when premature testing revealed what appeared to be inadequate bonding. Instead of reapplying heat immediately, I allowed additional cooling time and discovered the adhesive had achieved perfect strength. This experience taught me patience in the testing phase.
- Properly bonded: Tape feels secure, no lifting edges, smooth finish
- Improperly bonded: Loose edges, visible bubbles, easy to peel
My gentle testing technique involves light pressure at the hem edge, checking for secure adhesive contact without forcing separation. Proper bonding feels firm and uniform, with no soft spots or lifting edges. The hem should lay flat against the garment with no visible adhesive bleeding or bubbling.
Special applications I have mastered
Beyond basic garment hemming, hem tape offers solutions for unique alteration challenges that traditional sewing cannot address effectively. Over the years, I've developed specialized techniques that expand the versatility of adhesive technology in professional alterations.
These advanced applications emerged from client requests that pushed the boundaries of conventional hemming. Wedding emergencies, rental garment adjustments, and delicate fabric challenges led me to discover hem tape's potential beyond standard alterations. Each specialized technique represents a solution to real-world problems encountered in my practice.
The versatility of hem tape in professional alterations continues to surprise clients and fellow professionals. What began as a simple adhesive strip has evolved into a comprehensive alteration tool capable of solving problems that once required complex sewing techniques or were considered impossible to address.
How I create temporary hems for special occasions
The wedding party crisis that introduced me to temporary hemming techniques remains one of my most memorable professional moments. Three bridesmaids arrived the morning of the wedding with floor-length dresses that needed immediate shortening. Traditional alterations were impossible given the time constraint and rental garment restrictions.
Double-sided hem tape with temporary durability attributes provided the perfect solution. The pressure-sensitive adhesive application method allowed quick positioning and immediate use, while the removable nature meant the rental garments could be returned unaltered after the event.
This technique works particularly well for occasions requiring garment adjustments that must be reversed afterward. The temporary bond holds securely during the event but removes easily without fabric damage or permanent alteration evidence.
- Wedding and formal events
- Rental garments
- Growing children’s clothes
- Trying different hem lengths
- Seasonal adjustments
- Choose removable double-sided tape
- Apply with light pressure only
- Avoid high heat activation
- Test removal on hidden area first
- Remove within 24-48 hours for easiest removal
The key to successful temporary applications lies in adhesive selection and application pressure. Light pressure activation provides sufficient hold for the event while maintaining easy removal capability. High heat or excessive pressure can create permanent bonds that defeat the temporary purpose.
My fabric specific hem tape techniques
Different fabric types present unique challenges that require specialized approaches developed through years of working with diverse materials. Fabric composition, weight, and care instructions directly influence hem tape and iron temperature selection, demanding tailored techniques for optimal results.
Hem tape works well on stable fabrics, but for stretch denim or knits, a hand-sewn hem often provides more flexibility and durability—especially on jeans that undergo frequent stress.
Silk represents the delicate end of the fabric spectrum, requiring lower iron temperatures and gentle handling. My silk technique emphasizes protection over speed, using extended low-heat application rather than brief high-heat contact. Press cloths become essential for preventing heat damage while ensuring adequate adhesive activation.
Denim's heavy weight and dense weave demand strong adhesive formulations and sustained heat application. The thick fabric requires extra pressure and longer activation times to ensure adhesive penetration through the weave structure. Steam assists the process by softening the dense fibers.
Polyester and other synthetic materials present heat sensitivity challenges. These fabrics can melt or distort under excessive heat, requiring careful temperature control and shorter application times. The synthetic composition affects adhesive bonding characteristics, sometimes requiring specific hem tape formulations.
| Fabric Type | Recommended Tape | Special Considerations | Iron Setting |
|---|---|---|---|
| Silk | Low-temp fusible | Use press cloth, test first | Low heat |
| Denim | Heavy-duty iron-on | Extra pressure needed | High heat |
| Polyester | Standard iron-on | Avoid overheating | Medium heat |
| Wool | Gentle fusible | Steam helps activation | Medium heat |
| Stretch fabrics | Flexible adhesive | Don’t overstretch | Low-medium heat |
Successful fabric-specific applications depend on understanding how fabric composition affects adhesive bonding. Natural fibers generally accept adhesive bonding more readily than synthetics, while fabric weight influences heat penetration requirements. These variables guide my selection of appropriate hem tape types and application techniques.
How I troubleshoot common hem tape issues
Hem tape problems often stem from incorrect application techniques or inappropriate adhesive selection for specific fabric types. Through years of helping clients fix failed applications, I've identified common issues and developed reliable solutions that restore professional results.
Adhesive bonding failures represent the most frequent problem category. Insufficient iron temperature, inadequate application time, or improper fabric preparation can prevent proper bonding. The root cause determines the appropriate corrective approach, from reheating to complete tape removal and reapplication.
Visible tape edges indicate positioning errors during application. This aesthetic problem compromises the professional appearance of the finished hem but can be corrected through careful trimming or repositioning. Prevention through proper initial placement proves more effective than correction attempts.
- Tape not sticking: Increase heat or pressure, ensure fabric is clean
- Visible edges: Trim tape closer to fold line
- Uneven hem: Re-measure and reposition
- Heat damage: Use lower temperature with longer application time
Heat damage prevention requires understanding fabric tolerances and iron control. Each fabric type has maximum safe temperatures that, when exceeded, cause permanent damage. Recovery from heat damage is often impossible, making prevention through proper temperature selection essential.
My professional method for removing hem tape
Hem tape removal becomes necessary when alterations require modification or when applications fail to meet expectations. My professional technique removes adhesive without fabric damage, using controlled heat to soften bonds before gentle separation.
The heat and gentle pulling relationship forms the foundation of safe removal. Iron heat softens adhesive to a workable state, while gentle pulling prevents fabric tearing or distortion. The process requires patience – rushing leads to fabric damage that may be irreparable.
A challenging removal project on a vintage wool coat demonstrated this technique's effectiveness. The previous alteration had used inappropriate hem tape that created an overly strong bond. Through careful heat application and patient work, I successfully removed the tape without damaging the valuable fabric.
- Apply low heat with iron to soften adhesive
- Gently peel tape starting from one corner
- Work slowly to avoid fabric damage
- Remove any residue with warm soapy water
- Allow fabric to dry completely
- Press area smooth if needed
Adhesive residue removal requires gentle solvents that won't damage fabric. Warm soapy water handles most residue situations, while stubborn deposits may require specialized adhesive removers. Always test removal methods on hidden fabric areas before applying to visible surfaces.
How I care for garments with hem tape
Proper care extends hem tape alteration life significantly, based on long-term client feedback and my own testing with various garment types. Washing machine cycles and temperature settings directly affect hem tape durability, requiring specific care approaches for optimal longevity.
Washing machine effects on hem tape vary by adhesive type and application method. Iron-on varieties generally withstand machine washing better than pressure-sensitive types, though both require appropriate water temperatures and cycle selections. Cold water cycles protect adhesive bonds while effectively cleaning garments.
Dry cleaning presents an alternative care method that often proves gentler on hem tape applications. The chemical cleaning process avoids the mechanical agitation and water exposure that can weaken adhesive bonds. However, fabric care instructions and hem tape compatibility must be considered.
- DO: Wash in cold water on gentle cycle
- DO: Air dry when possible
- DO: Follow fabric care labels
- DON’T: Use high heat in dryer
- DON’T: Use bleach or harsh chemicals
- DON’T: Wring or twist hemmed areas
Heat exposure during drying poses the greatest risk to hem tape durability. High dryer temperatures can soften adhesive bonds or cause them to fail completely. Air drying eliminates this risk while preserving both fabric and adhesive integrity for maximum garment life.
My top professional tips for hem tape success
Mastering hem tape application requires understanding the subtle relationships between fabric preparation, iron control, adhesive activation, and garment handling. These professional insights represent the difference between adequate results and truly professional-quality alterations.
Fabric preparation excellence begins with pre-washing to eliminate shrinkage variables. Clean fabric surfaces ensure optimal adhesive bonding, while proper pressing creates the foundation for accurate measurements and positioning. These preparatory steps cannot be shortcut without compromising final results.
Iron temperature selection demands understanding both fabric tolerances and adhesive requirements. The optimal setting balances adequate adhesive activation with fabric protection. Testing on hidden areas provides confidence before committing to visible garment areas.
- Always test on a hidden area first
- Pre-wash fabrics to prevent shrinkage issues
- Keep iron moving to prevent scorching
- Use sharp scissors for clean tape cuts
- Allow complete cooling before handling
The transformative potential of mastering hem tape application extends beyond simple alterations. Clients consistently express amazement at the professional results achievable through this no-sew approach. One client's comment perfectly captures this transformation: "I never imagined I could achieve alterations that look professionally sewn without touching a needle."
Understanding adhesive activation timing prevents premature handling that can compromise bonds. Complete cooling allows adhesive to reach full strength, ensuring durability that matches or exceeds traditional sewing methods. Patience during this phase guarantees long-lasting results that maintain their appearance through repeated wear and cleaning.
Frequently Asked Questions
To apply hem tape, start by folding the fabric to your desired hem length and inserting the tape between the layers. Use a hot iron to press over the area for 8-10 seconds, activating the adhesive to bond the fabric. This no-sew method is quick and effective for most clothing repairs, though always check fabric compatibility first.
Hem tape is an adhesive strip designed for bonding fabric edges without sewing, commonly used for hemming pants or curtains. It works by placing the tape between fabric layers and applying heat from an iron, which melts the adhesive to create a secure hold. This makes it a convenient alternative to traditional stitching for quick fixes.
Common types of hem tape include double-sided adhesive tape for easy bonding, fusible web tape for permanent holds, and fabric glue tape for temporary fixes. There are also washable and waterproof varieties suited for specific needs like outdoor gear. Choose based on your fabric type and whether you need a removable or lasting solution.
Yes, hem tape really works for many applications, providing a reliable no-sew hem on fabrics like cotton, denim, and synthetics. It holds up well to regular wear but may not be ideal for heavy or stretchy materials. Testing on a small area ensures the best results for your project.
To get hemming tape to stick, ensure the fabric is clean and dry before placing the tape in position. Press with a hot iron for the recommended time, using steady pressure to activate the adhesive fully. If it doesn’t adhere, try increasing the heat slightly or using a pressing cloth for better results.


