
Finding the best storage for sewing notions on a small budget involves using creative, low-cost solutions to organize small supplies like thread, buttons, and zippers. This approach focuses on maximizing space and keeping items visible and accessible without buying expensive, specialized containers. Common user concerns include preventing tangled thread and lost needles, so smart, affordable organization is key to an efficient and enjoyable sewing practice. This method often involves repurposing common household items.
Key Benefits at a Glance
- Save Money: Repurpose household items like glass jars, tins, and ice cube trays instead of buying expensive, specialized organizers.
- Maximize Small Spaces: Use vertical storage such as wall-mounted pegboards or over-the-door shoe organizers to keep your workspace clear.
- Find Supplies Faster: Keep notions visible and sorted by type in clear containers, reducing time spent searching for the right button or bobbin.
- Protect Your Notions: Keep delicate items like needles, pins, and thread safe from dust, tangles, and damage with proper containment.
- Promote Sustainability: Give a second life to everyday packaging and containers, reducing waste and supporting a more eco-friendly crafting habit.
Purpose of this guide
This guide is for hobby sewists, crafters, and anyone with a growing collection of notions who needs to get organized without overspending. It solves the common problem of a cluttered, inefficient sewing area that stems from limited space and a tight budget. You will learn practical tips for turning everyday items into functional storage, what common mistakes to avoid (like using containers that could damage supplies), and how to create a system that keeps your tools tidy for the long haul, making your creative time more enjoyable and productive.
My Journey to Budget-Friendly Sewing Notion Organization
Like many sewists, I spent my first few years with notions scattered across multiple containers, drawers, and surfaces throughout my home. My cutting table became a dumping ground for everything from loose buttons to tangled ribbons. I'd waste precious sewing time hunting for the right thread color or searching through three different boxes to find matching snaps. Even worse, I'd often buy duplicates of items I already owned but couldn't locate.
The turning point came during a time-sensitive project when I spent two hours looking for bias tape I knew I had somewhere. That frustration led me to develop a systematic approach to notion storage that prioritizes function over expensive specialty products. Over the past five years, I've refined my storage systems using primarily repurposed household items and simple DIY solutions, saving hundreds of dollars while creating a workspace that actually enhances my creativity.
My approach isn't about having the prettiest sewing room or the most Instagram-worthy storage containers. It's about creating systems that work reliably, cost very little, and can be adapted as your sewing interests evolve. The best storage solution is the one you'll actually use consistently, and in my experience, that's rarely the most expensive option.
How I Assess My Sewing Notion Organization Needs
Before implementing any storage solution, I learned the hard way that taking inventory prevents both wasted money and organizational frustration. The audit process I've developed over years of trial and error has become the foundation that makes every subsequent storage decision more effective and budget-conscious.
This systematic approach revealed patterns in my sewing habits that influenced my storage choices. I discovered I had four different packages of the same bias tape color and zero seam rippers despite thinking I owned several. More importantly, the audit helped me understand which notions I reach for constantly versus those I use seasonally, information that proved crucial for determining storage placement.
- Empty all notion containers and drawers onto a large surface
- Group similar items together (threads, buttons, zippers, etc.)
- Count quantities and note duplicates or missing items
- Identify your most-used notions for priority placement
- Measure available storage spaces before choosing containers
- Take photos of your sorted groups for reference
The photo documentation step proved invaluable when I later questioned whether I really needed three different thread storage systems. Looking back at my "before" photos reminded me exactly why certain changes were necessary and helped me resist the temptation to constantly reorganize working systems.
My Budget-Friendly Storage Philosophy
My storage philosophy centers on the principle that effective organization comes from smart systems, not expensive products. After watching friends spend hundreds on specialty sewing storage only to abandon those systems within months, I developed a "shop your home first" approach that has saved me significant money while creating more functional solutions.
The key insight that changed everything was realizing that most household items already possess the exact qualities needed for notion storage: compartmentalization, visibility, and accessibility. A repurposed ice cube tray provides better button sorting than many expensive button boxes, and it costs nothing if you already own it.
This philosophy proved its worth when a sewing friend asked me to help organize her chaotic craft room. Using only items from her kitchen and office, we created a complete storage system that transformed her productivity. She later calculated that purchasing equivalent specialty storage would have cost over $300, but our repurposed solution cost exactly zero dollars and worked better than her previous expensive organizers.
The "shop your home first" approach also provides flexibility that purchased systems often lack. When my sewing interests shifted from garment construction to quilting, I could easily reconfigure my repurposed containers to accommodate different notion types without additional investment.
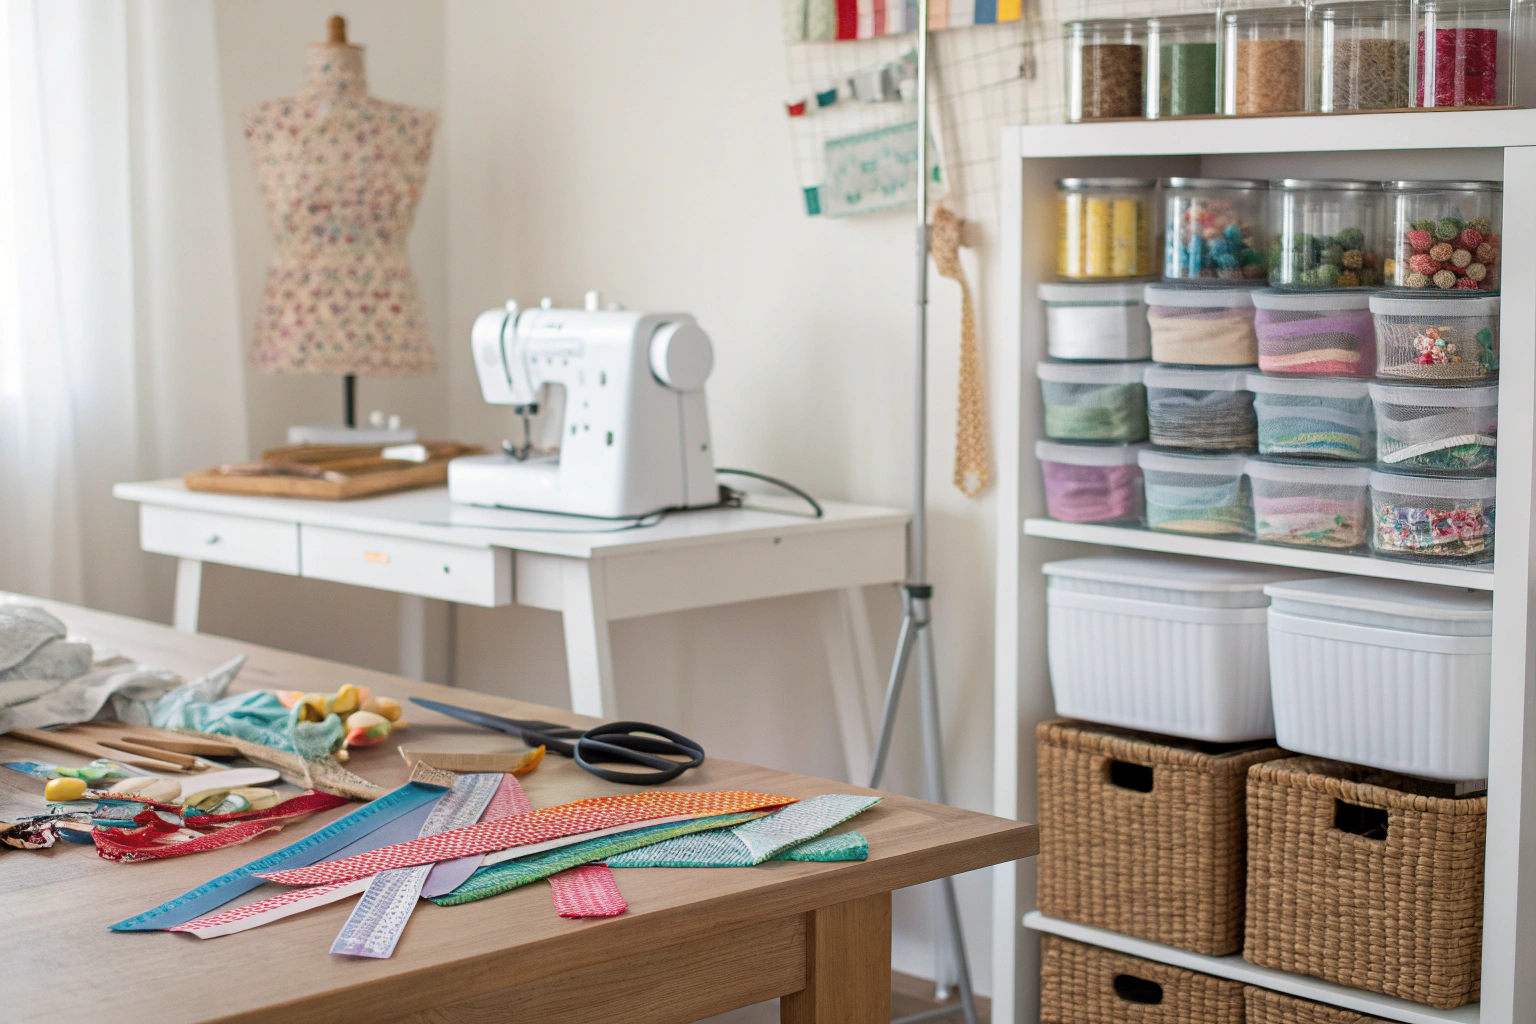
Kitchen Items I've Repurposed for Perfect Notion Storage
Kitchen items have become the backbone of my notion organization because they're designed for exactly what sewing notions need: easy visibility, compartmentalization, and frequent access. Over the years, I've discovered that some of the most effective storage solutions were already sitting in my kitchen cabinets or destined for recycling.
The transformation began when I realized my old spice rack could hold thread spools perfectly, providing both visibility and easy access. That success led me to examine every kitchen item with fresh eyes, asking not "what is this for?" but "what could this organize?" This shift in perspective opened up possibilities I'd never considered.
- Mason jars – Perfect for buttons, snaps, and small hardware sorted by color
- Spice racks – Ideal for organizing small thread spools by color families
- Ice cube trays – Excellent for separating tiny findings and beads
- Cutlery organizers – Great for ribbons, bias tape, and elastic storage
- Lazy Susans – Convenient for frequently-used notions near your machine
- Magnetic spice containers – Attach to metal surfaces for pins and needles
- Glass baby food jars – Clear visibility for small quantities of specialty items
The lazy Susan discovery happened accidentally when I inherited one from my grandmother's kitchen. Placing it near my sewing machine with frequently-used notions eliminated the constant reaching and searching that used to interrupt my workflow. Now I can access scissors, seam rippers, pins, and measuring tools with a simple spin, keeping my hands and attention focused on my project.
Mason jars proved particularly valuable for button storage because their clear glass provides instant color identification while the screw-on lids prevent spills. I organize buttons by color in separate jars, making it easy to grab the right shade without dumping out mixed collections.
Other Household Items That Store My Notions Brilliantly
Beyond the kitchen, I've discovered storage gems throughout my home that work brilliantly for sewing notions. The key is looking at function rather than original purpose, which has led to some of my most effective organizational solutions.
My breakthrough moment came when I repurposed a clear shower caddy for ribbon storage. The multiple compartments keep different ribbon types separated while the clear plastic provides instant visibility. Hanging it on a wall hook near my cutting table means ribbons stay untangled and accessible without taking up valuable surface space.
Office supplies have provided equally valuable solutions. A desktop file organizer now holds my pattern collection vertically, making it easy to flip through options without unstacking and restacking. The individual slots keep patterns separated and prevent the crumpling that used to happen when patterns were stacked horizontally.
Pill organizers with daily compartments have become indispensable for small hardware like snaps, grommets, and specialty buttons. The clear compartments make inventory visible at a glance, while the secure closures prevent spills during transport or storage.
Even items headed for recycling have found new life in my sewing space. Large yogurt containers with clear lids store fabric scraps sorted by color, while smaller containers hold elastic and bias tape wound on cardboard cores to prevent tangling.
DIY Storage Projects That Cost Me Almost Nothing
When repurposing existing items wasn't enough, I turned to simple DIY projects using materials I already had or could obtain for under five dollars. These projects allowed me to create custom solutions perfectly sized for my specific needs and space constraints.
My DIY philosophy focuses on projects requiring minimal tools and skills while providing maximum organizational impact. Most of my successful projects use common materials like cardboard, wood scraps, and basic hardware that many sewists already have in their homes or can acquire inexpensively.
The cardboard thread organizer was my first successful DIY project, created from a large shipping box and wooden dowels. This project taught me that effective storage doesn't require expensive materials or advanced woodworking skills. Simple construction using readily available materials often produces more functional results than complex purchased systems.
My fabric scrap sorting system uses repurposed cardboard boxes covered with contact paper to create attractive, functional storage. Each box holds scraps of different sizes, making it easy to find the right piece for appliqué or small projects without digging through mixed collections.
My DIY Thread Storage Shelf
Creating my own thread storage shelf solved the dual problems of visibility and capacity that plagued my previous storage attempts. Commercial thread racks cost $50-100 for decent capacity, but my DIY version holds 40+ spools and cost less than $15 in materials.
Label your storage clearly—this becomes essential when you’re juggling multiple projects, from fixing zippers to sewing baby quilts, each requiring specific notions.
The project began when I realized my thread collection had outgrown every repurposed container I'd tried. I needed something that would display threads for easy color selection while keeping them secure and dust-free. After measuring my available wall space and existing thread collection, I designed a simple shelf system using basic lumber and finishing nails.
- Cut wood shelf to desired width (mine is 24 inches for 40 spools)
- Mark nail placement every 1/2 inch along the front edge
- Hammer small finishing nails at a slight upward angle
- Sand any rough edges and apply wood stain if desired
- Mount shelf brackets to wall at comfortable eye level
- Test with a few thread spools before loading completely
- Organize threads by color family or project for easy selection
The angled nail placement was crucial for preventing spools from sliding off while still allowing easy removal. I learned this detail the hard way after my first attempt with straight nails resulted in threads constantly falling to the floor.
This shelf system has proven so effective that I've built three additional shelves as my thread collection grew. The total investment remains under $40, while equivalent commercial storage would have cost several hundred dollars. More importantly, I can customize the spacing and height for my specific threads and workspace.
How I Organize Small Sewing Notions By Type
Organizing notions by type rather than by project transformed my sewing efficiency and eliminated the frustration of hunting through mixed collections. This category-based approach allows me to see my complete inventory of each notion type, preventing duplicate purchases and making project planning more accurate.
The evolution to type-based organization happened gradually as I noticed patterns in my searching behavior. I'd spend time looking for "that blue button" across multiple containers when a color-sorted button system would have made the search instant. Similarly, hunting for the right zipper length through mixed collections wasted time that could be spent sewing.
My current system dedicates specific storage areas to each major notion category, with the most frequently used items positioned for easiest access. Thread and bobbins occupy prime real estate near my sewing machine, while seasonal items like specialty trims live in clearly labeled containers on higher shelves.
The key to sustainable type-based organization is creating obvious homes for each category and maintaining those designations consistently. When every notion type has a specific location, putting items away becomes automatic, and the system maintains itself with minimal effort.
My Thread and Bobbin Storage Solutions
Thread storage has evolved through several iterations as my collection grew and my understanding of my usage patterns improved. My current system combines multiple approaches to accommodate different thread types and usage frequencies while maintaining easy visibility and access.
Keep your bobbins sorted by thread type and color—especially if you switch between projects like hemming jeans and sewing silk pillowcases, which require very different threads.
The journey began with threads stored in their original boxes, which provided protection but made color selection difficult. Moving to clear containers improved visibility but created tangling problems. My current multi-tiered approach uses different storage methods optimized for specific situations.
| Storage Method | Cost | Capacity | Accessibility | Best For |
|---|---|---|---|---|
| DIY Pegboard with Nails | $10-15 | 50+ spools | Excellent | Large collections |
| Shower Curtain Rings on Hanger | $3-5 | 20-30 spools | Good | Small spaces |
| Dowel Rod System | $8-12 | 40+ spools | Excellent | Custom sizing |
| Repurposed Spice Rack | Free | 15-25 spools | Good | Desktop organization |
| Bobbin Tower (DIY) | $5-8 | 25+ bobbins | Excellent | Matching thread sets |
For bobbins, I learned that keeping them with their matching thread spools prevents the common problem of wound bobbins becoming orphaned. My DIY bobbin tower uses a wooden dowel mounted vertically in a weighted base, allowing bobbins to stack while remaining easily accessible.
The pegboard system handles my largest thread collection and provides the best visibility for color selection. Mounting it at eye level near my cutting table means I can see my complete thread inventory while planning projects, which has significantly reduced overbuying and improved color coordination.
My Button, Snap, and Small Hardware Organization
Small notions present unique storage challenges because they're easily lost, frequently needed, and come in countless varieties. My system emphasizes containment and visibility while preventing the mixing that makes small items nearly impossible to find.
The foundation of my small notion organization is the principle that every small item needs a designated container, no matter how few pieces I own. Loose buttons inevitably disappear, while buttons in dedicated containers stay findable and countable.
- Use pill organizers with clear lids for sorting buttons by size
- Save mint tins for travel sewing kits with essential small notions
- Photograph button cards before removing buttons to remember original sets
- Label small containers with masking tape and permanent marker
- Store snap components in separate compartments to prevent mixing
- Use magnetic containers for metal findings that stick together
- Keep a small dish near your workspace for temporary small item storage
Dollar store bins and organizers provide versatile, low-cost storage for sewing notions like buttons and pins. Target dollar spot items, such as $3 drawer units, offer sturdy plastic compartments ideal for small spaces. For detailed compartment trays, consider adjustable options. DIY fabric bins from scrap materials maximize budgets while customizing for notions. Explore jar dividers using household items for buttons and feet. These solutions keep everything accessible without high costs.
The photography tip for button cards has saved me countless hours and prevented numerous mistakes. Before removing buttons from their original cards, I take a quick photo with my phone. This preserves the information about button size, style number, and original groupings, which proves invaluable when I need matching buttons for repairs or additional garments.
Snap storage requires special attention because the components easily separate and mix together, creating frustrating sorting sessions. I use separate small containers for socket and stud components, clearly labeled to prevent confusion during installation.
My Ribbon, Trim, and Elastic Storage
Long, flexible notions like ribbon and trim require storage that prevents tangling while maintaining easy access for measuring and cutting. My system has evolved to accommodate both short pieces and full spools while keeping everything visible and untangled.
The challenge with ribbon storage is balancing accessibility with protection from dust and tangling. Ribbons stored loosely inevitably become knotted messes, while ribbons stored too securely become difficult to access for quick projects.
My current system uses a combination of hanging storage for frequently used ribbons and flat storage for specialty or seasonal items. Wide ribbons hang on individual hooks mounted inside a closet door, while narrow ribbons wind onto cardboard cores and store in clear containers sorted by color family.
For elastic and bias tape, I've found that winding onto cardboard cores prevents stretching while keeping the materials accessible. Empty toilet paper tubes work perfectly for this purpose and cost nothing. I label each tube with the elastic width and remaining length to make selection easy.
The "accessibility test" I apply to any long-notion storage system is simple: can I access and measure what I need in under 30 seconds? If accessing stored ribbon requires unwinding, untangling, or moving other items, the storage method needs refinement.
My Twill Tape and Specialized Trim Storage
Twill tape and similar specialty trims require dispensing systems that allow easy measuring and cutting without waste or tangling. My solution adapts expensive commercial trim dispensers using simple materials available at any hardware store.
The breakthrough came when I realized that most commercial trim dispensers are essentially dowel rods with guides for controlling dispensing. By mounting dowel rods horizontally in a simple wooden frame, I created a dispensing system that holds multiple trim types while allowing easy access and measurement.
My DIY dispenser uses 1/4-inch dowels mounted in a wooden frame that sits on my cutting table. Each dowel holds one type of trim, and the horizontal mounting allows the trim to unroll smoothly without tangling. Small eye hooks screwed into the front of the frame guide the trim and help control tension during dispensing.
This system cost under $10 in materials compared to $50-100 for commercial dispensers, and it's completely customizable for the trim types I actually use. Adding or removing dowels takes minutes, and the entire unit stores flat when not in use.
My Sewing Machine Needle Storage
Needle organization requires a system that keeps different types and sizes separated while providing protection from damage and easy identification of needle condition. My approach emphasizes safety, visibility, and tracking needle usage to prevent the frustration of dull needles.
The foundation of effective needle storage is the "nearby access" principle: needles change frequently during sewing, so storage must be convenient to the machine while providing secure protection. Needles scattered in drawers or stored far from the machine inevitably lead to using the wrong needle for the task.
My current system uses a combination of magnetic storage for needles currently in rotation and protective storage for backup inventory. A small magnetic dish near my machine holds the 3-4 needle types I use most frequently, while a labeled needle book stores my complete inventory organized by type and size.
The needle tracking component prevents the common problem of unknowingly using dull needles. I mark used needles with a small piece of tape and track approximate usage hours. When needles show wear signs or reach my predetermined usage limit, they go directly to disposal rather than back into storage where they might be reused inappropriately.
For machine needle storage specifically, I learned that keeping needles in their original packaging until needed provides the best protection while maintaining size and type identification. A simple business card file box holds multiple needle packages organized alphabetically by type, making selection quick and accurate.
My Machine Accessory Storage
Sewing machine accessories and attachments require storage that provides visibility while protecting delicate components from damage. My system organizes accessories by machine type and function while keeping everything easily accessible during sewing sessions.
The challenge with accessory storage is accommodating items of vastly different sizes and shapes, from tiny screws to large specialty feet. My solution uses repurposed containers with custom dividers to create secure storage that adapts to different accessory collections.
My primary accessory storage uses clear plastic containers with adjustable dividers, allowing me to customize compartment sizes for different accessories. Each compartment holds one accessory type, and clear labeling on the container exterior makes identification instant.
For frequently used accessories like standard presser feet, I use a magnetic strip mounted near my machine. This provides immediate access while keeping accessories visible and organized. The magnetic storage works particularly well for metal accessories that would otherwise roll around in drawers.
Machine manual storage integrates with accessory organization since manuals contain the information needed to use accessories effectively. I keep manuals in page protectors within the same storage area as accessories, creating a complete reference system for machine-specific information.
My Pattern and Template Organization
Pattern storage presents unique challenges because patterns are large, delicate, and need to remain intact for multiple uses. My system has evolved from keeping patterns in original envelopes to a more functional approach using recycled materials that provide better protection and organization.
The transition from original envelope storage happened when I realized that manufacturer envelopes often tear with use and provide no visual reference for pattern identification. Trying to remember which envelope contains which pattern wastes time and leads to unnecessary envelope handling that can damage patterns.
My current system uses manila envelopes for pattern storage with visual identification systems that eliminate guessing. Each envelope contains one complete pattern with all pieces, and the exterior provides enough information to identify contents without opening.
- Manila envelopes – Sturdier than original packaging, uniform size for filing
- Photo documentation – Visual reference eliminates guessing about contents
- Hanging file system – Vertical storage saves space and prevents crushing
- Clear labeling – Size, modifications, and fabric requirements noted on exterior
- Digital backup – Photos of pattern pieces stored digitally for reference
- Modification tracking – Notes about alterations made for future reference
For digital patterns, I maintain both printed and electronic copies organized in parallel systems. Digital patterns live in clearly named folders on my computer, while printed versions follow the same manila envelope system as traditional patterns.
Template storage for quilting and other crafts uses a similar approach with flat storage in large envelopes or folders. Templates cut from template plastic store in page protectors within binders, providing protection while maintaining easy access for tracing.
My Pattern Organization Using Manila Envelopes with Photos
The manila envelope system with photo documentation has revolutionized my pattern organization by eliminating the guesswork that used to plague pattern selection. This system saves hours of searching and prevents the pattern damage that occurred when I repeatedly opened envelopes trying to identify contents.
The process begins with photographing the finished garment or a clear illustration from the pattern instructions. This visual reference becomes the primary identification method, making pattern selection as simple as flipping through photo references rather than trying to decipher envelope descriptions.
- Take a clear photo of the finished garment or project sample
- Print photo in 4×6 size on regular printer paper
- Write pattern details on the back: size used, modifications, fabric type
- Tape or glue photo to front of manila envelope
- Place all pattern pieces inside envelope
- Secure envelope with large safety pins through all layers
- File alphabetically or by garment type in hanging file system
The detailed notes on photo backs have proven invaluable for future sewing projects. Recording the size used, any modifications made, and fabric type eliminates the trial-and-error that used to accompany pattern reuse. These notes also help me remember why certain adjustments were made, preventing repeated fitting mistakes.
Security pins through all layers of the envelope prevent pattern pieces from sliding out while allowing easy access when needed. This method has eliminated the pattern piece losses that used to occur with less secure closure methods.
The time savings from this system are substantial. Pattern selection that once required 10-15 minutes of envelope opening and examining now takes under a minute of photo scanning. More importantly, patterns remain in better condition because they're handled less frequently and more carefully.
How I Maximize Small Spaces Vertical Storage Solutions
Vertical storage transformed my small sewing area by utilizing wall space that was previously wasted while keeping essential items accessible. The key insight was recognizing that walls offer significantly more storage potential than horizontal surfaces in most sewing spaces.
My vertical storage strategy divides wall space into functional zones based on frequency of use and item size. This approach ensures that the most accessible areas hold the most frequently needed items while maximizing every inch of available wall space.
- Eye-level zone: Most frequently used notions and current project supplies
- Upper wall area: Seasonal or specialty items in labeled containers
- Behind-door space: Hanging organizers for ribbons, patterns, and tools
- Side wall pegboard: Thread storage, scissors, and measuring tools
- Under-shelf hooks: Hanging baskets for works-in-progress
- Magnetic strips: Pins, needles, and small metal tools on wall or machine
The transformation began when I measured my available wall space and realized I had over 40 square feet of unused vertical storage potential. Installing simple shelving, pegboard, and hanging systems multiplied my storage capacity without requiring additional furniture or floor space.
Weight distribution became crucial as I added more vertical storage. I learned to distribute heavy items across multiple mounting points and to use wall anchors appropriate for the wall type and load requirements. This attention to proper mounting has prevented storage failures and wall damage.
The vertical approach also improved my sewing workflow by creating visual organization systems. Thread colors displayed on wall-mounted racks make color selection faster, while tools hanging on pegboard remain visible and accessible throughout sewing sessions.
My "Golden Triangle" Workspace Layout
The "golden triangle" concept revolutionized my small sewing space efficiency by arranging my three primary work stations—cutting, pressing, and sewing—to minimize movement and maximize productivity. This layout principle, borrowed from kitchen design, proves equally valuable in sewing spaces.
My discovery of this principle happened during a particularly frustrating sewing session when I realized I was walking across my small room dozens of times to move between cutting table, ironing board, and sewing machine. Measuring my movement patterns revealed that poor layout was wasting significant time and energy.
The optimal triangle arrangement places the three work stations within easy reach of each other while maintaining enough space for comfortable work at each station. In my 8×10 foot sewing room, this meant positioning stations no more than 4-5 feet apart while ensuring clear pathways between them.
The pressing station positioning proved most critical because pressing happens frequently throughout most sewing projects. Placing my iron and ironing board centrally between cutting and sewing areas eliminated the back-and-forth walking that used to interrupt my workflow.
This layout change reduced movement time by approximately 60% during typical sewing sessions, allowing me to maintain focus on projects rather than constantly transitioning between work areas. The efficiency gains become particularly noticeable during complex projects requiring frequent pressing and fitting adjustments.
How I Created a Portable Sewing Station
Living in a small apartment for two years taught me to create sewing storage that could function efficiently while packing away completely when needed. This portable approach later proved valuable even after moving to a space with a dedicated sewing room.
The foundation of effective portable storage is selecting containers that serve double duty as both storage and workspace organizers. My system uses nested containers that pack efficiently for storage while providing organized workspace setup when deployed.
The core of my portable station is a large rolling cart with multiple shelves that holds my sewing machine and essential supplies. When not in use, everything packs into labeled containers that stack in a closet. Setup time from packed to fully functional workspace is under 10 minutes.
Essential notion storage for the portable system emphasizes frequently used items in easily transported containers. Thread, scissors, measuring tools, and current project supplies live in a dedicated portable organizer that moves with me regardless of where I'm sewing.
The portability requirement forced me to be more selective about which notions truly deserve space in my active inventory. This editing process eliminated accumulated supplies I rarely used while ensuring that my portable kit contains everything needed for most projects.
My Favorite Budget Store Finds When to Buy and What to Look For
Strategic shopping at budget stores has provided some of my most effective storage solutions while maintaining the low-cost philosophy that drives my organizational approach. The key is knowing which items are worth purchasing versus which can be better substituted with repurposed alternatives.
My budget shopping strategy focuses on items that provide capabilities not easily replicated with household items: specific sizes, durability requirements, or specialized functions. Clear storage containers exemplify this category because their transparency and stackability offer advantages that most household containers lack.
“It is a simple shelf bin from Target. I paid $3 for it. It is pretty sturdy plastic.”
— ISeeStarsQuilting, Unknown Date
Source link
| Item Type | Dollar Store | IKEA | Target | Best Value |
|---|---|---|---|---|
| Clear Storage Bins | $1-3 | $3-8 | $5-12 | Dollar Store |
| Drawer Organizers | $1-2 | $2-5 | $4-8 | Dollar Store |
| Wall Hooks/Pegboard | $1-4 | $5-15 | $8-20 | IKEA |
| Rolling Carts | N/A | $25-40 | $30-60 | IKEA |
| Mason Jars | $3-5 | N/A | $8-12 | Dollar Store |
| Magnetic Containers | $2-4 | $4-8 | $6-15 | Dollar Store |
“Upstanding Tool Caddy – Sewing Tool Organizer
Regular price: $9.99 USD
Was: $19.99 USD
Now: $9.99 USD
You save: $10.00 (50% OFF)”
— MadamSew, Unknown Date
Source link
Dollar stores excel for basic containers, drawer organizers, and simple storage solutions where durability requirements are minimal. However, I've learned to avoid dollar store options for items requiring frequent handling or weight-bearing, as the quality often proves inadequate for long-term use.
IKEA provides excellent value for larger storage solutions like rolling carts, shelving systems, and pegboard installations. Their modular approach allows systems to grow and adapt as storage needs change, making the slightly higher initial investment worthwhile for foundational storage pieces.
Target's dollar spot section offers quality comparable to dedicated dollar stores but with better design and often superior materials. I've found their small containers and organizers particularly valuable for notion storage where appearance matters in visible workspace areas.
How I Maintain My Organized Sewing Space
Maintaining organizational systems requires developing habits that prevent the gradual deterioration that destroys even well-designed storage solutions. My maintenance approach focuses on simple, consistent practices that take minimal time but preserve the functionality that makes organized storage worthwhile.
The foundation of sustainable organization is the "immediate return" principle: every item goes back to its designated location immediately after use, not "temporarily" placed somewhere convenient. This habit prevents the accumulation of misplaced items that eventually overwhelm organizational systems.
- DO: Return items to designated spots immediately after each project
- DON’T: Let notions pile up ‘temporarily’ on your cutting table
- DO: Spend 10 minutes tidying your space before starting each session
- DON’T: Buy new storage until you’ve used what you have
- DO: Review and purge unused items every 6 months
- DON’T: Keep broken or worn-out notions ‘just in case’
- DO: Take photos of your organized systems to remember the setup
- DON’T: Change your entire system when only one area needs adjustment
My maintenance routine includes a brief tidying session before each sewing period and a more thorough organization review every few months. The pre-sewing tidy takes 5-10 minutes but ensures I start each session with a functional workspace rather than spending sewing time hunting for misplaced items.
The quarterly review process helps me identify organizational problems before they become overwhelming. During these sessions, I evaluate which storage areas are working well and which need adjustment, making small improvements rather than waiting for major reorganization projects.
Photographic documentation of organizational systems has proved invaluable for maintaining consistency over time. When I question whether a storage method is working, comparing current photos to "before" images usually reinforces why changes were made and prevents unnecessary system modifications.
My Final Thoughts How Creativity Thrives in Organized Spaces
After five years of refining my notion organization systems, I've discovered that effective storage does far more than simply keep supplies tidy. Well-organized notions enhance creativity by removing barriers between inspiration and execution, allowing ideas to flow directly into action without interruption.
The transformation extends beyond efficiency to actual creative output. When I can quickly locate any notion I need, I'm more likely to attempt complex projects and more willing to experiment with techniques that require specific supplies. The confidence that comes from knowing I can find what I need when I need it has expanded my sewing ambitions significantly.
The budget-conscious approach has proven more sustainable than expensive storage systems because it encourages creative problem-solving and adaptation. When storage solutions cost little or nothing, I feel free to modify them as my needs change rather than feeling committed to systems that no longer serve my evolving interests.
My advice for anyone beginning their own organization journey is to start with one small category of notions rather than attempting to reorganize everything simultaneously. Choose your most frustrating storage problem—whether it's tangled thread, lost buttons, or scattered patterns—and focus on creating one reliable system that works consistently.
The satisfaction of reaching for exactly the right notion and finding it immediately never gets old. More importantly, that reliability frees mental energy for the creative decisions that make sewing truly enjoyable. Organization isn't about perfection; it's about creating systems that support and enhance the creative work you love.
Frequently Asked Questions
The most budget-friendly containers for sewing notions include plastic bins and organizers from dollar stores, repurposed glass jars from your kitchen, and small tackle boxes from discount retailers. These options keep costs low while providing durable storage for items like threads, needles, and buttons. Always label them for easy access and to maintain organization.
To store sewing notions effectively, use clear containers or divided trays to categorize items like pins, zippers, and elastics, making them easy to find. Keep them in a dedicated drawer or shelf away from dust and moisture to preserve quality. For added convenience, incorporate magnetic strips for metal items or hanging organizers for threads.
The best way to organize small sewing notions like buttons and hardware is by using compartmentalized boxes or pill organizers, sorting them by color, size, or type. This prevents mixing and allows quick retrieval during projects. For visibility, opt for transparent containers and label each section clearly.
Yes, you can make effective sewing notion organizers from household items like empty spice jars for buttons, egg cartons for small hardware, and shoeboxes divided with cardboard for larger notions. These DIY solutions are cost-effective and customizable to fit your space. Just ensure they’re clean and sturdy to protect your supplies.
To organize sewing notions visually and accessibly, use clear acrylic drawers or wall-mounted pegboards with labeled hooks for items like scissors and tapes. Color-code categories and place frequently used notions at eye level for quick access. This setup not only enhances visibility but also inspires creativity in your sewing space.
Create a portable sewing notions kit on a budget by repurposing a small makeup bag or toolbox with divided sections for essentials like needles, threads, and pins. Source items from dollar stores or thrift shops to keep costs down. Include only must-haves to maintain portability without overloading the kit.


