
Learning how to hem jeans by hand is a simple way to shorten denim without a sewing machine. This technique involves using a needle and strong thread to create a new, durable hem, often with a blind stitch that remains nearly invisible from the outside. It gives you complete control over the final length and finish, preventing your jeans from dragging or fraying and ensuring a custom fit tailored perfectly to your shoes and personal style.
Key Benefits at a Glance
- Save Money: Avoid costly tailor fees or the expense of buying a sewing machine for a one-off task.
- No Special Equipment: Requires only a needle, strong thread, scissors, and pins—items many people already own.
- Preserve the Original Hem: A key hand-sewing technique allows you to keep the original factory hem for a professional, authentic finish.
- Perfect Custom Fit: You can precisely adjust the length to work perfectly with your favorite shoes, from sneakers to heels.
- Convenient and Accessible: Make alterations anytime, anywhere, without needing access to electricity or a dedicated sewing space.
Purpose of this guide
This guide is for anyone who wants to alter their own jeans at home, especially beginners without a sewing machine. It solves the common problem of jeans being too long, which causes the ends to get dirty, drag on the ground, and fray prematurely. You will learn a simple, step-by-step process for measuring, pinning, and stitching a professional-looking hem by hand. We cover common mistakes to avoid, like uneven lines or using weak thread, so you can achieve a durable, clean finish that looks great and lasts for years.
How I became a hand hemming expert for denim
After years of struggling with ill-fitting jeans and expensive tailoring bills, I decided to master the art of hand hemming denim myself. What started as a necessity became a passion, and eventually a professional skill that has saved me hundreds of dollars while giving me the perfect fit every time. Hand hemming jeans isn't just about shortening pants – it's about understanding the relationship between denim characteristics, proper tools, and precise techniques that create lasting, invisible alterations.
Through countless projects on everything from raw selvedge denim to delicate stretch fabrics, I've learned that hand hemming offers unique advantages over machine methods. The control, precision, and ability to preserve original styling details make this traditional technique invaluable for anyone serious about garment care and sustainable fashion practices.
- Master professional hand-hemming techniques for denim garments
- Learn when hand-hemming is superior to machine methods
- Discover essential tools and their specific uses for denim projects
- Achieve invisible, durable hems that preserve original jean styling
- Extend garment life through sustainable alteration practices
Why I prefer hand hemming for certain jeans projects
While machine hemming works well for many garments, I've discovered that hand hemming excels in specific situations where precision and preservation matter most. The thickness of denim, combined with its unique construction methods, creates scenarios where hand techniques deliver superior results compared to machine alternatives.
Machine hemming can struggle with the multiple layers found at jean seams, often creating uneven stitching or skipped stitches. Hand hemming eliminates these issues by allowing complete control over needle placement and thread tension. Additionally, the ability to work slowly through challenging areas prevents the fabric distortion that sometimes occurs under machine presser feet.
The most compelling reason I choose hand hemming is the invisible finish it provides. Unlike machine hems that create visible topstitching lines, hand-sewn slip stitches remain completely hidden from the outside of the garment. This preservation of the original appearance is especially important when working with designer jeans or vintage pieces where maintaining authenticity matters.
- Preserving original hem appearance on vintage or designer jeans
- Working with embellished jeans that can’t fit under presser feet
- Hemming raw denim that’s too thick for home sewing machines
- Creating invisible hems on lightweight or stretch denim
- Repairing existing hems without removing original stitching
- Achieving custom lengths for specialty fits or styling preferences
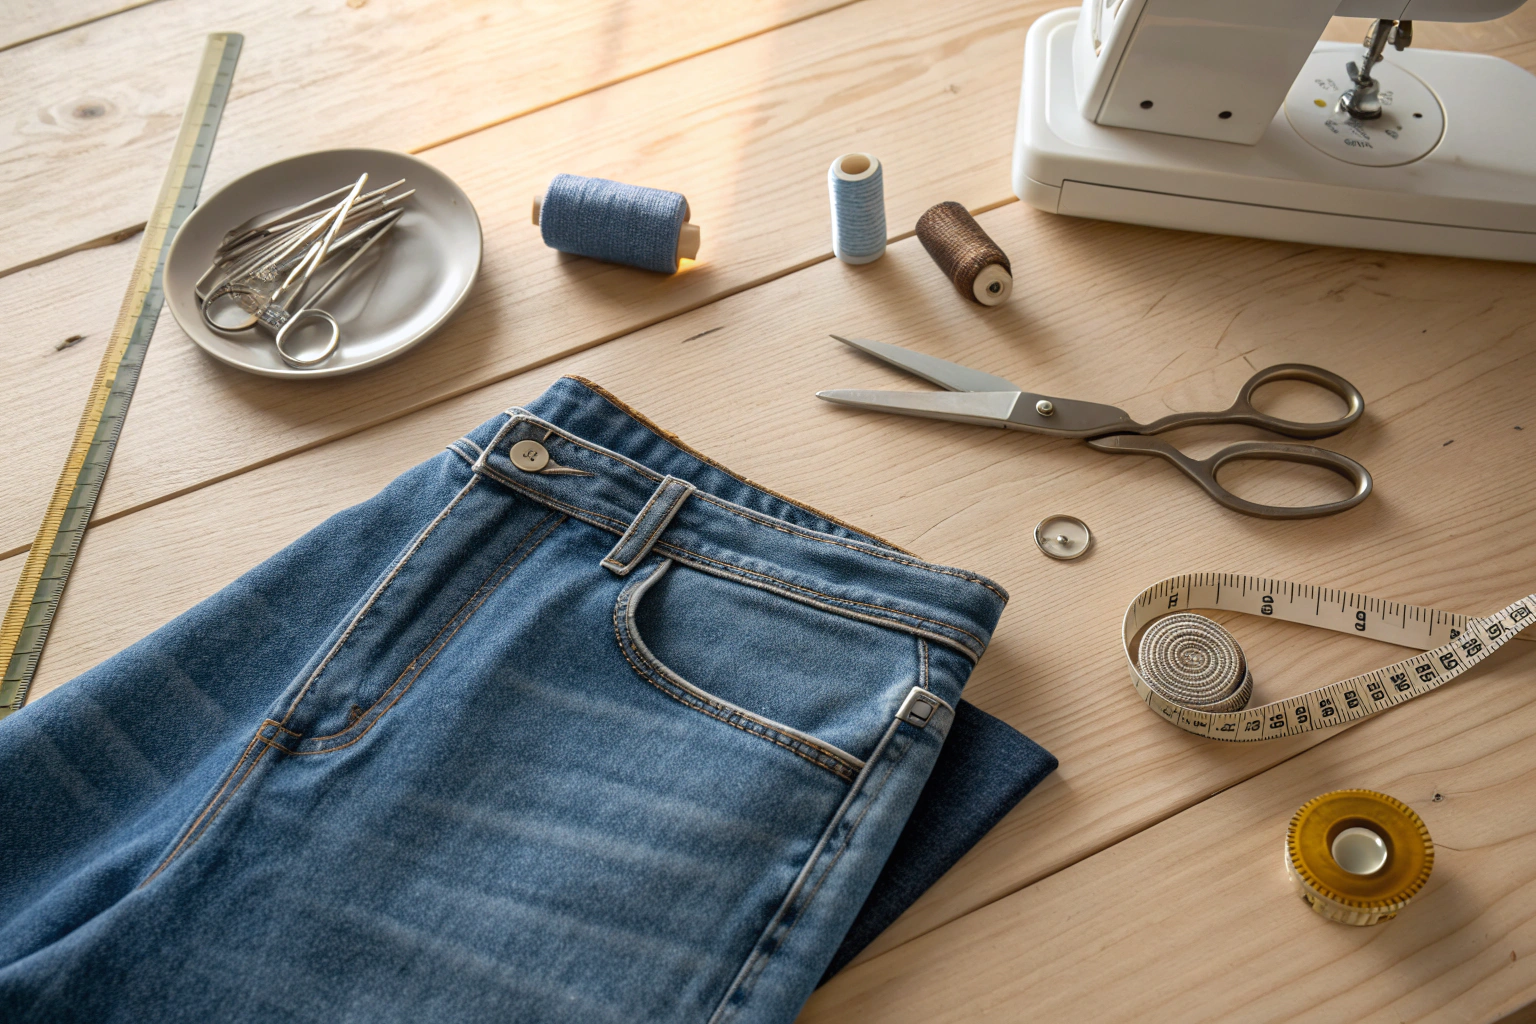
My essential toolkit for professional hand hemming
Success in hand hemming denim begins with the right tools, each specifically chosen to handle the unique challenges that thick, tightly woven fabric presents. Over the years, I've refined my toolkit to include only the most essential items that consistently deliver professional results.
Before you begin, ensure you have a sharp hand-sewing needle suitable for denim, strong polyester thread, fabric chalk, and small sharp scissors. If you’re unsure how to thread a needle—especially with thick thread for heavy fabrics—consider using a needle threader, a small tool that makes the process effortless even with stiff threads.
The relationship between tool quality and final results cannot be overstated when working with denim. Inferior needles bend or break under the stress of penetrating multiple fabric layers, while dull scissors create frayed edges that compromise the entire project. Investing in proper tools pays dividends in both efficiency and quality of finished hems.
Understanding how each tool interacts with denim characteristics helps explain why specific selections matter. Denim's tight weave and thickness require tools that can maintain precision under stress while providing the control necessary for invisible stitching. The tools I recommend have proven themselves through hundreds of projects on various denim weights and styles.
- Heavy-duty needles (size 16-18) for penetrating thick denim layers
- Strong polyester or cotton thread that won’t break under tension
- Sharp fabric scissors for clean cuts through multiple denim layers
- Glass-head pins or wonder clips that won’t slip on thick fabric
- Flexible measuring tape for accurate length measurements
- Metal thimble for finger protection when pushing through seams
- Fabric marker for precise hem line marking
How I choose the perfect needle and thread for denim
The foundation of successful hand hemming lies in selecting the appropriate needle and thread combination for your specific denim project. This relationship between tool specifications and fabric characteristics directly impacts both the ease of stitching and the durability of finished hems.
Needle selection depends primarily on denim weight and the number of layers you'll encounter at seam intersections. Heavy raw denim requires the strongest needles available, while lightweight stretch denim allows for more flexibility in needle choice. The key is matching needle strength to fabric resistance without creating unnecessarily large holes in the fabric.
Thread a heavy-duty needle with matching thread like golden orange for jeans, and use a backstitch starting at the seam: insert needle through both layers, come up slightly ahead, then back down between stitches for durability.
Thread selection involves balancing strength, color matching, and hand-sewing characteristics. Polyester thread offers superior strength and durability, making it ideal for heavily stressed areas like hem corners. Cotton thread provides a more traditional feel and works beautifully with natural fiber denim, though it requires more careful handling during stitching.
| Needle Type | Best For | Denim Weight | Thread Recommendation |
|---|---|---|---|
| Denim Needle (16-18) | Raw denim, thick seams | Heavy weight | Polyester or cotton |
| Universal Heavy (14-16) | Standard jeans | Medium weight | All-purpose polyester |
| Embroidery Needle (14) | Decorative stitching | Light to medium | Embroidery thread |
| Leather Needle (18-20) | Extra thick denim | Very heavy | Heavy-duty polyester |
My method for preparing jeans before hemming
Proper preparation forms the foundation of successful hand hemming, preventing the costly mistakes that can ruin an entire project. The preparation phase establishes accurate measurements, ensures fabric stability, and creates the framework for precise stitching that follows.
Always prewash your jeans before hemming to prevent post-alteration shrinkage that can ruin your precise handwork. I learned this the hard way—after spending hours on an invisible hem, only to see it pucker after the first wash.
The most critical preparation step involves pre-washing jeans to eliminate any potential shrinkage that could affect final length. Denim, particularly raw or minimally processed varieties, can shrink significantly during the first wash. Failing to account for this shrinkage results in hems that become too short after the first washing.
To hem jeans by hand, first try them on inside out and pin the desired length, ensuring even measurement on both legs. Mark and cut excess fabric about 1 inch below the fold, then double-fold the raw edge for a clean hem.
Accurate measuring requires trying on jeans with the shoes you'll typically wear with them. Different heel heights dramatically affect where jeans should fall, and measuring without appropriate footwear leads to disappointing results. I've learned to be extremely methodical during this phase, as correcting measurement errors after cutting becomes impossible.
- Wash and dry jeans to pre-shrink fabric before measuring
- Try on jeans with intended shoes to determine desired length
- Mark hem line with fabric marker while wearing jeans
- Remove jeans and lay flat on work surface
- Measure and mark consistent hem line around entire garment
- Add seam allowance (typically 1-2 inches) below marked line
- Press marked fold line with iron to create crisp guide
My technique for finding the perfect length
Determining the ideal hem length requires understanding how different jean styles interact with various shoe types and personal style preferences. The relationship between jean cut, intended footwear, and desired aesthetic creates specific length requirements that vary significantly between styles.
“This hem measures 3/4 of an inch measure up from the original Mark the width of the Hem and make another mark.”
— Notches Sewing, August 2024
Source link
The measuring process requires precision and consistency to ensure both legs match perfectly. I use a flexible measuring tape to establish the distance from waistband to desired hem point, then verify this measurement around the entire circumference of each leg. Any discrepancies at this stage become magnified in the finished garment.
Personal style preferences play a crucial role in length determination. Some people prefer a clean break over shoes, while others favor a cropped look that shows ankle. Understanding these preferences before beginning ensures satisfaction with the final result and prevents the need for additional alterations.
- Skinny jeans: Hem to sit just above ankle bone with flats
- Straight leg: Allow slight break over shoe with 1/4 inch extra
- Bootcut: Hem to cover shoe heel but not drag on ground
- Wide leg: Create clean line that skims floor with heels
- Cropped styles: End 2-3 inches above ankle for intentional gap
My approach to cutting and preparing the raw edge
Cutting denim requires sharp tools and steady technique to achieve the clean, even edges essential for professional-looking hems. The density and weave structure of denim can cause inferior scissors to crush fibers rather than cut them cleanly, creating frayed edges that compromise the entire project.
“Use a fabric pen and your fabric scissors or rotary cutter to mark and cut your leg 1″ below your folded hem.”
— A Beautiful Mess, Unknown 2024
Source link
The cutting technique involves making one decisive cut through all layers simultaneously to ensure perfectly matched hem lines. Attempting to cut each layer separately or making multiple passes creates uneven edges that become visible in the finished hem. Sharp fabric scissors designed for heavy materials make this process significantly easier and more accurate.
Edge preparation following cutting depends on the denim's tendency to fray and the intended hem style. Some denim requires fray check application to prevent unraveling, while others have tightly woven edges that remain stable without treatment. Understanding your specific fabric's characteristics guides these preparation decisions.
- Double-check measurements before making any cuts
- Use sharp fabric scissors to cut straight across marked line
- Cut through all layers simultaneously for even hem line
- Apply fray check to raw edge if denim tends to unravel
- Trim any loose threads or uneven areas
- Test fold to ensure even hem allowance around garment
My step by step hand hemming technique
The actual hemming process brings together all the preparation work into a systematic approach that creates invisible, durable results. Understanding how each step builds upon the previous one helps maintain consistency and quality throughout the project.
For more on the subject, see hand hemming steps. Detailed techniques appear in sewing hacks.
Working inside out provides better access to the hem area while keeping the finished side of the garment protected during stitching. This orientation also makes it easier to achieve the invisible stitching that distinguishes professional hand hemming from amateur attempts. The inside-out position allows complete control over stitch placement and tension.
The systematic approach I've developed ensures consistent results regardless of denim type or thickness. Each step serves a specific purpose in creating hems that remain invisible, durable, and professionally finished. Rushing through any stage compromises the final result and often requires time-consuming corrections.
- Turn jeans inside out and lay flat on work surface
- Create double fold hem by folding raw edge up twice
- Pin or clip fold in place around entire hem circumference
- Thread needle with 18-24 inches of matching thread
- Tie secure knot at thread end using professional technique
- Begin slip stitching from inside seam area for hidden start
- Work around hem using consistent 1/4 inch stitch spacing
- Finish with secure knot hidden inside fold
- Press completed hem with iron for professional appearance
My method for creating a double folded hem
The double fold technique creates a clean, finished edge while providing the structure necessary for durable hems in thick denim. This folding method encases the raw edge completely, preventing fraying while creating the foundation for invisible stitching.
Creating even folds around the entire circumference requires patience and attention to detail. Denim's thickness can make folding challenging, particularly at seam intersections where multiple layers create bulk. Working slowly and pressing each fold as you go ensures consistent results that translate to professional-looking finished hems.
The relationship between fold width and final hem appearance affects both aesthetics and functionality. Narrower folds work well with lightweight denim but may not provide adequate structure for heavier fabrics. Wider folds offer more durability but can create bulk that becomes visible from the outside of the garment.
- Fold raw edge up 1/2 inch to create first fold
- Press first fold with fingers to create initial crease
- Fold again to desired hem width (typically 1-1.5 inches)
- Ensure both folds are even around entire garment
- Pin every 3-4 inches to secure fold in place
- Check that hem hangs evenly when jeans are right side out
My trick for a secure professional knot
Creating secure knots that remain hidden while providing lasting durability requires specific techniques developed through years of professional hand sewing. The knot serves as the anchor point for all subsequent stitching, making its security and placement critical to hem longevity.
The professional knotting technique I use creates a compact, secure anchor that won't pull through fabric under stress. This method differs significantly from simple overhand knots that can slip or create bulk that becomes visible from the outside of the garment. Proper knot placement ensures the starting point remains completely hidden within the hem fold.
Thread length affects both knotting ease and stitching efficiency. Longer threads reduce the need for frequent re-threading but become difficult to manage and more prone to tangling. The optimal length balances efficiency with control, allowing smooth stitching without constant interruption.
- Wrap thread end around index finger twice
- Roll wrapped thread off finger while pinching with thumb
- Pull thread end through rolled loop to create knot
- Slide knot down to thread end by pulling gently
- Test knot security by tugging thread firmly
- Trim excess thread close to knot for clean finish
How I perfected the slip stitch for invisible hems
The slip stitch forms the heart of invisible hand hemming, creating secure attachment while remaining completely hidden from the garment's exterior. Mastering this technique requires understanding the relationship between needle placement, thread tension, and fabric interaction.
Proper slip stitch execution involves catching only one or two threads from the main fabric while securing the fold firmly. This minimal fabric engagement prevents visible stitching lines while providing adequate strength for normal wear and washing. The technique requires practice to develop the touch necessary for consistent results.
Thread tension plays a crucial role in slip stitch success. Too tight, and the fabric puckers, creating visible distortion. Too loose, and the hem lacks security and may sag over time. Developing the proper tension comes through experience and attention to how the fabric responds to each stitch.
- Insert needle into fold crease to hide knot
- Catch 1-2 threads of jean fabric with needle tip
- Move needle forward 1/4 inch along hem fold
- Insert needle back into fold at same level
- Pull thread snug but not tight to avoid puckering
- Repeat process maintaining consistent spacing
- Keep stitches loose enough to remain invisible from outside
How I tackle the most challenging parts of hemming jeans
Even experienced hand sewers encounter difficulties when working with denim's unique characteristics. The fabric's thickness, combined with construction details like multiple seam layers and topstitching, creates specific challenges that require targeted solutions and specialized techniques.
Understanding these challenges before beginning helps set realistic expectations and prevents frustration that can lead to rushed work or abandoned projects. Each challenge has specific solutions developed through experience with various denim types and construction methods.
The most common difficulties arise from denim's resistance to needle penetration, particularly at seam intersections where multiple fabric layers create nearly impenetrable barriers. These areas require patience, proper tools, and techniques that work with the fabric rather than against it.
- Side seams create 4-6 layers of thick denim that resist needle penetration
- Inseam areas may have additional topstitching creating bulk
- Raw denim edges can be extremely stiff and difficult to fold
- Stretch denim may distort during handling and stitching
- Embellished areas require careful navigation around decorative elements
- Worn areas may have weakened fabric that tears easily
My techniques for conquering thick seams and corners
Thick seam areas present the greatest challenge in hand hemming jeans, requiring specialized techniques and tools to navigate successfully. The intersection of multiple fabric layers at side seams can create areas six layers thick, making needle penetration extremely difficult without proper approach.
Thimble use becomes essential when working through these thick areas, protecting fingers while providing the leverage necessary to push needles through resistant fabric. The metal thimble distributes pressure evenly, preventing the finger pain that can result from extended work on heavy fabrics.
Needle angle and technique modifications help overcome resistance in thick areas. Rocking the needle back and forth creates a gradual penetration path that requires less force than attempting to push straight through. This technique prevents needle bending while maintaining control over stitch placement.
- Use thimble on middle finger to push needle through thick layers
- Rock needle back and forth to work through resistant seams
- Take smaller stitches in thick areas to maintain control
- Trim excess seam allowance at corners to reduce bulk
- Press seams open with iron before hemming to flatten layers
- Consider using pliers to pull needle through extremely thick spots
My professional finishing touches for hand hemmed jeans
The finishing phase transforms completed hemming work into professional-quality alterations that rival expensive tailoring services. These final steps address details that distinguish amateur work from expert results, ensuring hems that look and perform like original garment construction.
Pressing plays a crucial role in achieving crisp, professional appearance that enhances the invisible nature of hand-sewn hems. Proper heat and steam application sets stitches while creating the sharp creases that characterize quality tailoring. The pressing technique must accommodate denim's thickness while avoiding shine or impressions from seam edges.
Quality control during finishing catches any inconsistencies or problems before they become permanent issues. This systematic review process ensures both legs match perfectly and all stitching meets professional standards. Taking time for thorough inspection prevents disappointment and maintains the high standards that make hand hemming worthwhile.
- Press completed hem with steam iron for crisp, professional appearance
- Check that hem hangs evenly when jeans are worn
- Verify all stitches are secure and invisible from outside
- Trim any loose threads or uneven areas
- Test hem durability by gently tugging at corners
- Compare both legs to ensure matching hem heights
How I care for my hand hemmed jeans to make them last
Proper care extends the life of hand-hemmed jeans while maintaining the quality and appearance of the alteration work. Hand-sewn hems require slightly different care considerations than machine-sewn alternatives, particularly regarding washing and drying practices that affect thread and stitch integrity.
Understanding how washing affects hand-sewn threads helps prevent premature failure or distortion of hemming work. Cotton threads may shrink differently than polyester, potentially affecting hem appearance if not properly managed. The gentle approach required for hand-sewn garments often extends overall garment life as well.
Storage and handling practices protect hand-sewn hems from stress and distortion that can occur during normal wardrobe management. Proper folding techniques prevent creasing that could weaken stitches, while appropriate hanging methods maintain hem shape and appearance between wearings.
- DO wash inside out to protect hand stitching
- DO air dry or use low heat to prevent thread shrinkage
- DO fold carefully along hem line when storing
- DON’T use bleach which can weaken hand-sewn threads
- DON’T wring or twist wet jeans which stresses seams
- DON’T iron directly over hand stitching without pressing cloth
What hand hemming jeans has taught me about sustainable fashion
Learning to hand-hem jeans opened my eyes to the broader implications of garment care and sustainable fashion practices. This seemingly simple skill represents a fundamental shift from disposable fashion mentality toward thoughtful stewardship of clothing resources.
Repairing and altering your own jeans extends their life and reduces textile waste. If your jeans have a small tear near the hem, you might even combine mending with hemming—a skill that pairs well with learning how to sew on a patch for reinforced durability.
The time investment required for hand hemming creates a deeper connection with garments that extends far beyond simple functionality. Each carefully placed stitch represents a commitment to quality and longevity that contrasts sharply with fast fashion's disposable approach. This mindful engagement with clothing care has transformed my entire relationship with my wardrobe.
Hand hemming skills transfer to other garment types and repair situations, building a foundation for comprehensive clothing maintenance that significantly extends garment life. The confidence gained from successfully altering jeans encourages tackling other repairs and modifications that would otherwise require professional services or result in discarded clothing.
- Hand-hemming extends garment life and reduces textile waste
- Proper tool selection makes denim alteration achievable at home
- Slip stitch technique creates invisible, professional-quality hems
- Preparation and measuring prevent costly mistakes and rework
- Finishing details distinguish amateur from professional results
- Sustainable fashion starts with caring for clothes you already own
The skills developed through hand hemming jeans create a foundation for lifelong clothing care that benefits both personal finances and environmental sustainability. Every garment saved from premature disposal represents a small victory against the waste inherent in modern fashion consumption. These cumulative actions, multiplied across many individuals, contribute to meaningful change in how society approaches clothing and resource use.
Frequently Asked Questions
To hem jeans by hand easily, turn them inside out, fold the excess fabric to your desired length, and pin it in place. Use a needle and strong thread to sew a blind hem stitch, which creates an invisible finish on the outside. Press the hem with an iron for a professional look, and this method works well even for beginners without a machine.
The essential tools for hemming jeans by hand include a sharp denim needle, heavy-duty thread, straight pins, scissors, a measuring tape, and an iron. A thimble can protect your fingers when pushing through thick fabric. These basic items ensure a smooth and effective hemming process without needing advanced equipment.
To shorten jeans without cutting, fold the excess length upward inside the leg and secure it with hand stitches or iron-on hem tape for a temporary fix. This preserves the original hem and allows easy reversal if needed. It’s a quick solution for adjusting fit without permanent alterations.
The backstitch is the strongest for hemming jeans by hand, as it creates a secure, durable line that resists pulling apart. For added strength, use a double thread and make small, even stitches. This stitch is ideal for denim’s thickness and ensures the hem holds up to daily wear.
To measure jeans properly before hemming, have the wearer put on the jeans with their usual shoes, then mark the desired hem length with pins or chalk, allowing 1-2 inches for the fold. Understanding how to measure waist for men can also help ensure overall fit, as it involves wrapping a tape around the natural waistline snugly but not tightly. Double-check measurements from the crotch to the hem for accuracy on both legs.


